Keeping track of inventory in a warehouse/stockroom is one of the core functions of OMNI. This section provides instructions on how to navigate through the various functions of the OMNI inventory system while ensuring accurate inventory management.
Open the OMNI Menu (three horizontal lines stacked on each other) and click on Inventory Management.
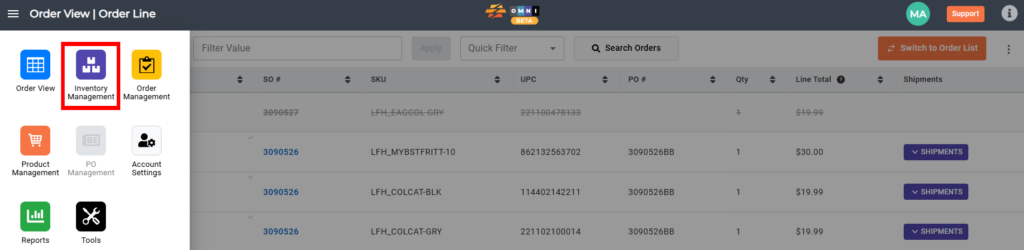
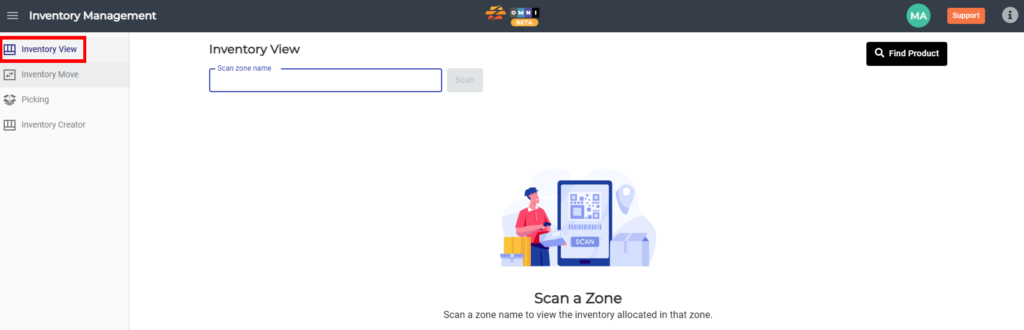
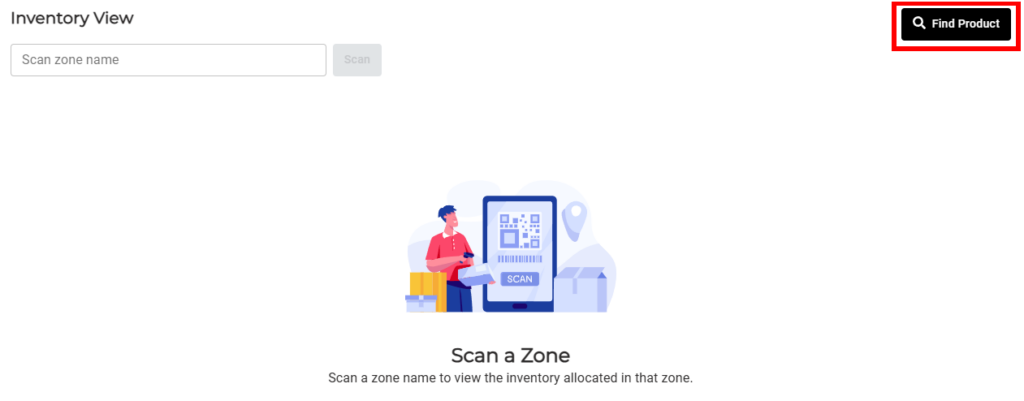
This will open up the Inventory Management module, which defaults to the Inventory View page. This module contains its sidebar menu which contains “Inventory View, Inventory Move, and Picking.” The sidebar can be collapsed for a larger viewing area.
It is important to note that certain buttons and fields throughout this module will show as gray and inactive. These options will only become available after certain other parameters have been met, such as filling in a data field.
A) Inventory View
1) Search
- Click on the Search button to open up the Search Box.
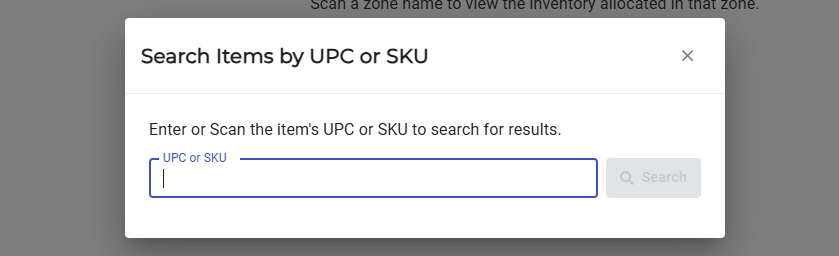
- Type or scan a UPC or SKU into the field in the Search Box and click the Search button (it will appear after data is entered into the field.)
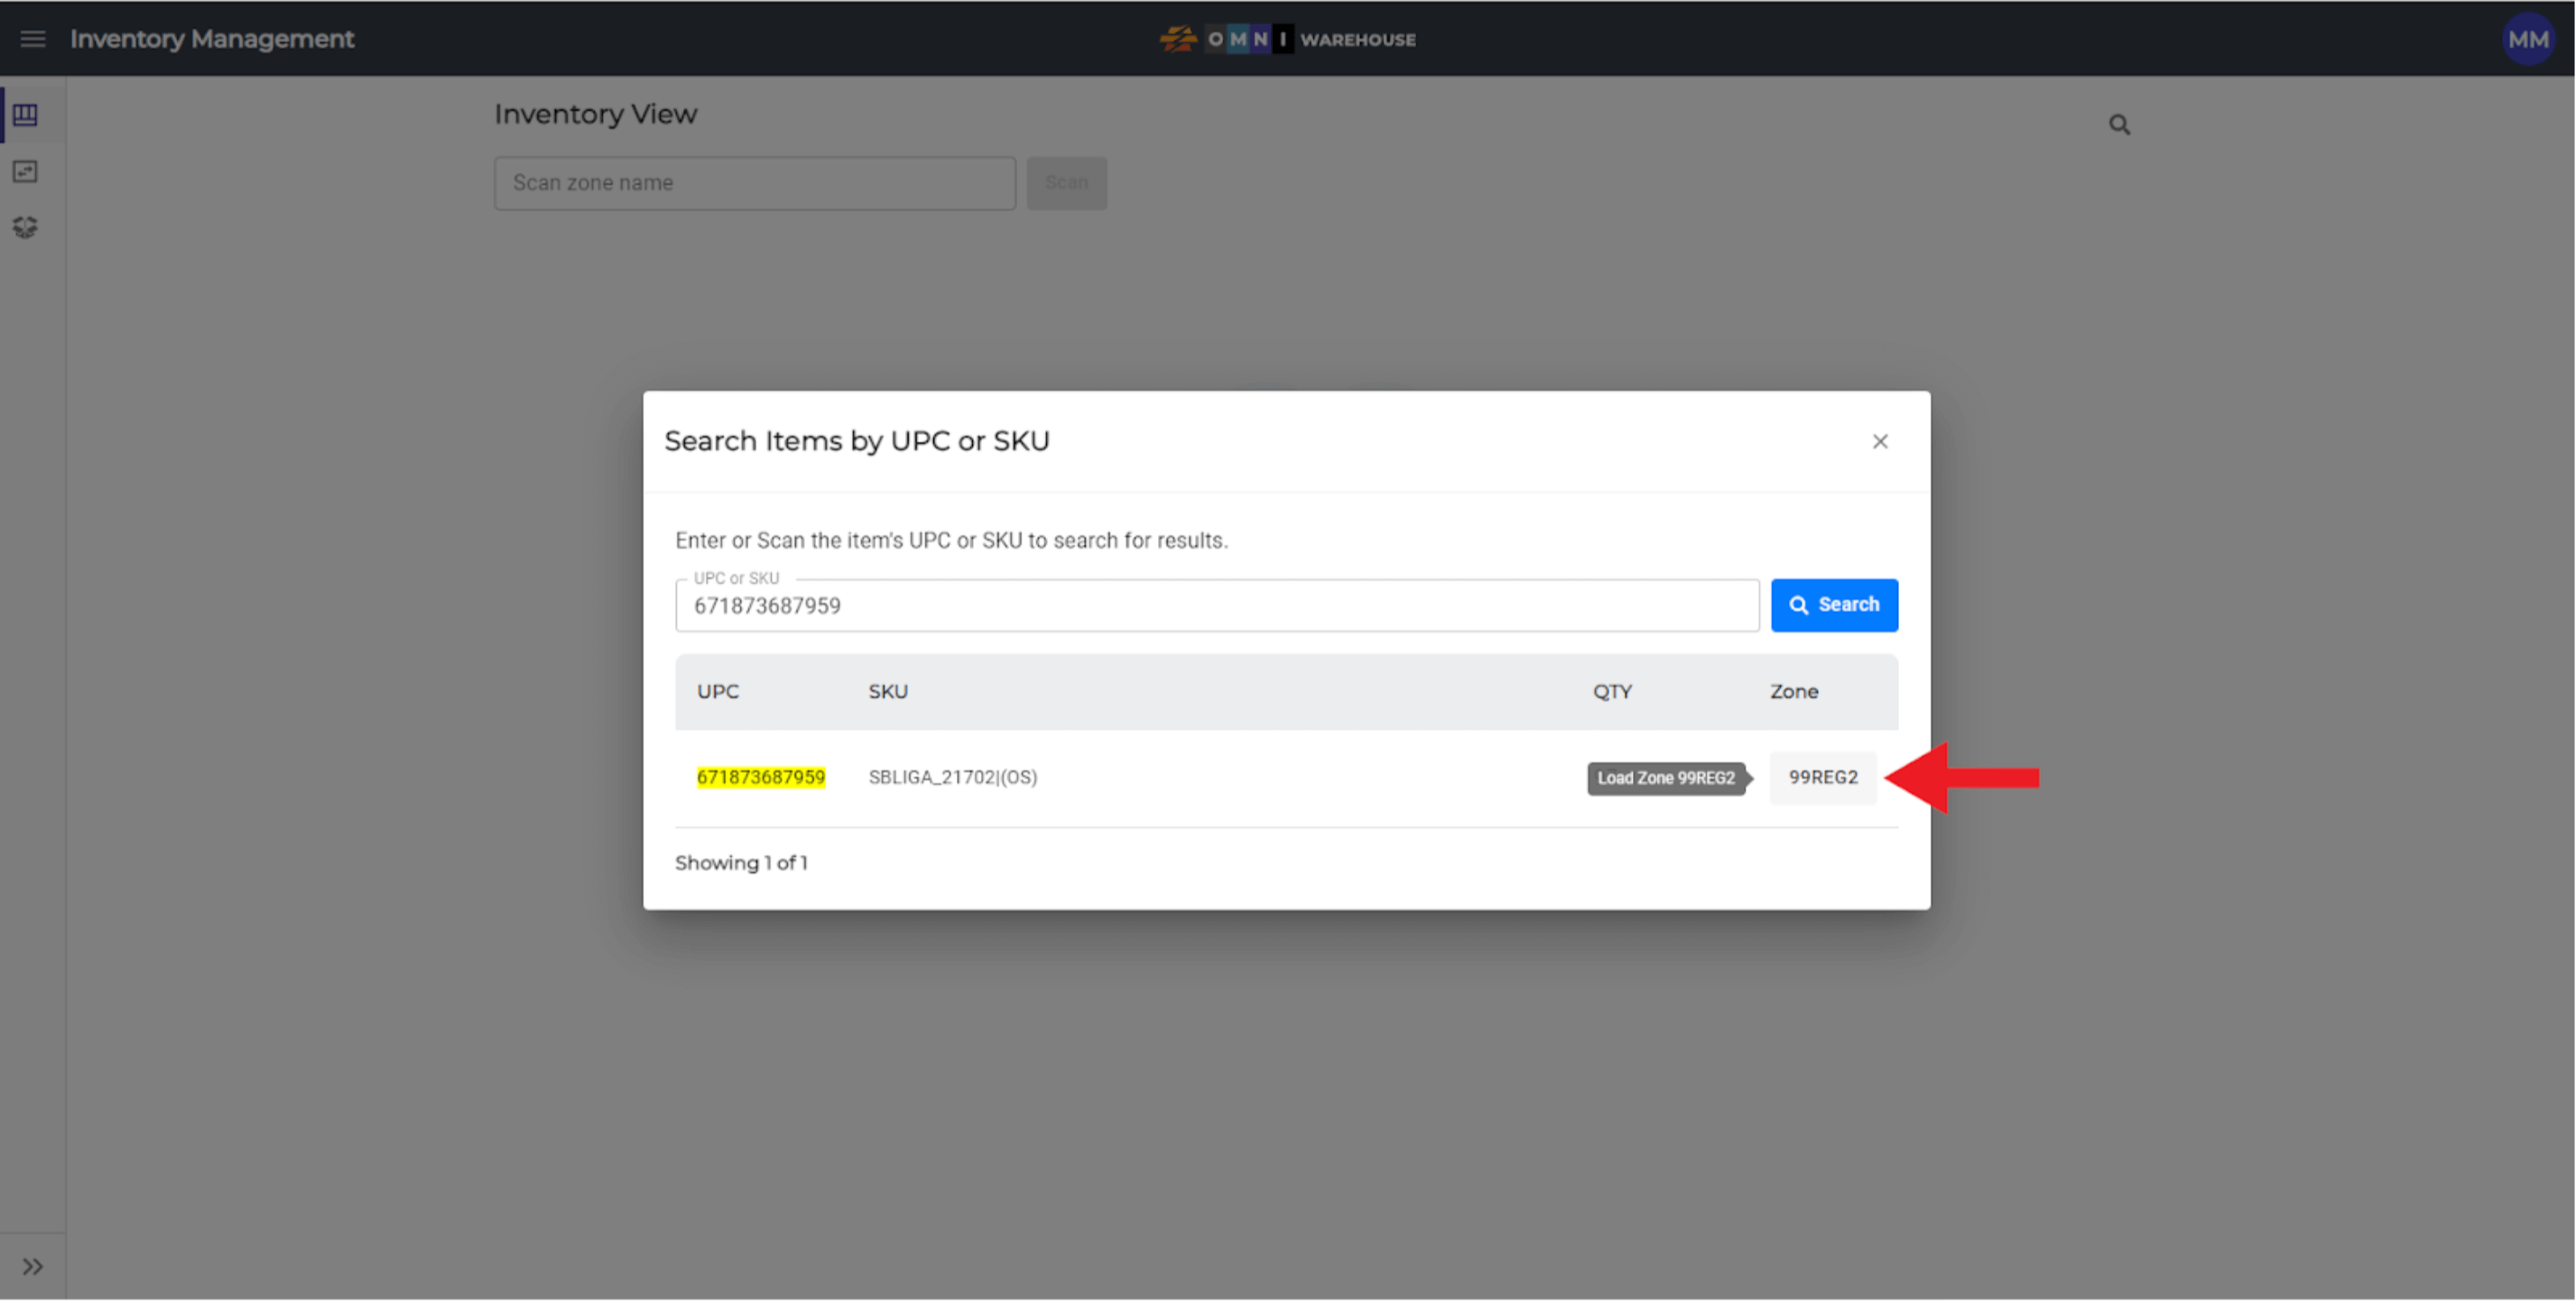
- The search results will be displayed in the box. In the example below, the search for UPC “671873687959” produced only 1 location for the result. Clicking on the Load Zone button will open up the Inventory Zone where the searched item is located (Zone: 99REG2)
- The Inventory View for Zone “99REG2” opens on the page and the searched item (UPC: 671873687959) can be seen in this warehouse location.

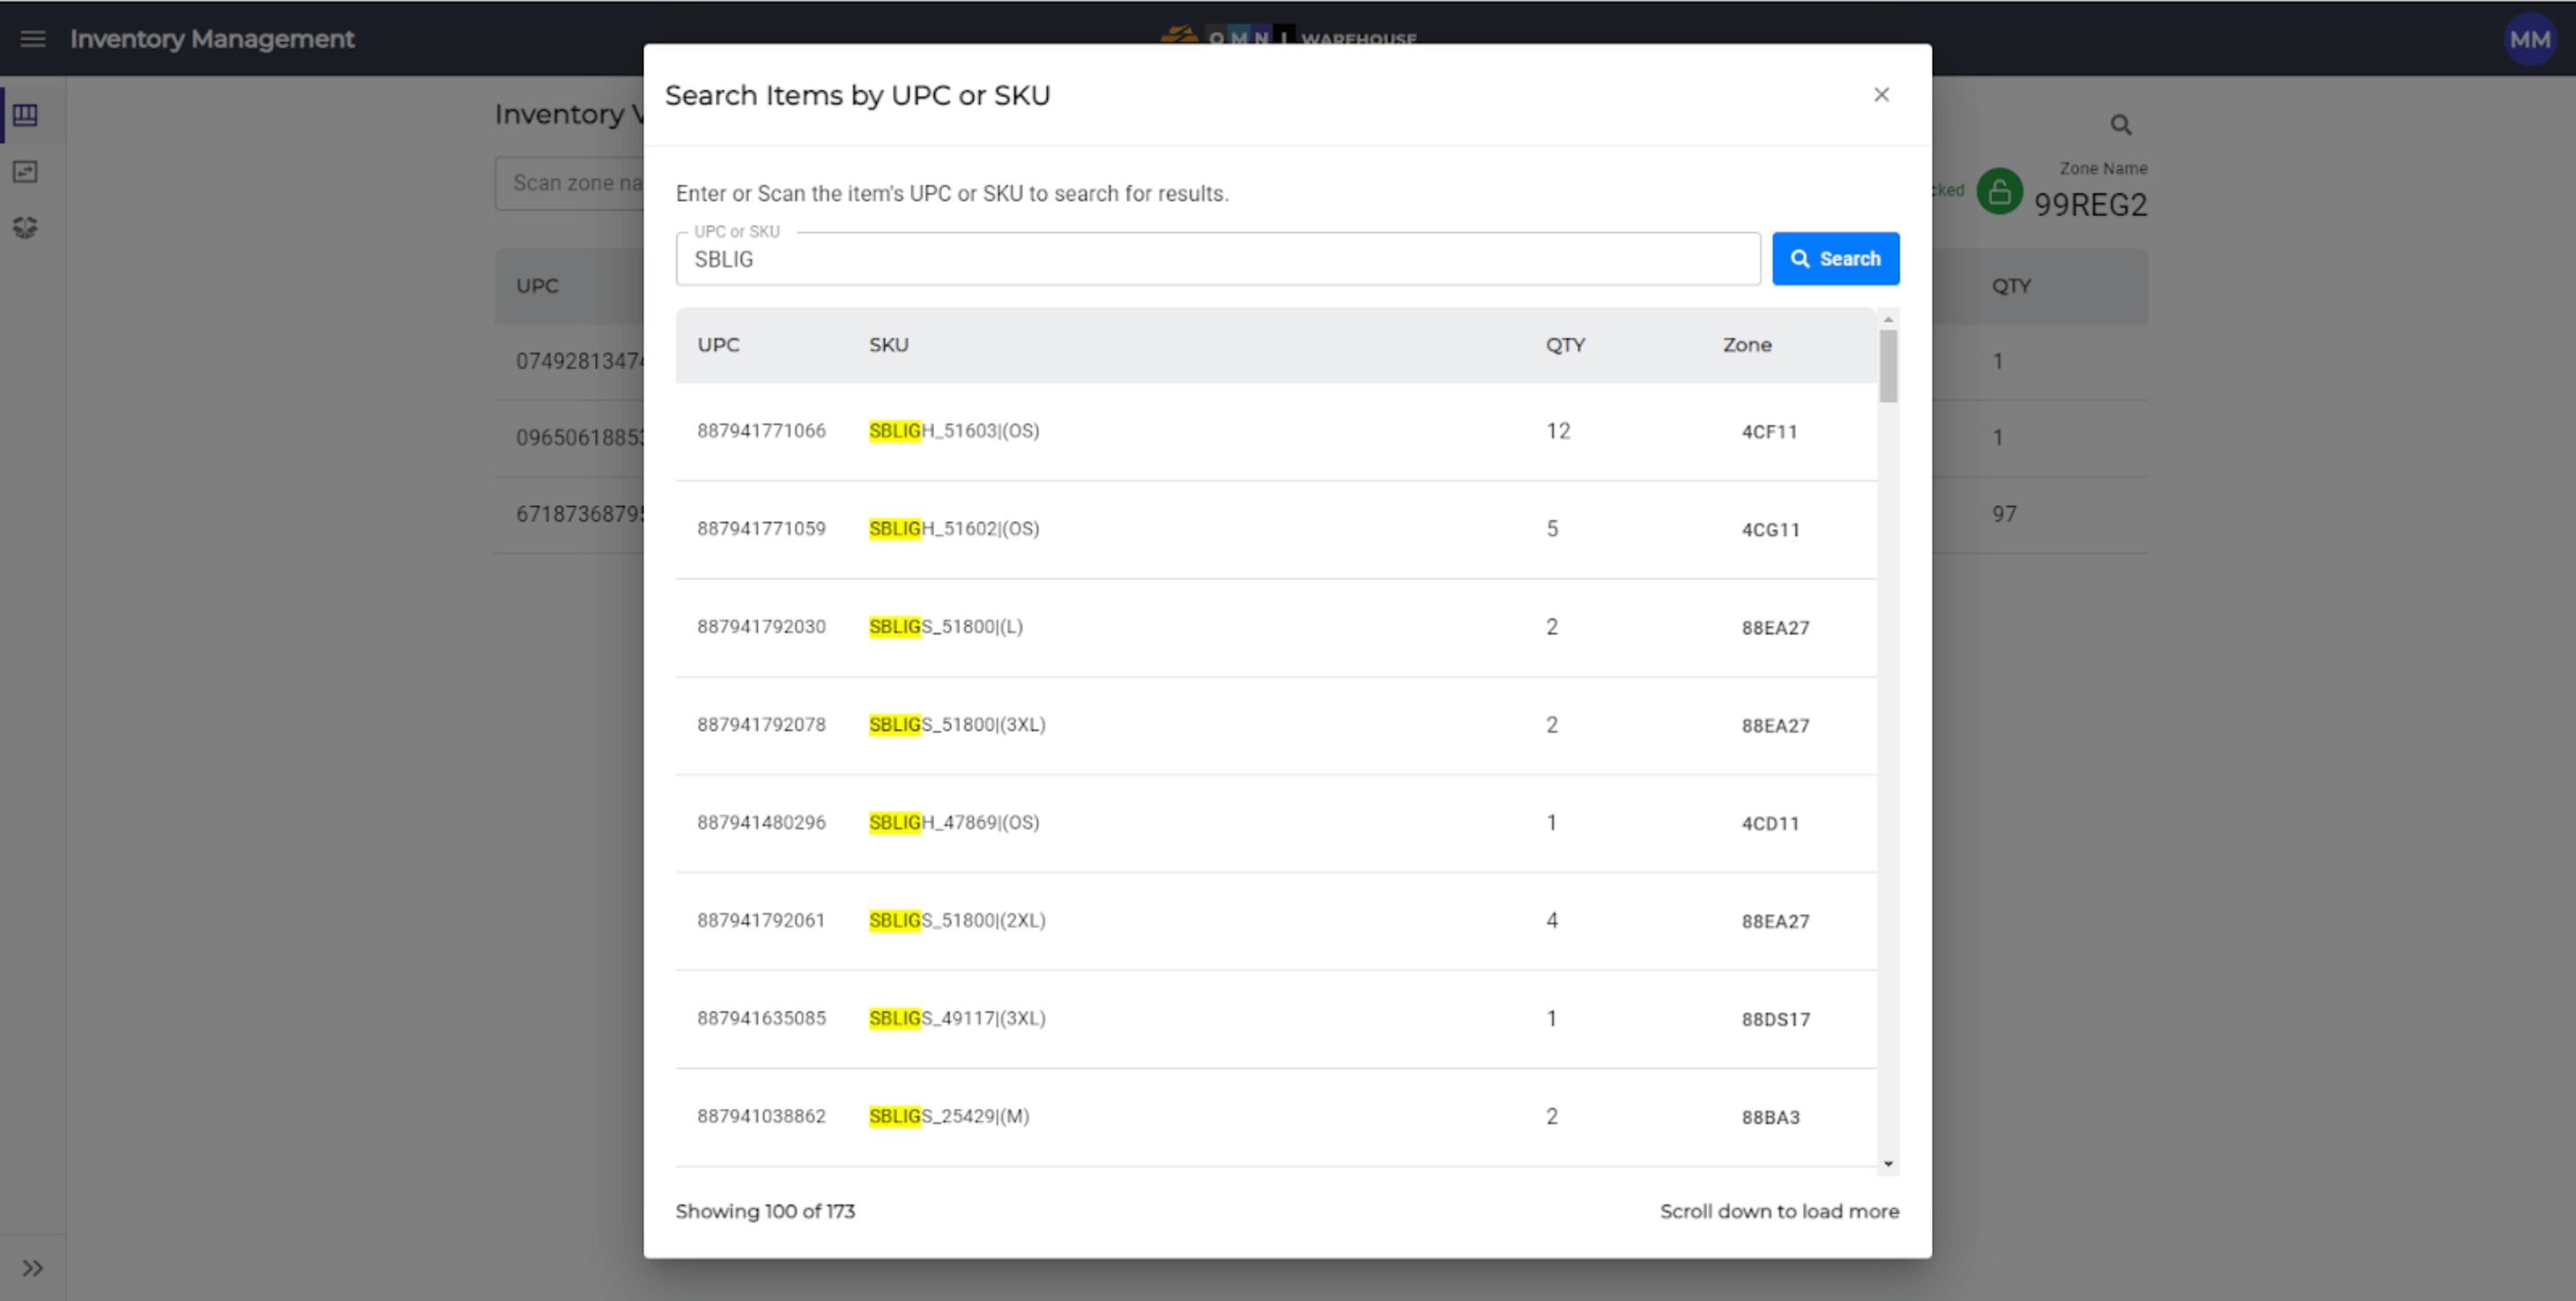
- Pro Tip: A partial UPC or SKU can be used to conduct a search for similar styles or items in the same UPC or SKU set. In the example below, the search for partial SKU “SBLIG” produces a greater search result than a search of the whole SKU “SBLIGA_21702|(OS)” would.
- To conduct another search, simply enter the new data into the “UPC or SKU” field and press the Search button or to exit click the “X” in the top right corner of the Search box.
2) Inventory Zone View
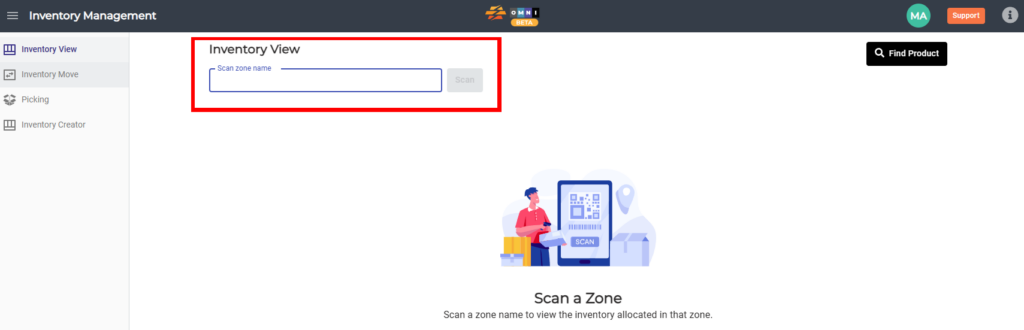
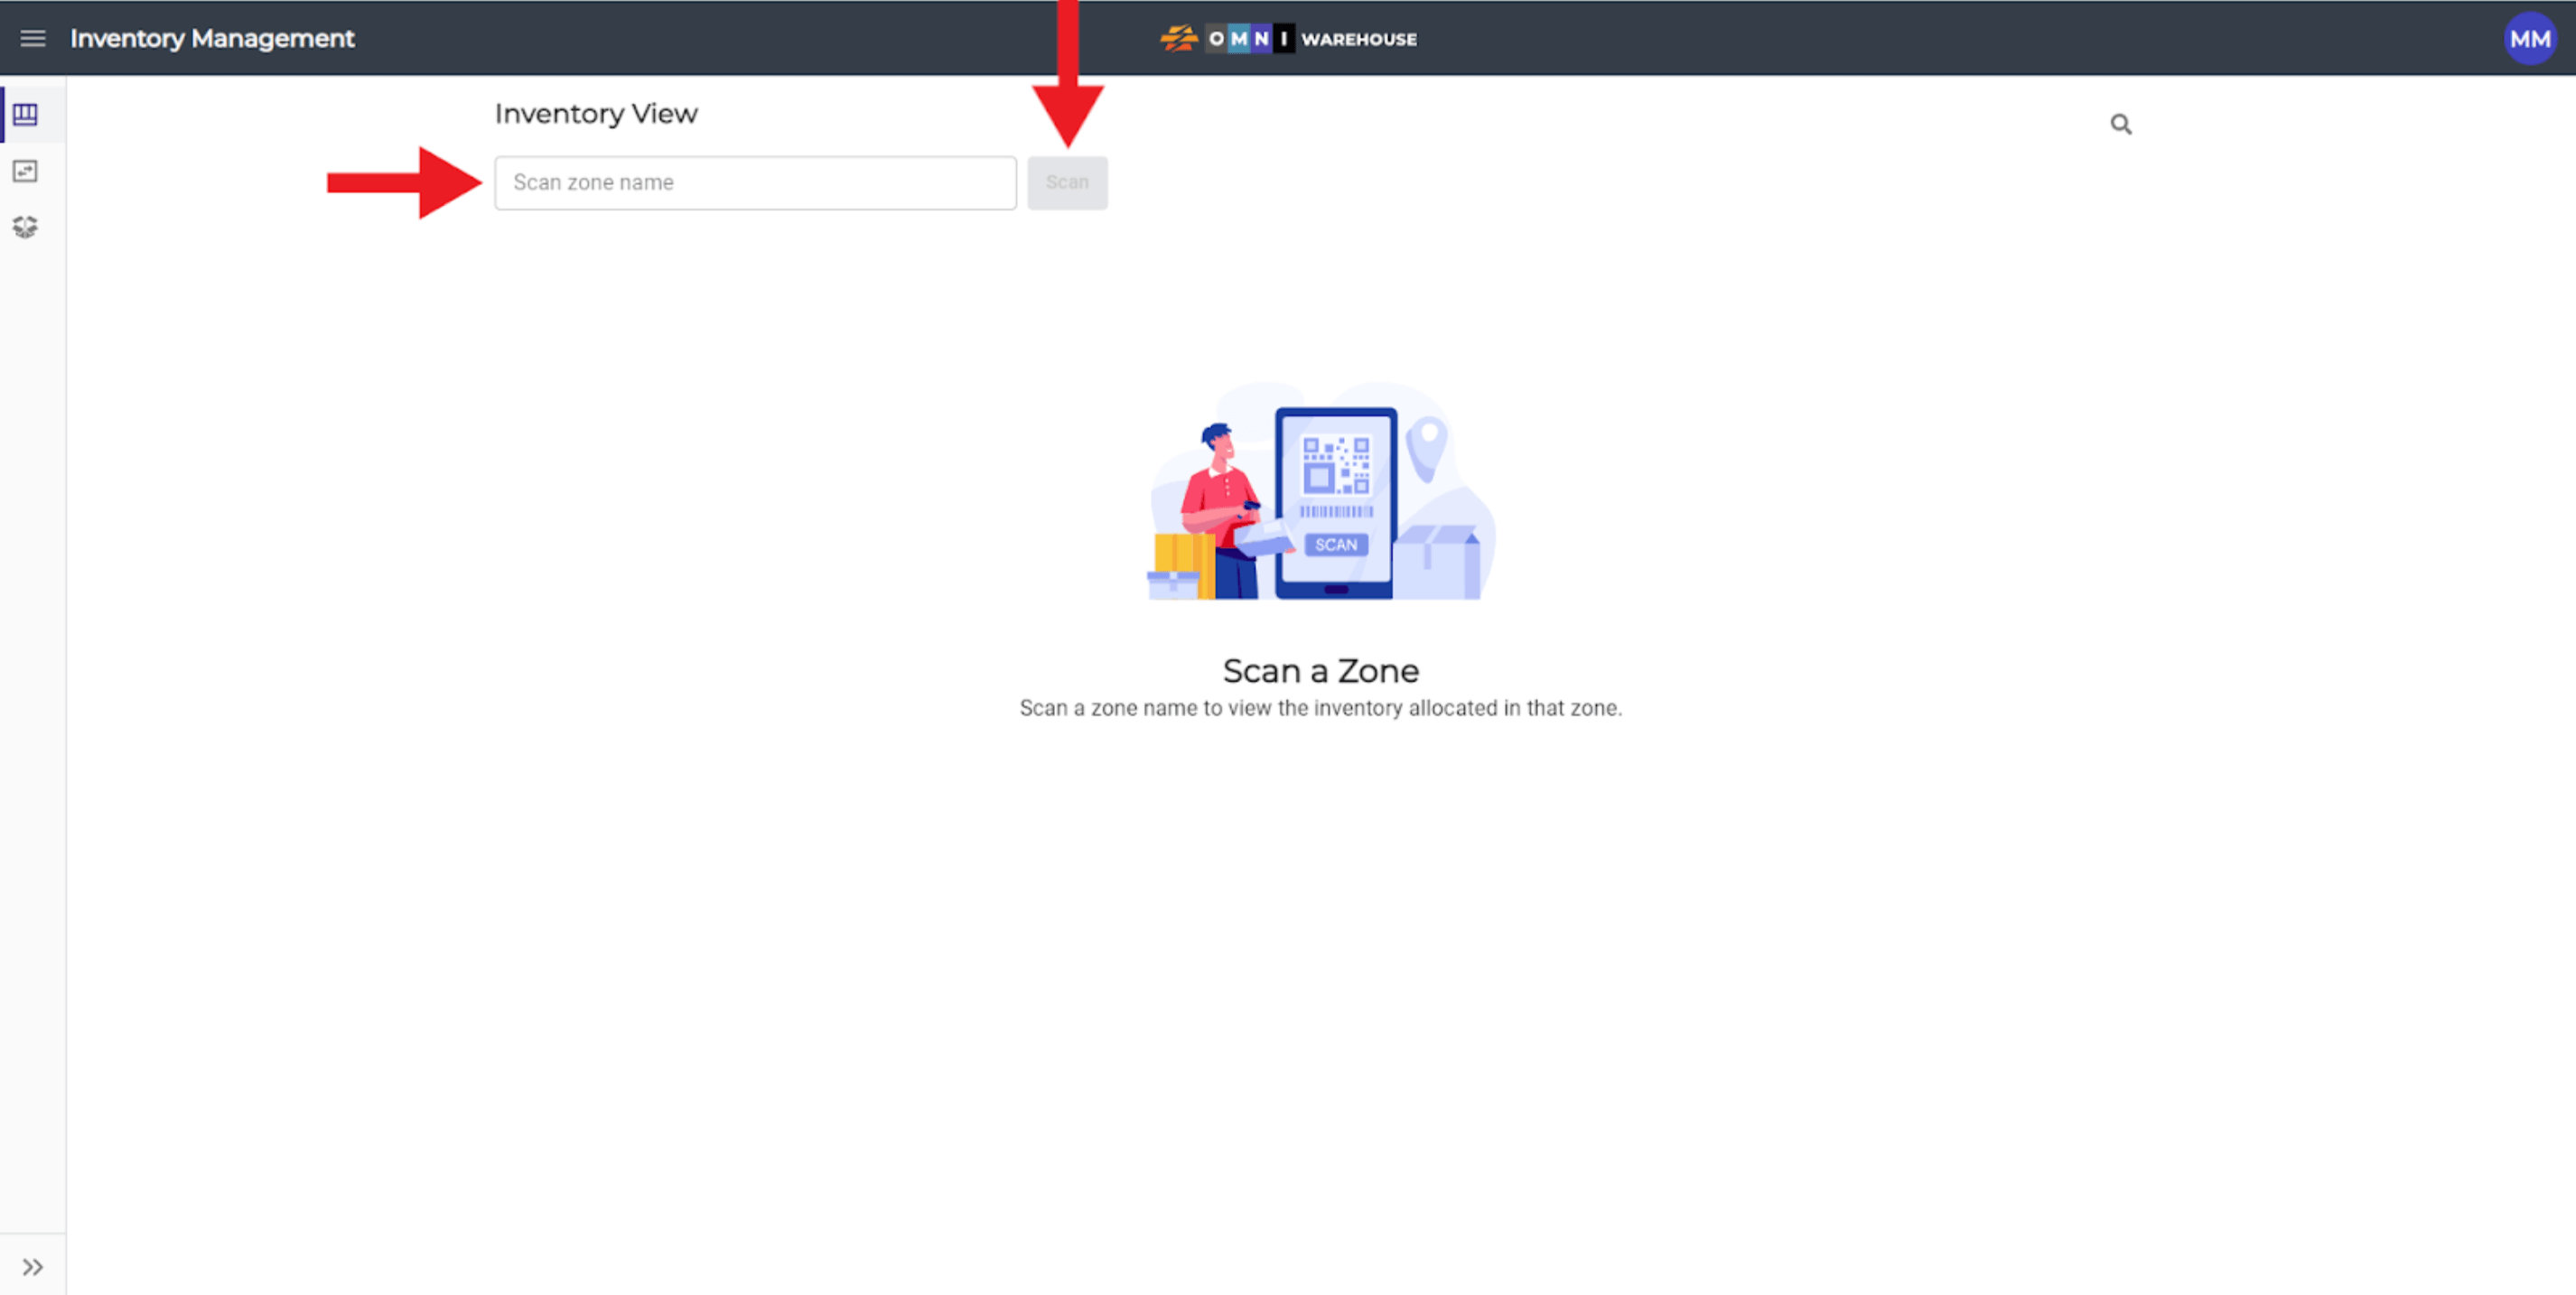
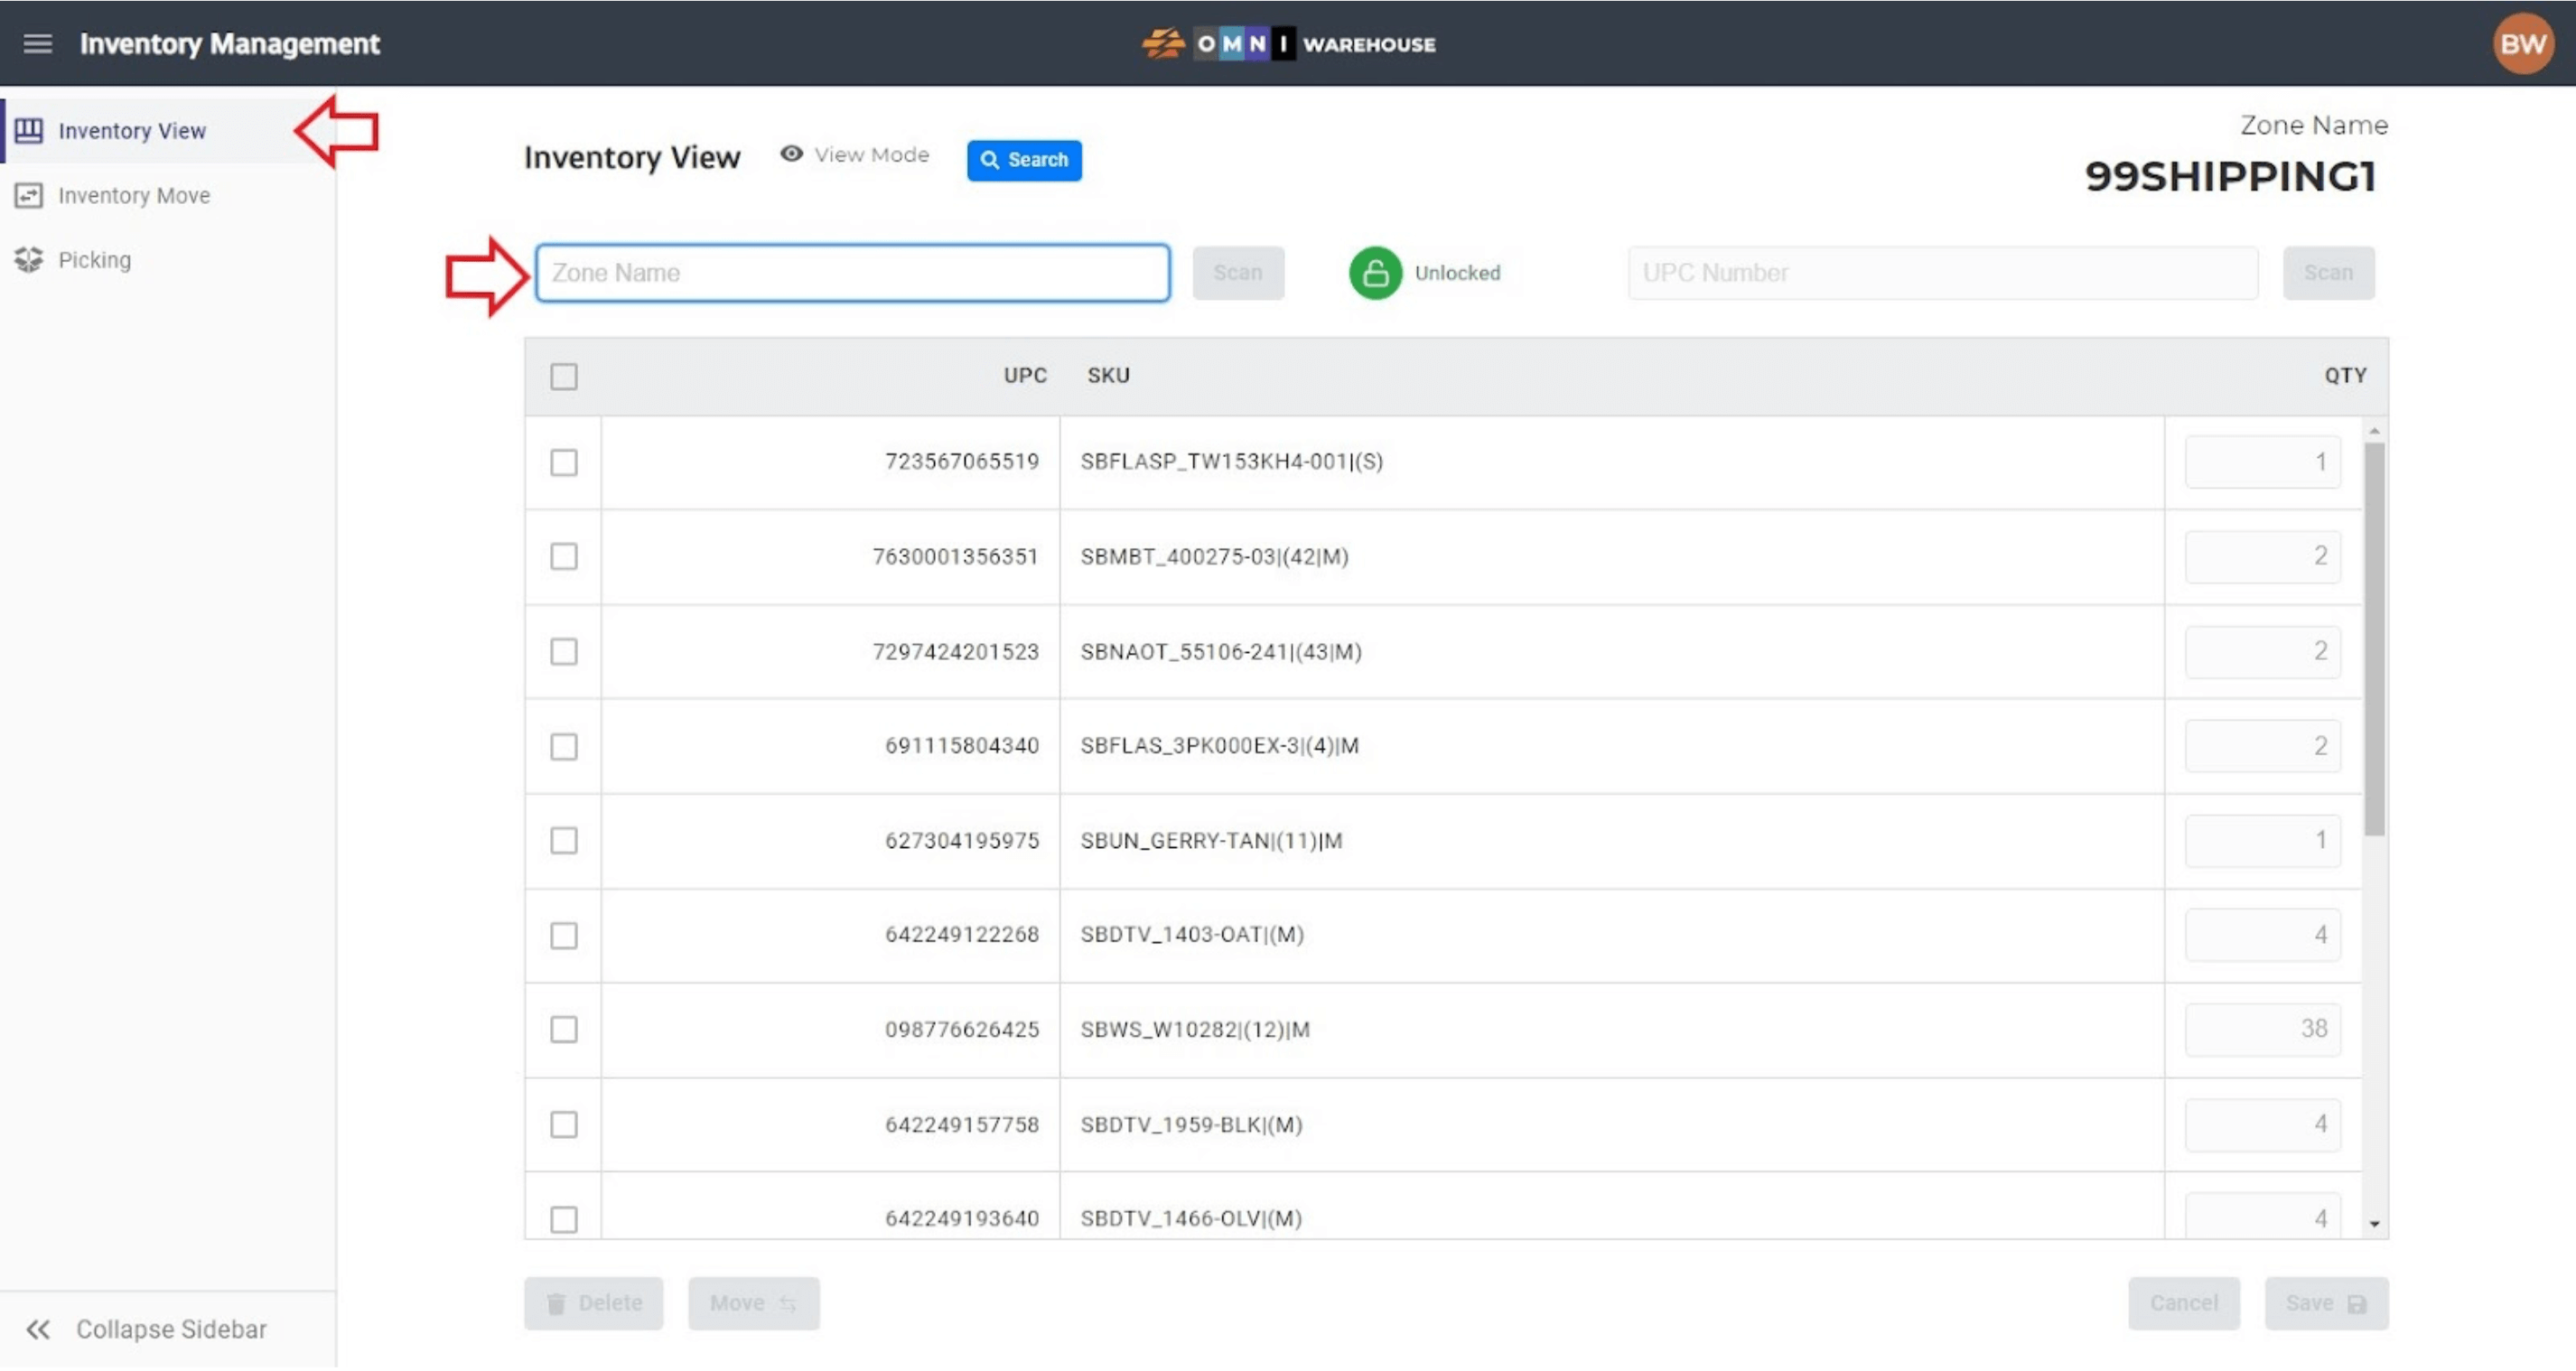
- To view an Inventory Zone or to create a new one, scan the Zone QR Code into the Zone Name field or simply enter the zone name into the field and press the Scan button. Note: If a new zone name is being created, it MUST be in a “Number-Alpha-Number” format such as “77AC5”.
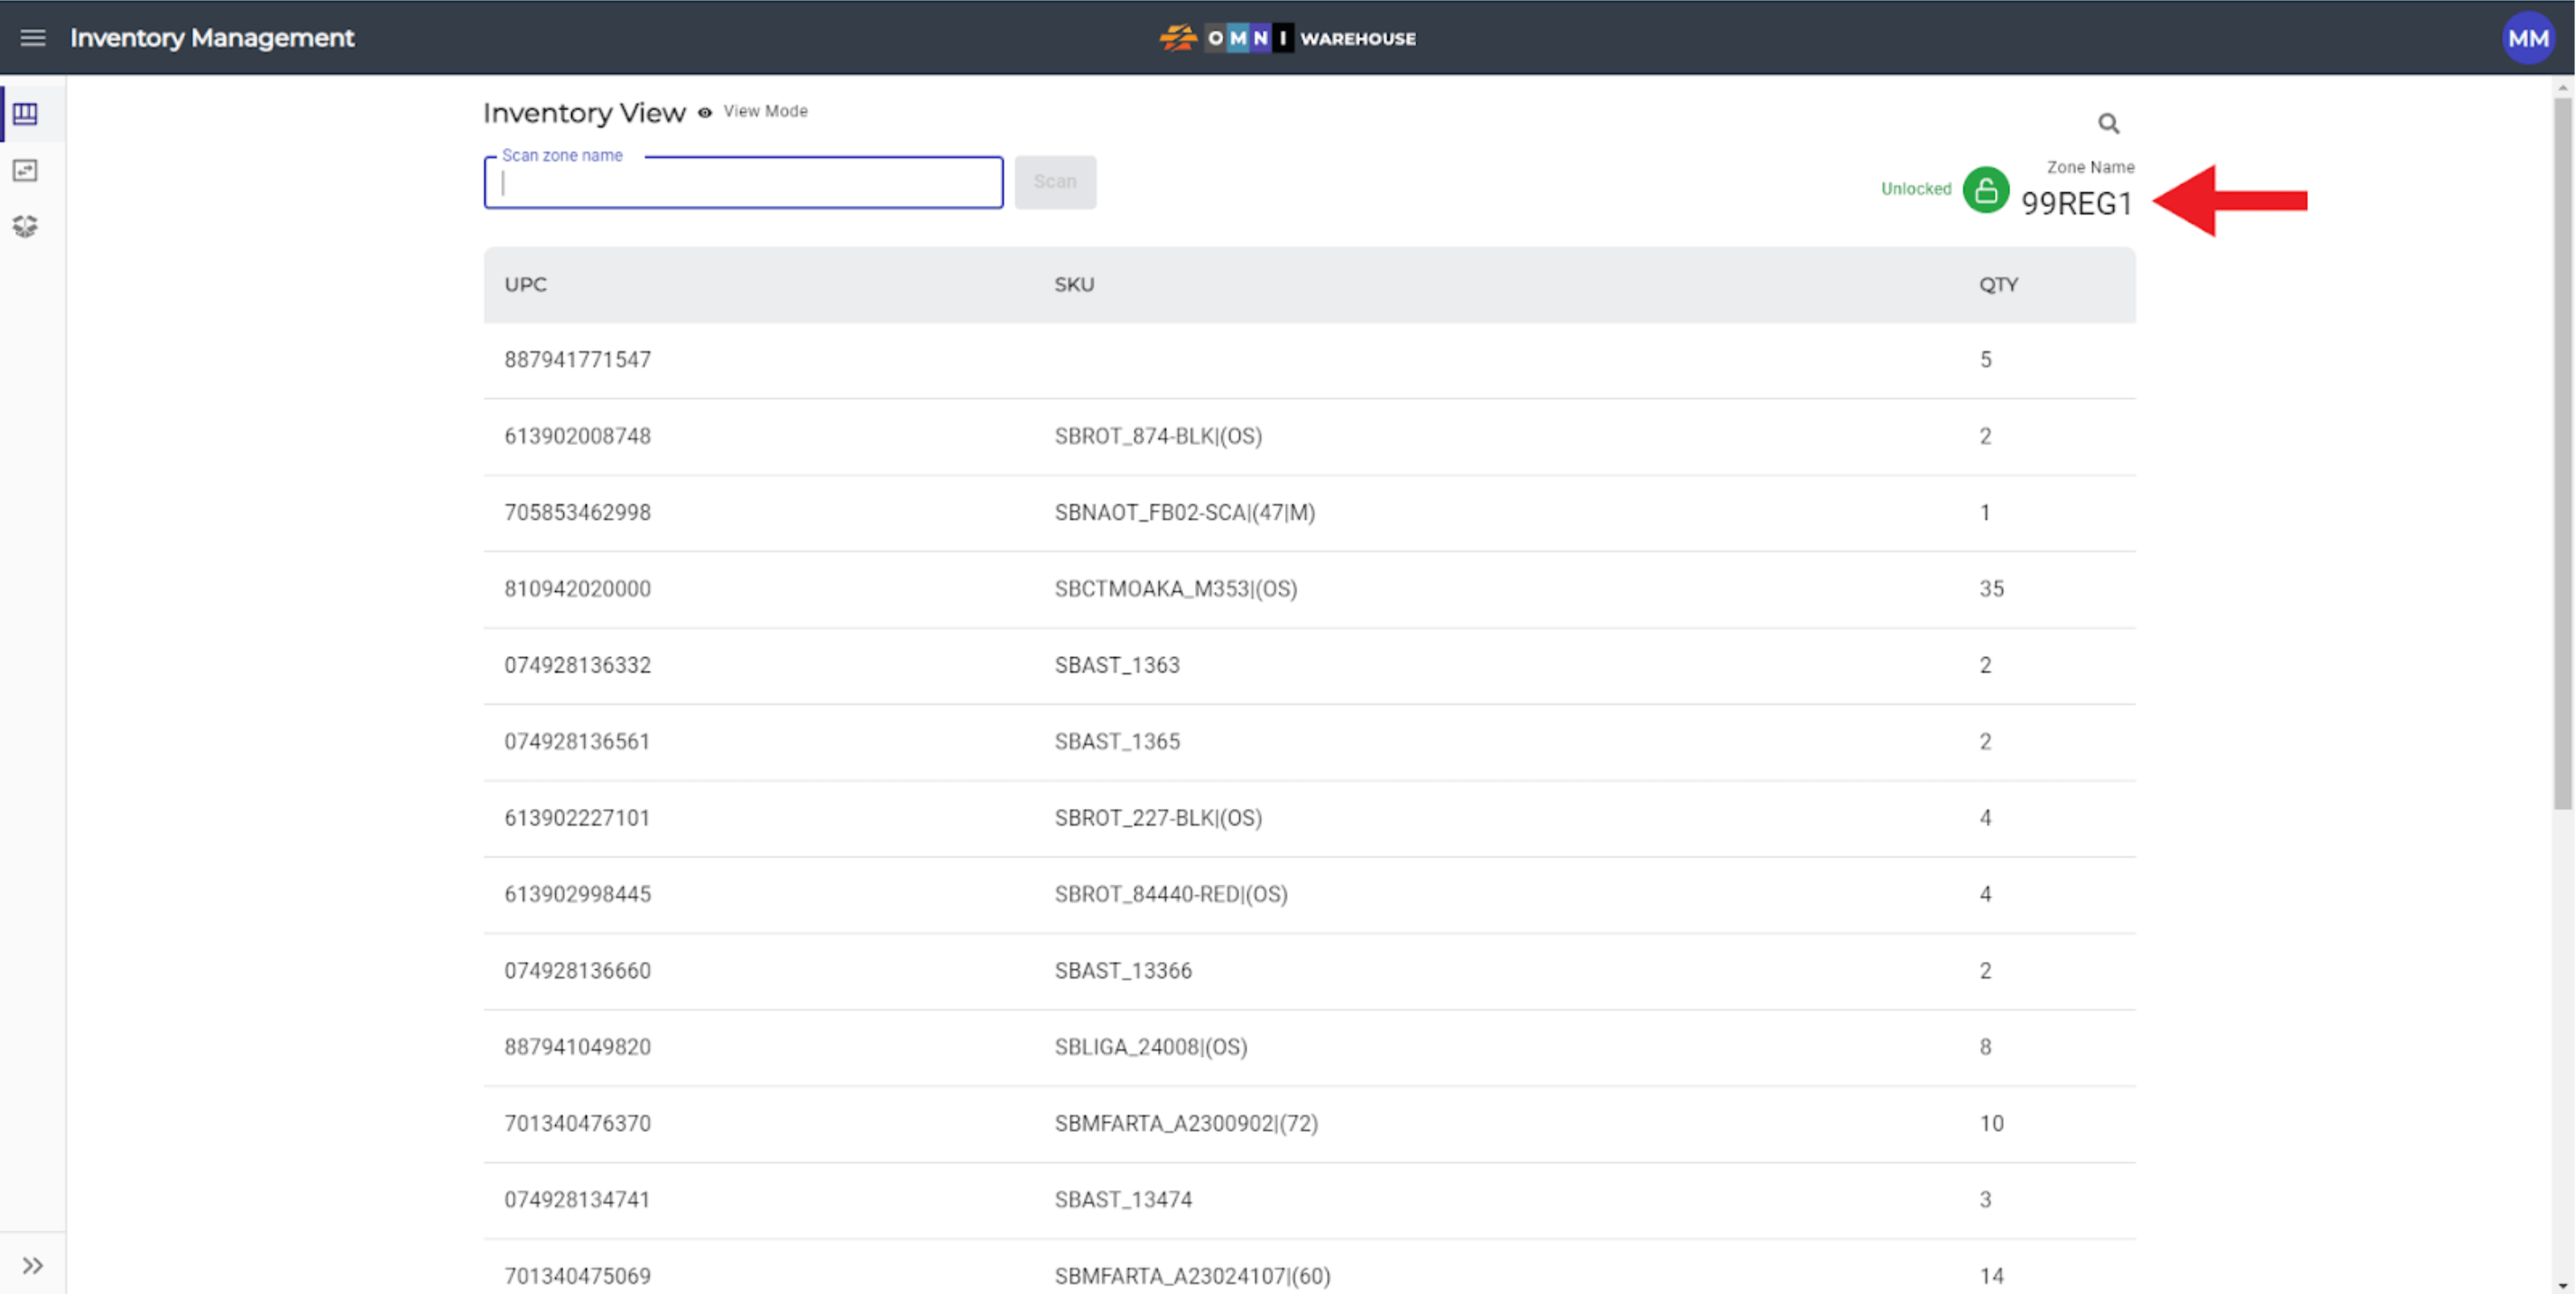
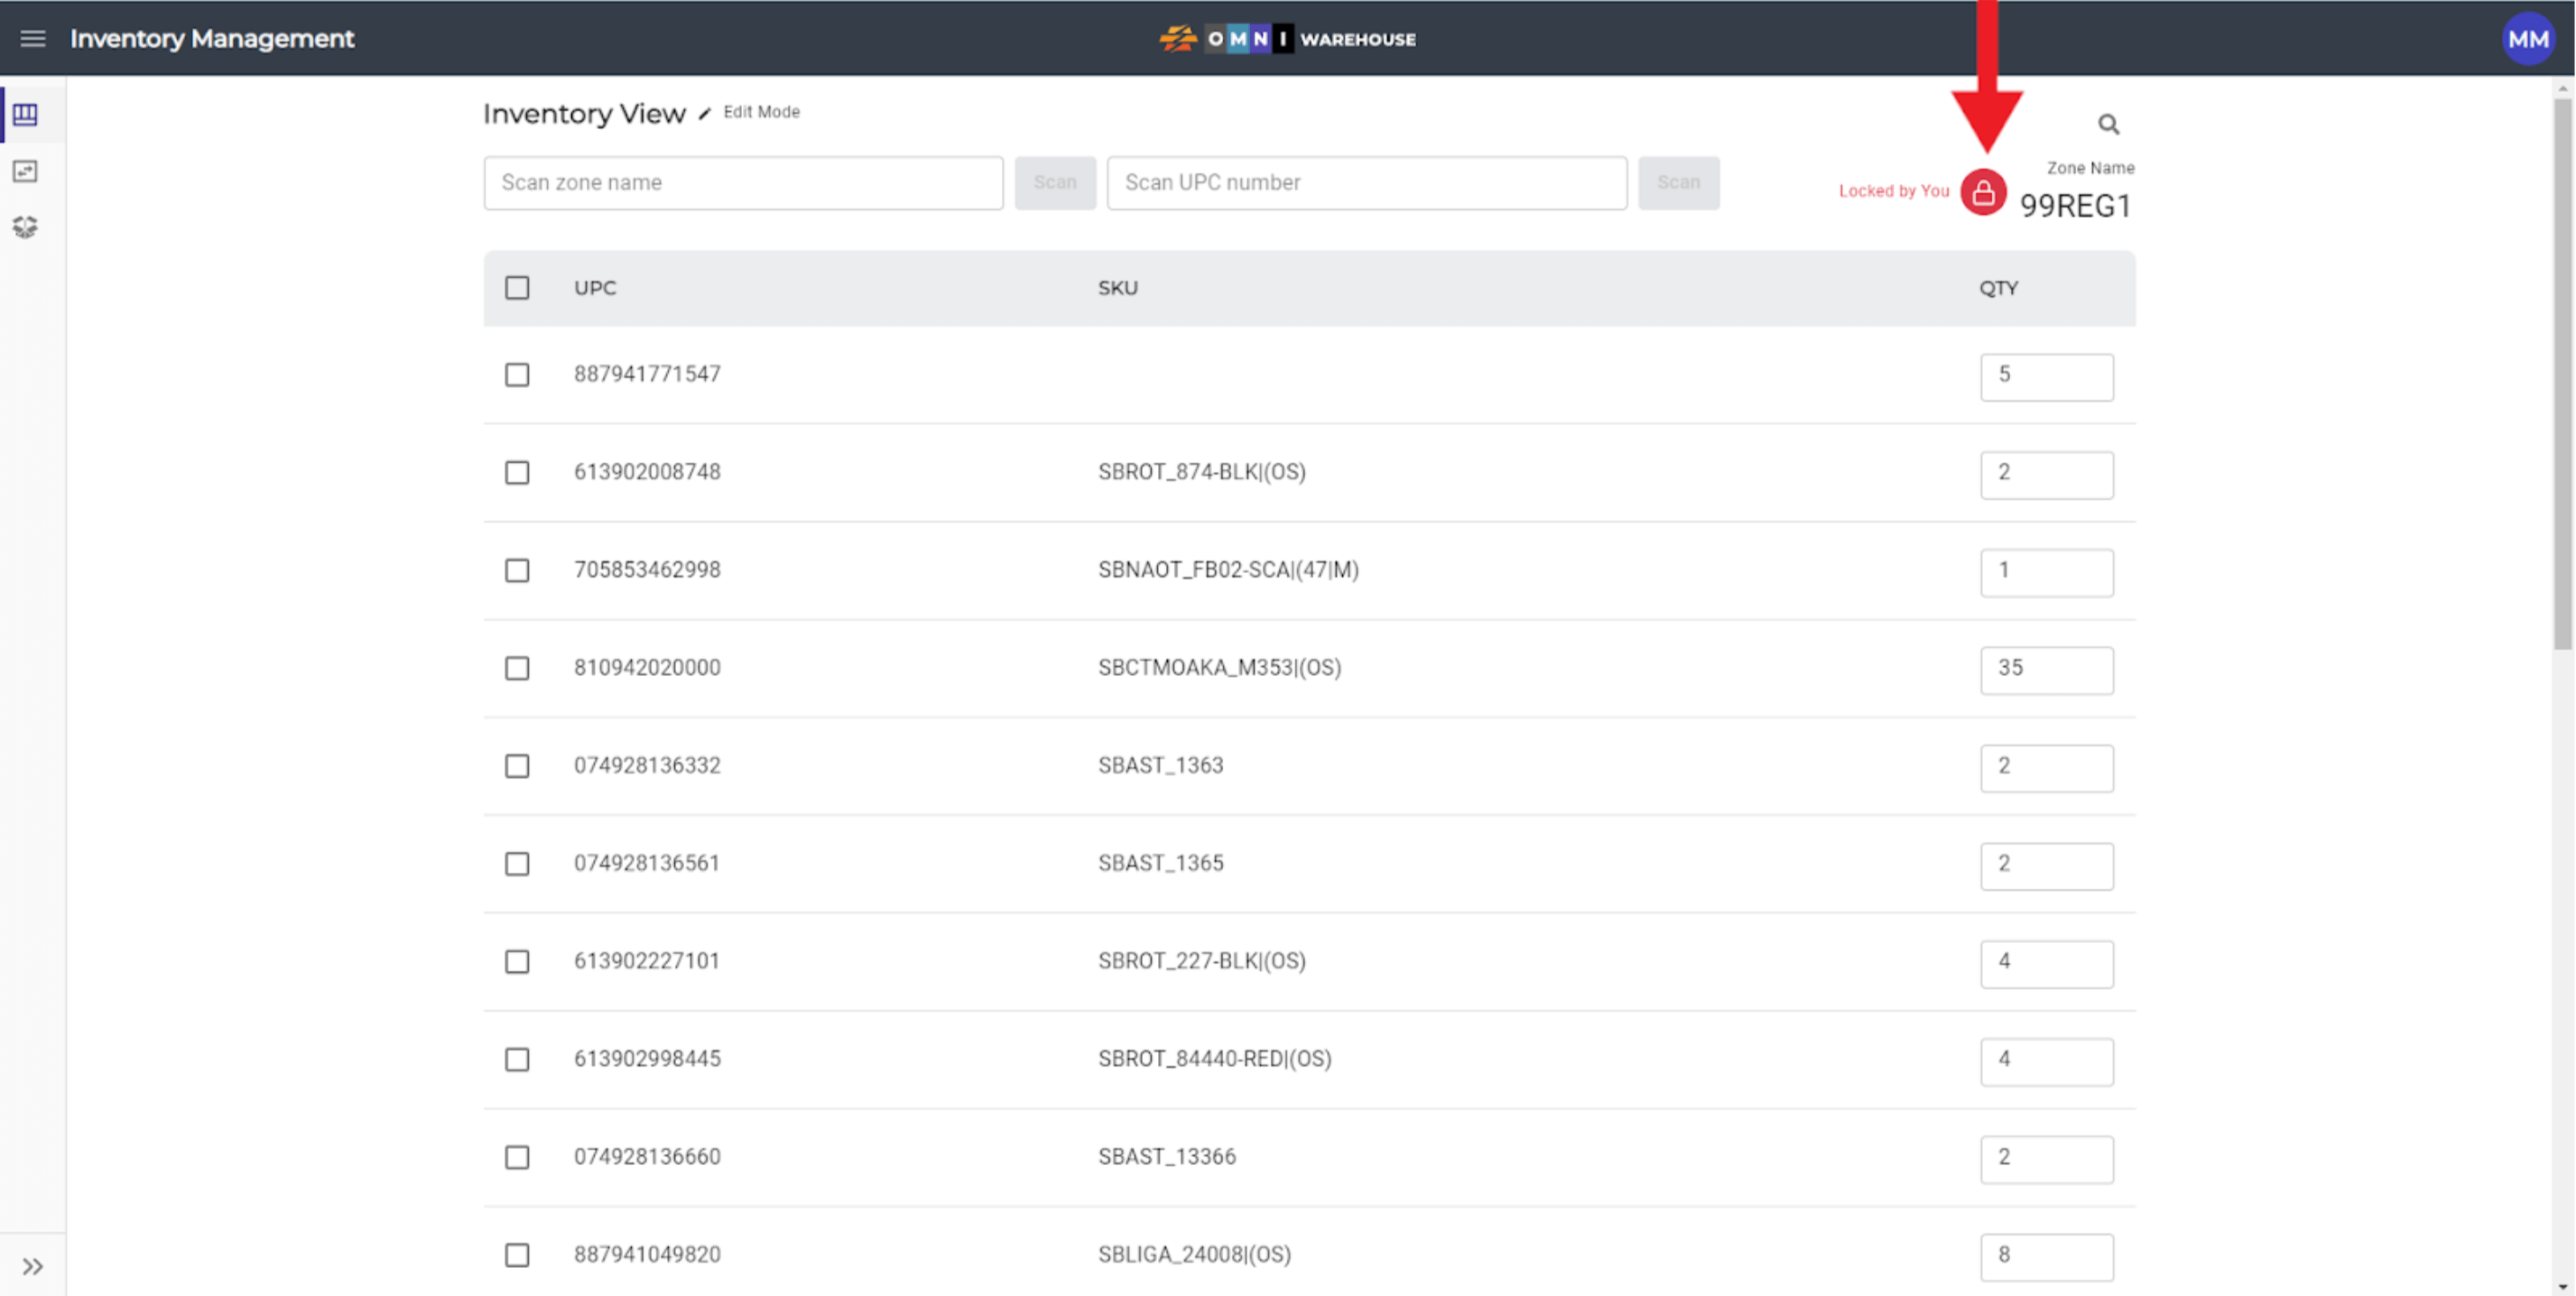
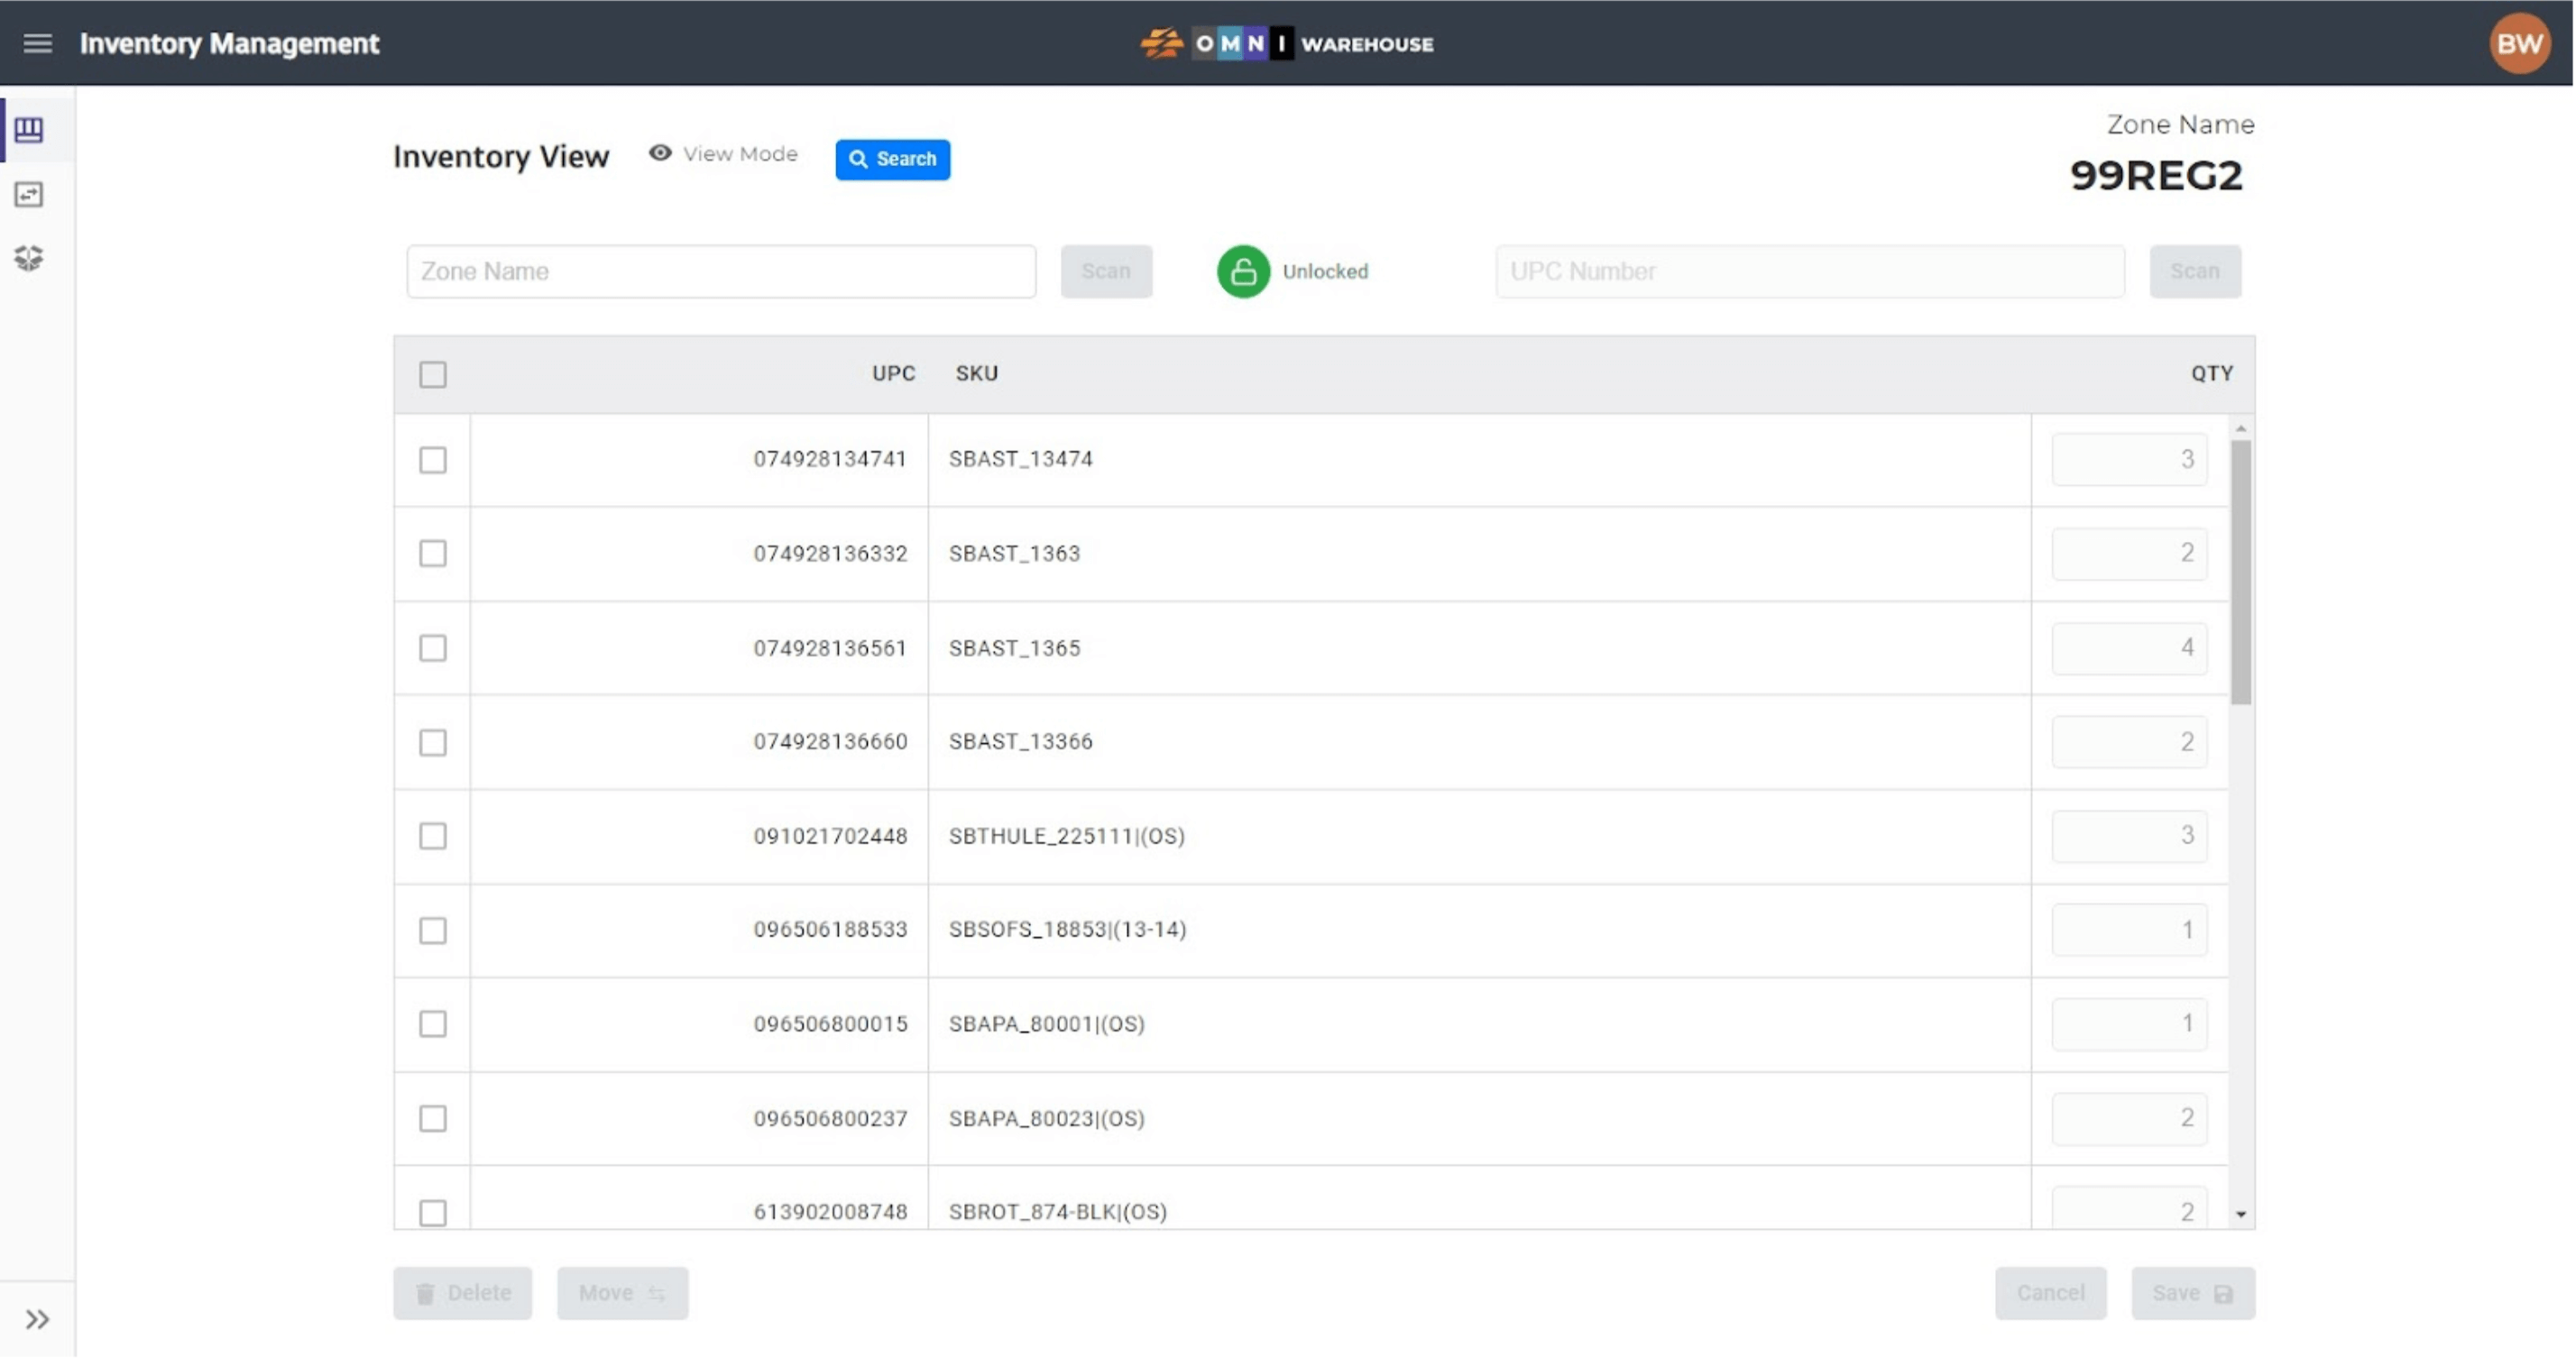
- This will open an inventory zone view. All inventory zones are in a “Number-Alpha-Number” format. In this example, the QR Code for zone 99REG1 was scanned as indicated on the top right corner under Zone Name. The contents of the zone are displayed with UPC, Qty, and Sku listed.
3) Zone Locks
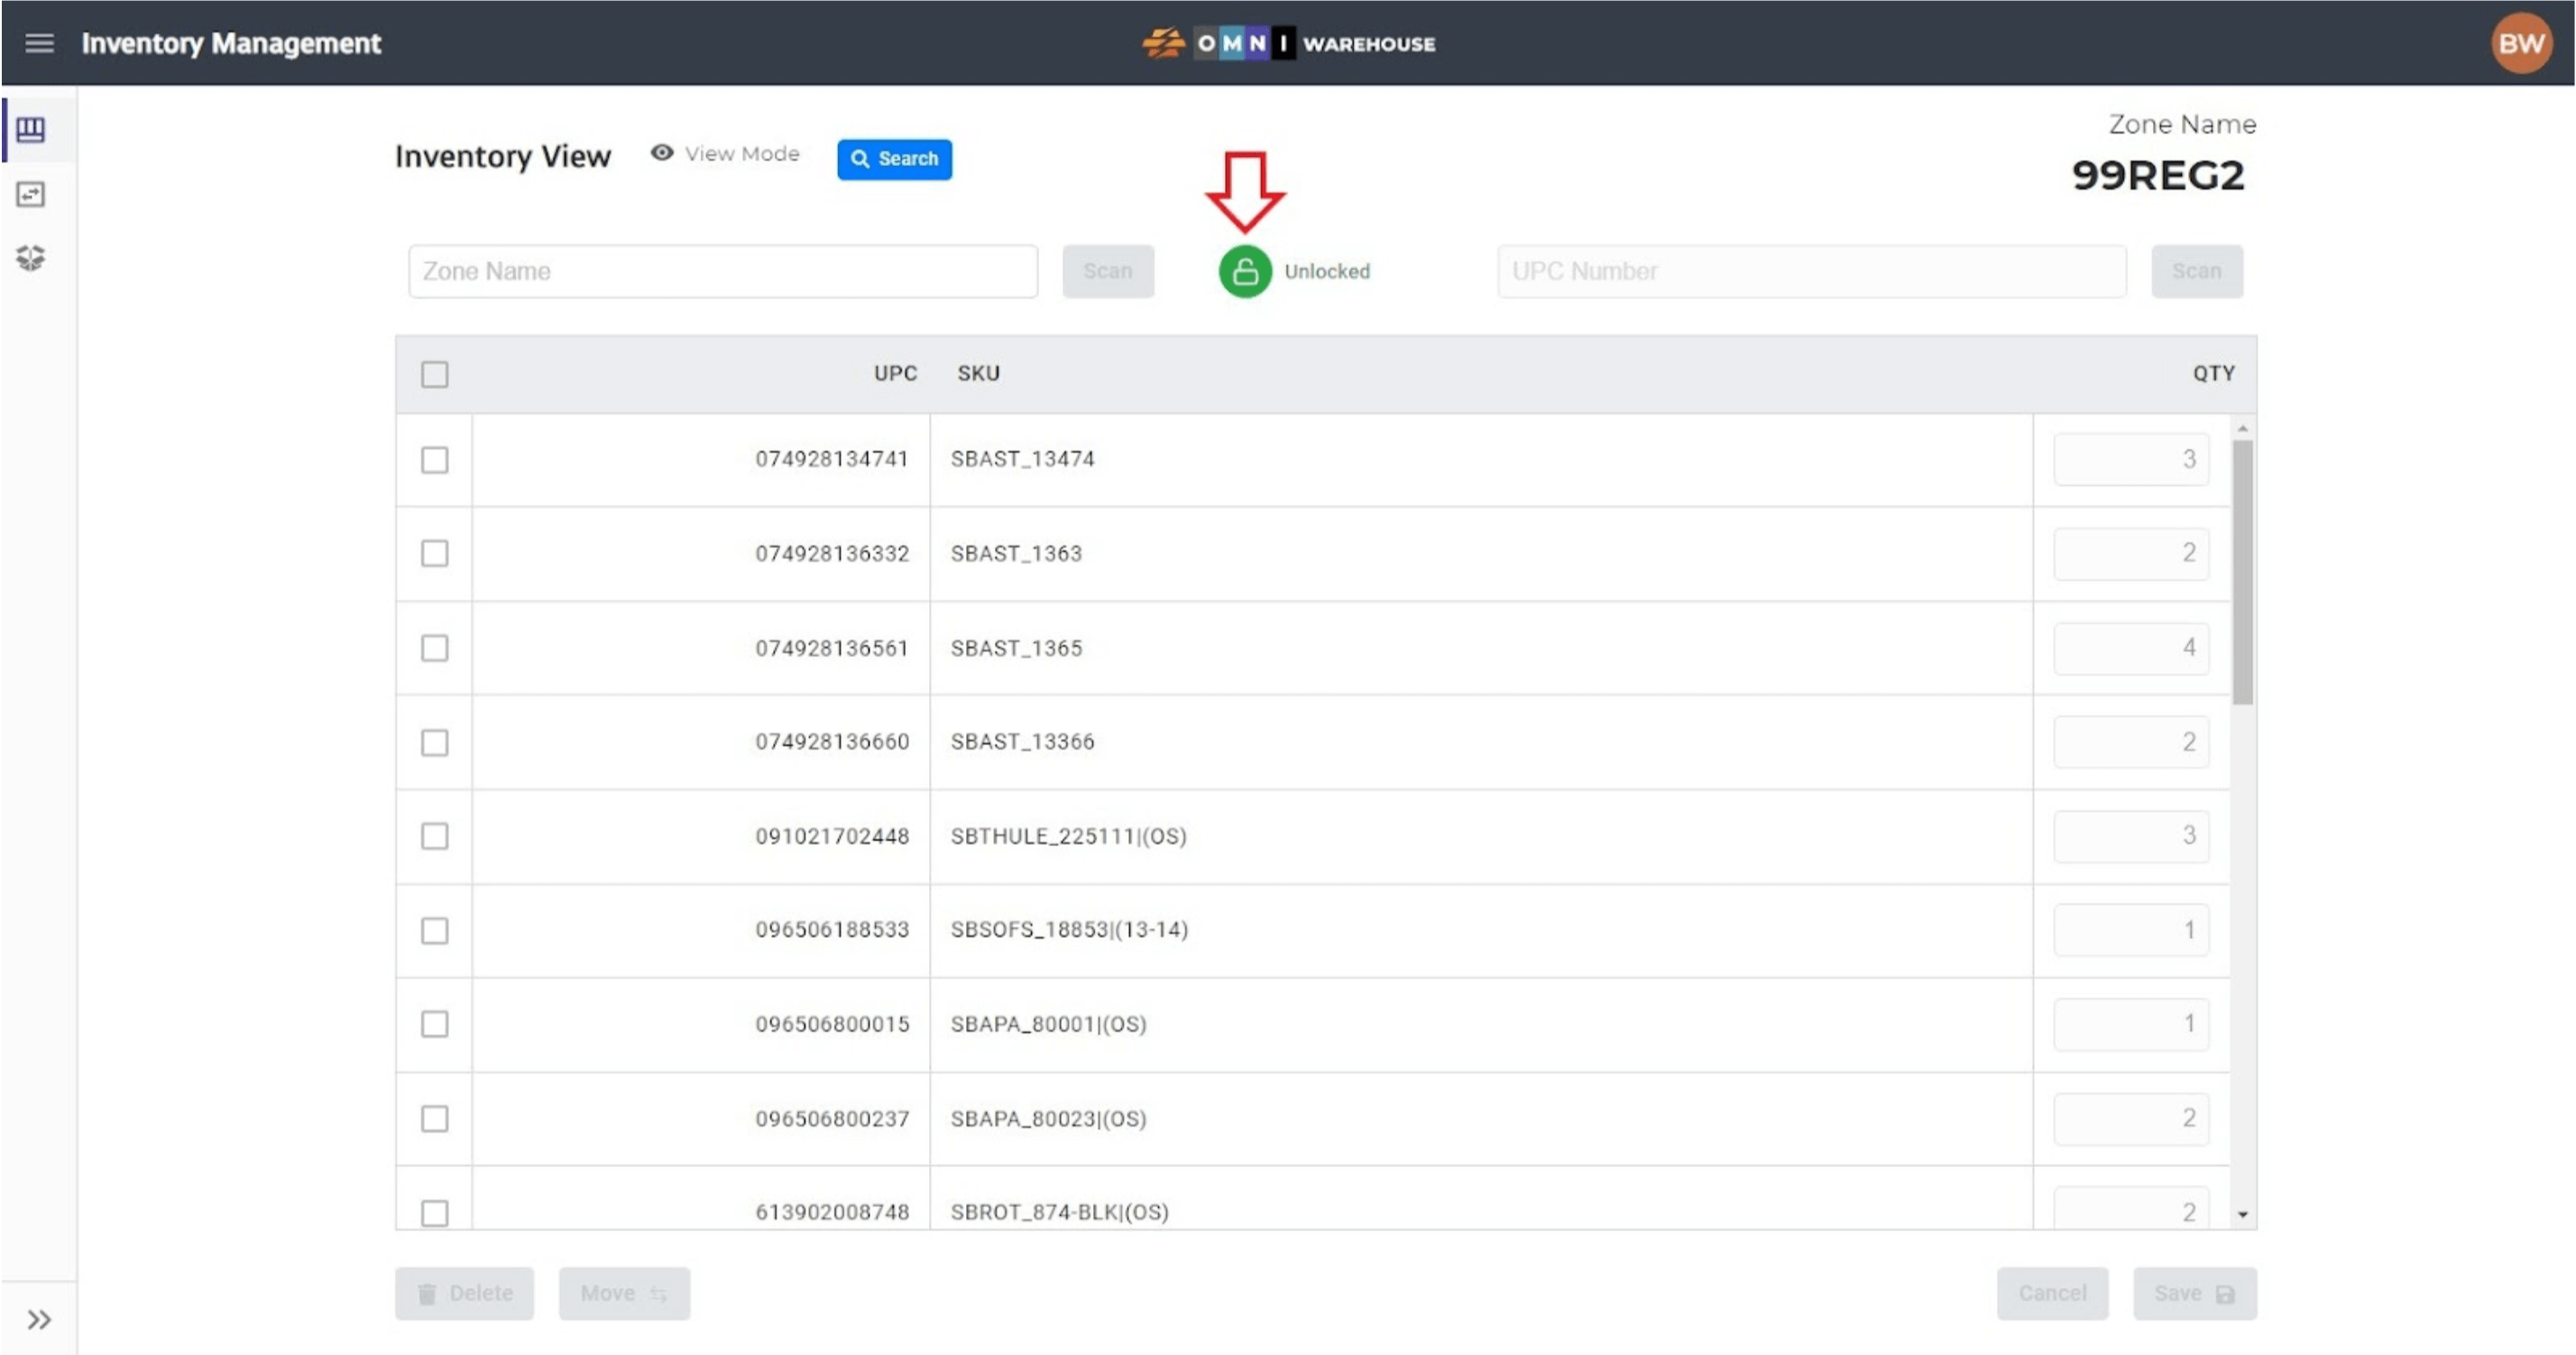
- Every zone can be locked or unlocked by clicking on the Zone Lock button. When engaged, the lock allows a user to edit the zone while also preventing another user from simultaneously editing the zone. A user can only unlock zones that they have locked themselves unless they have admin override rights and access.
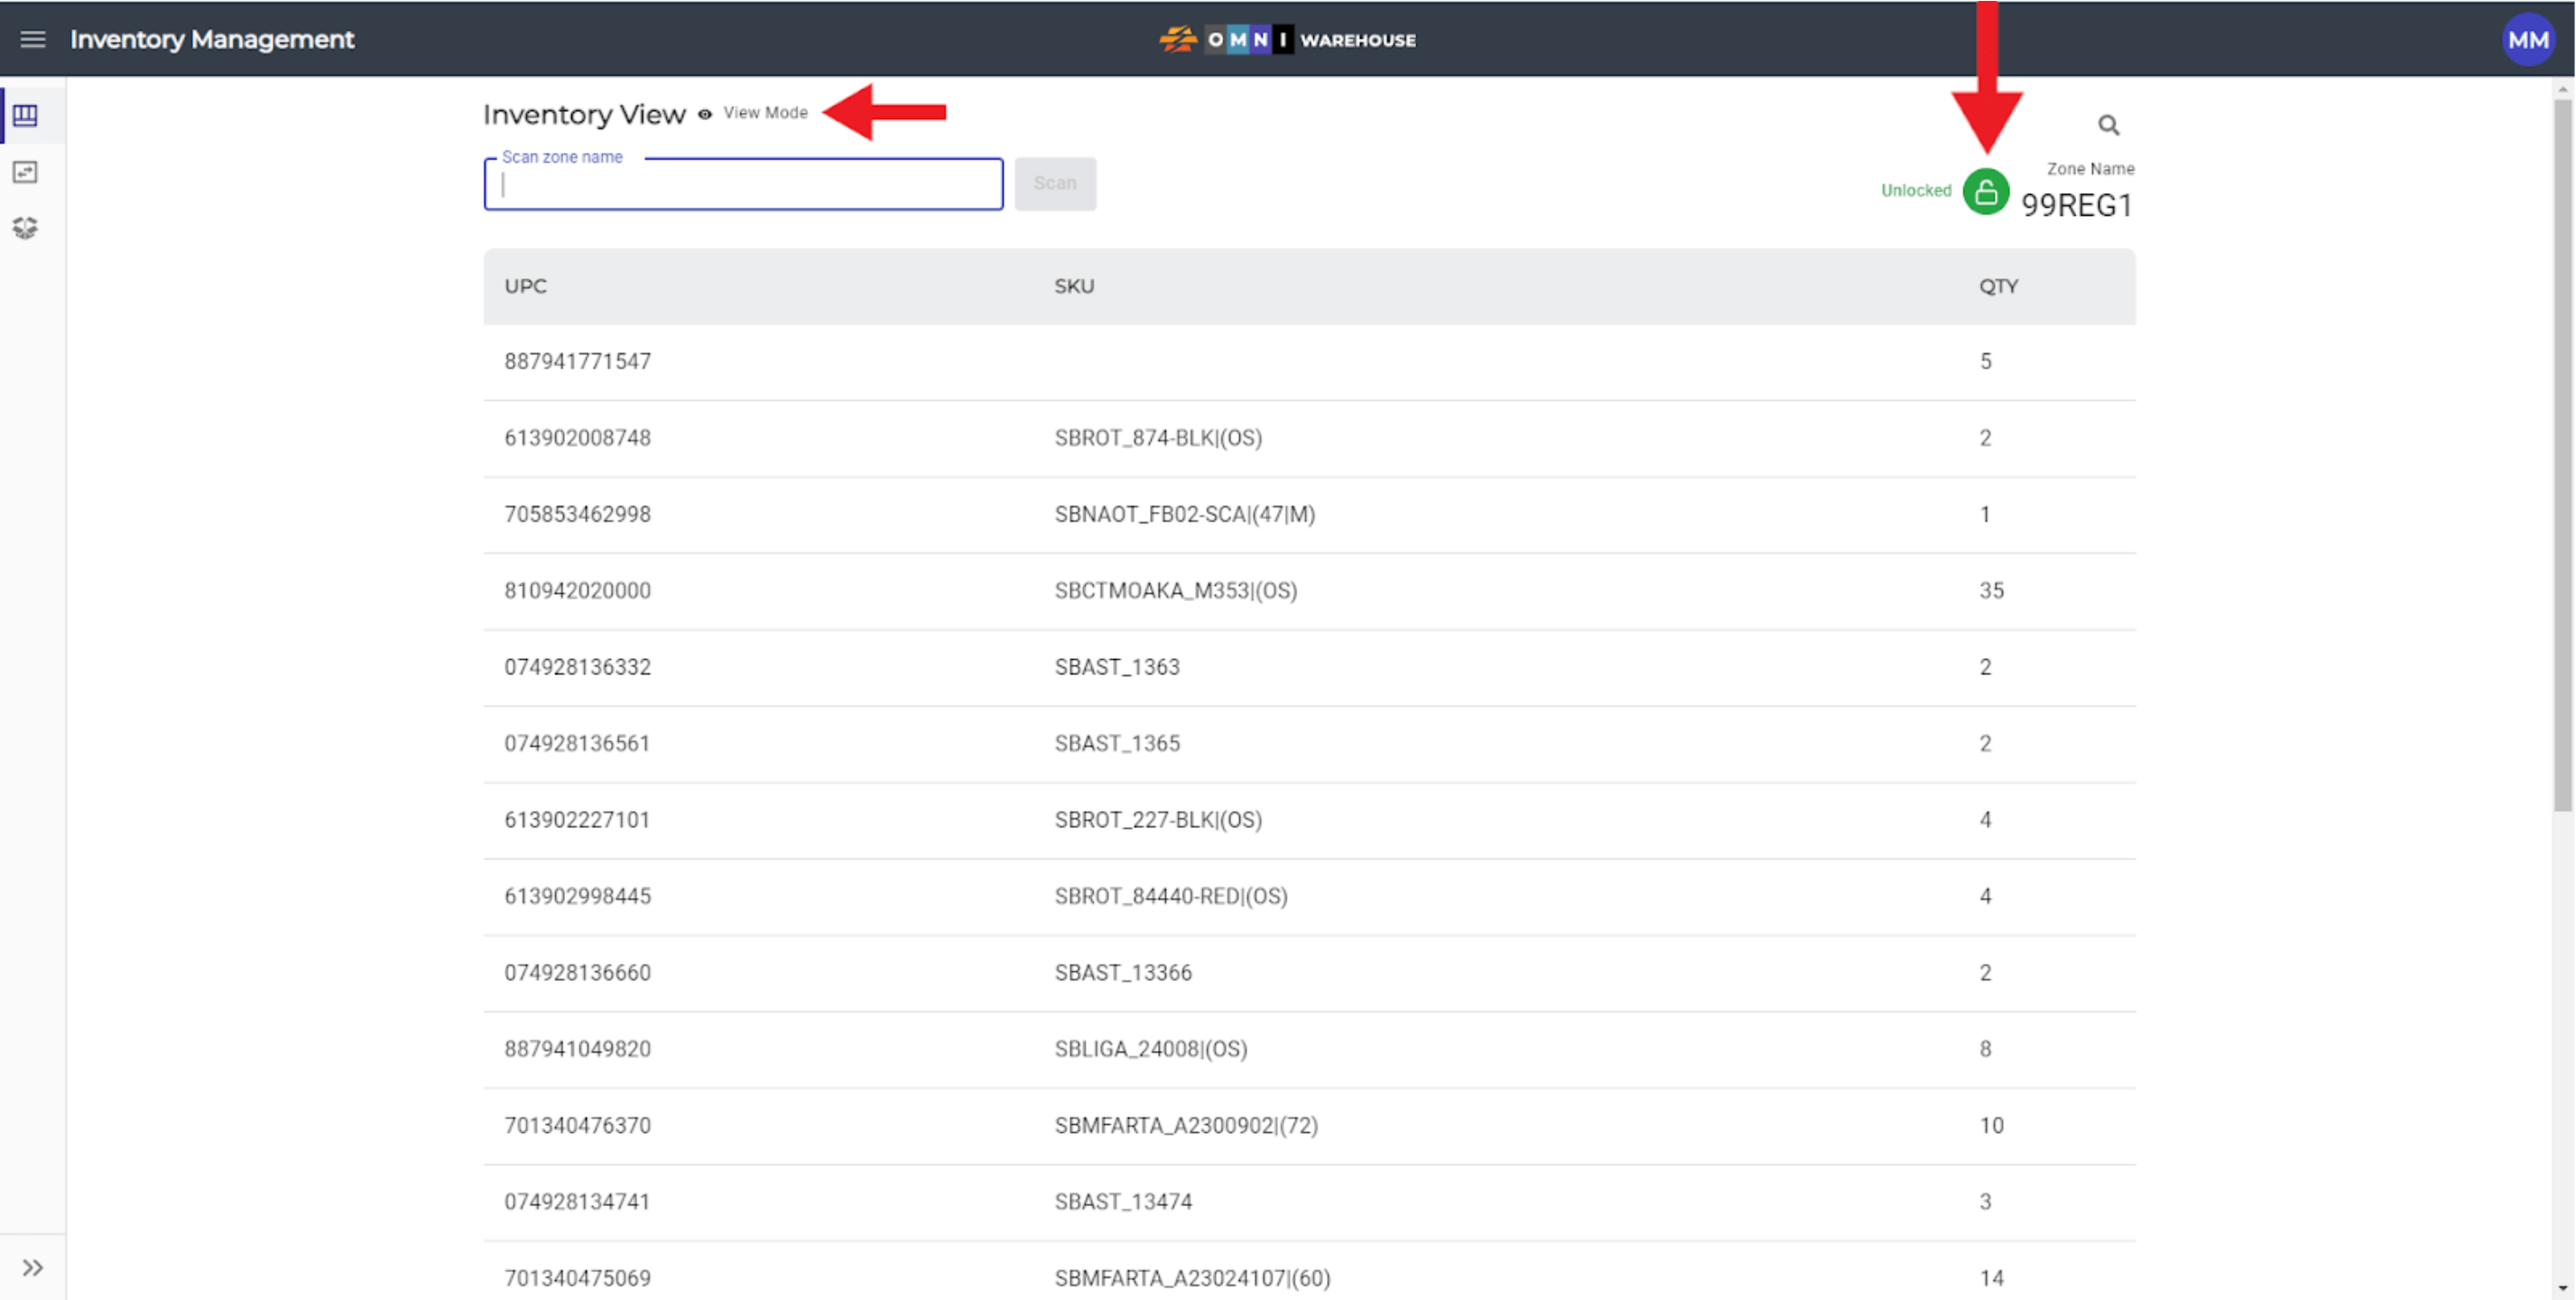
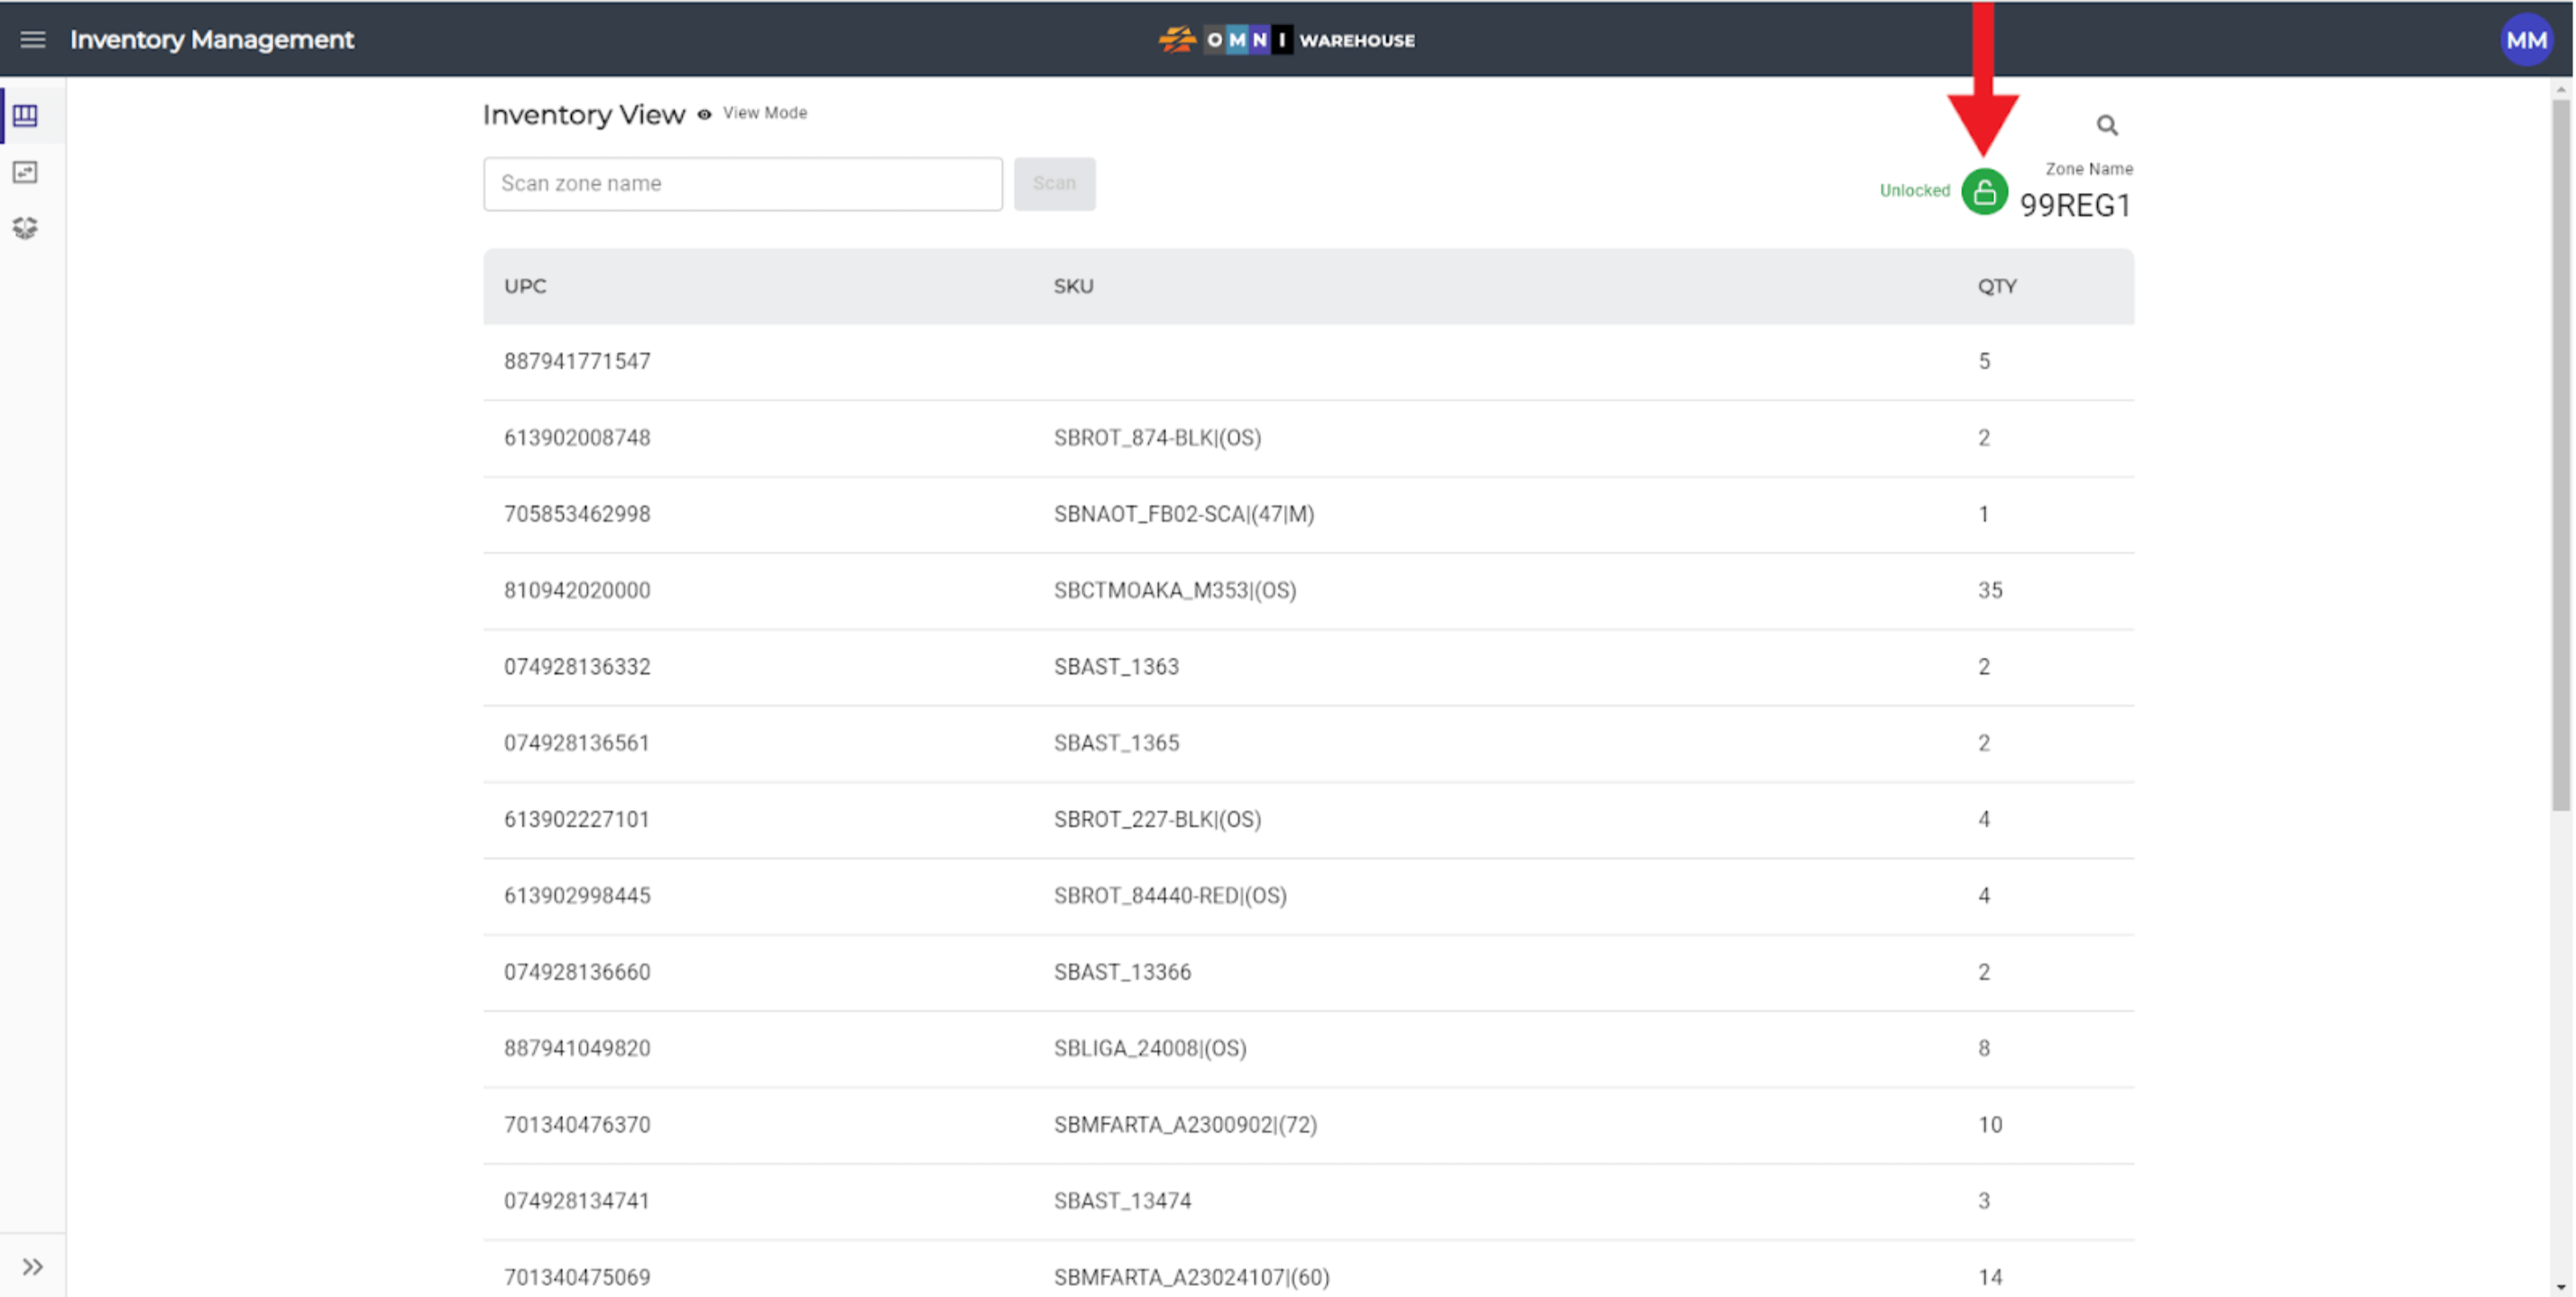
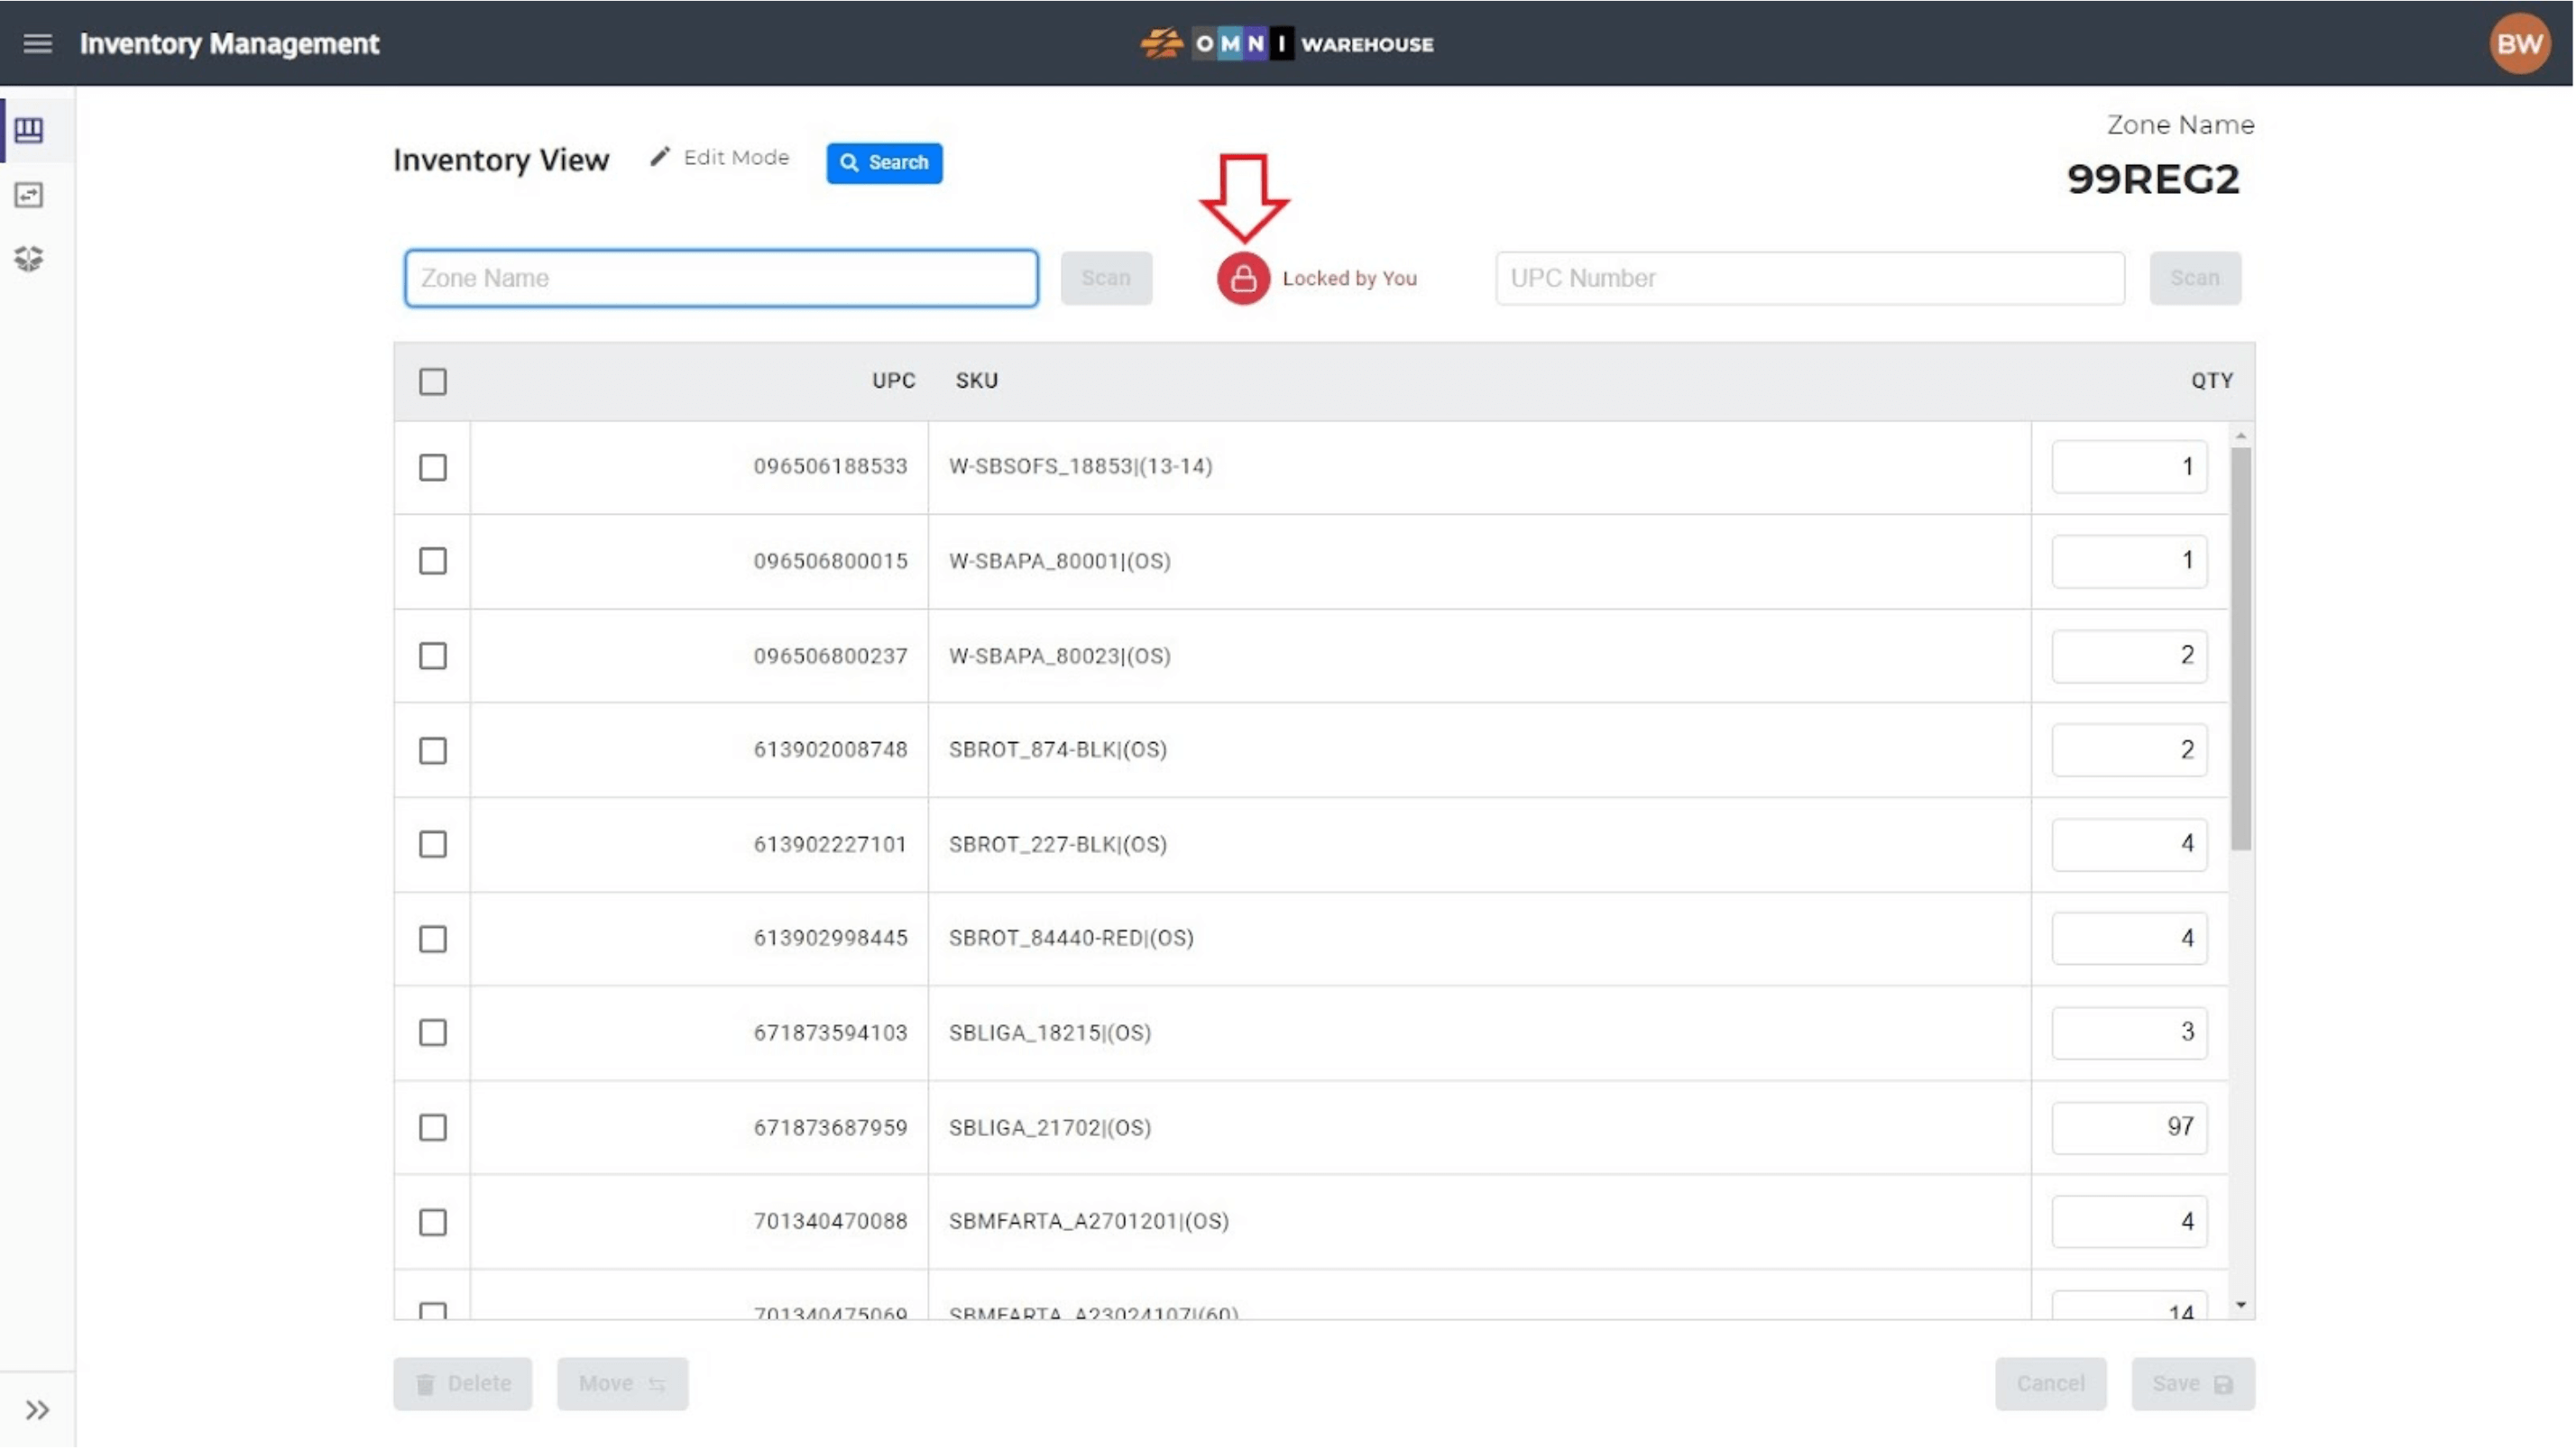
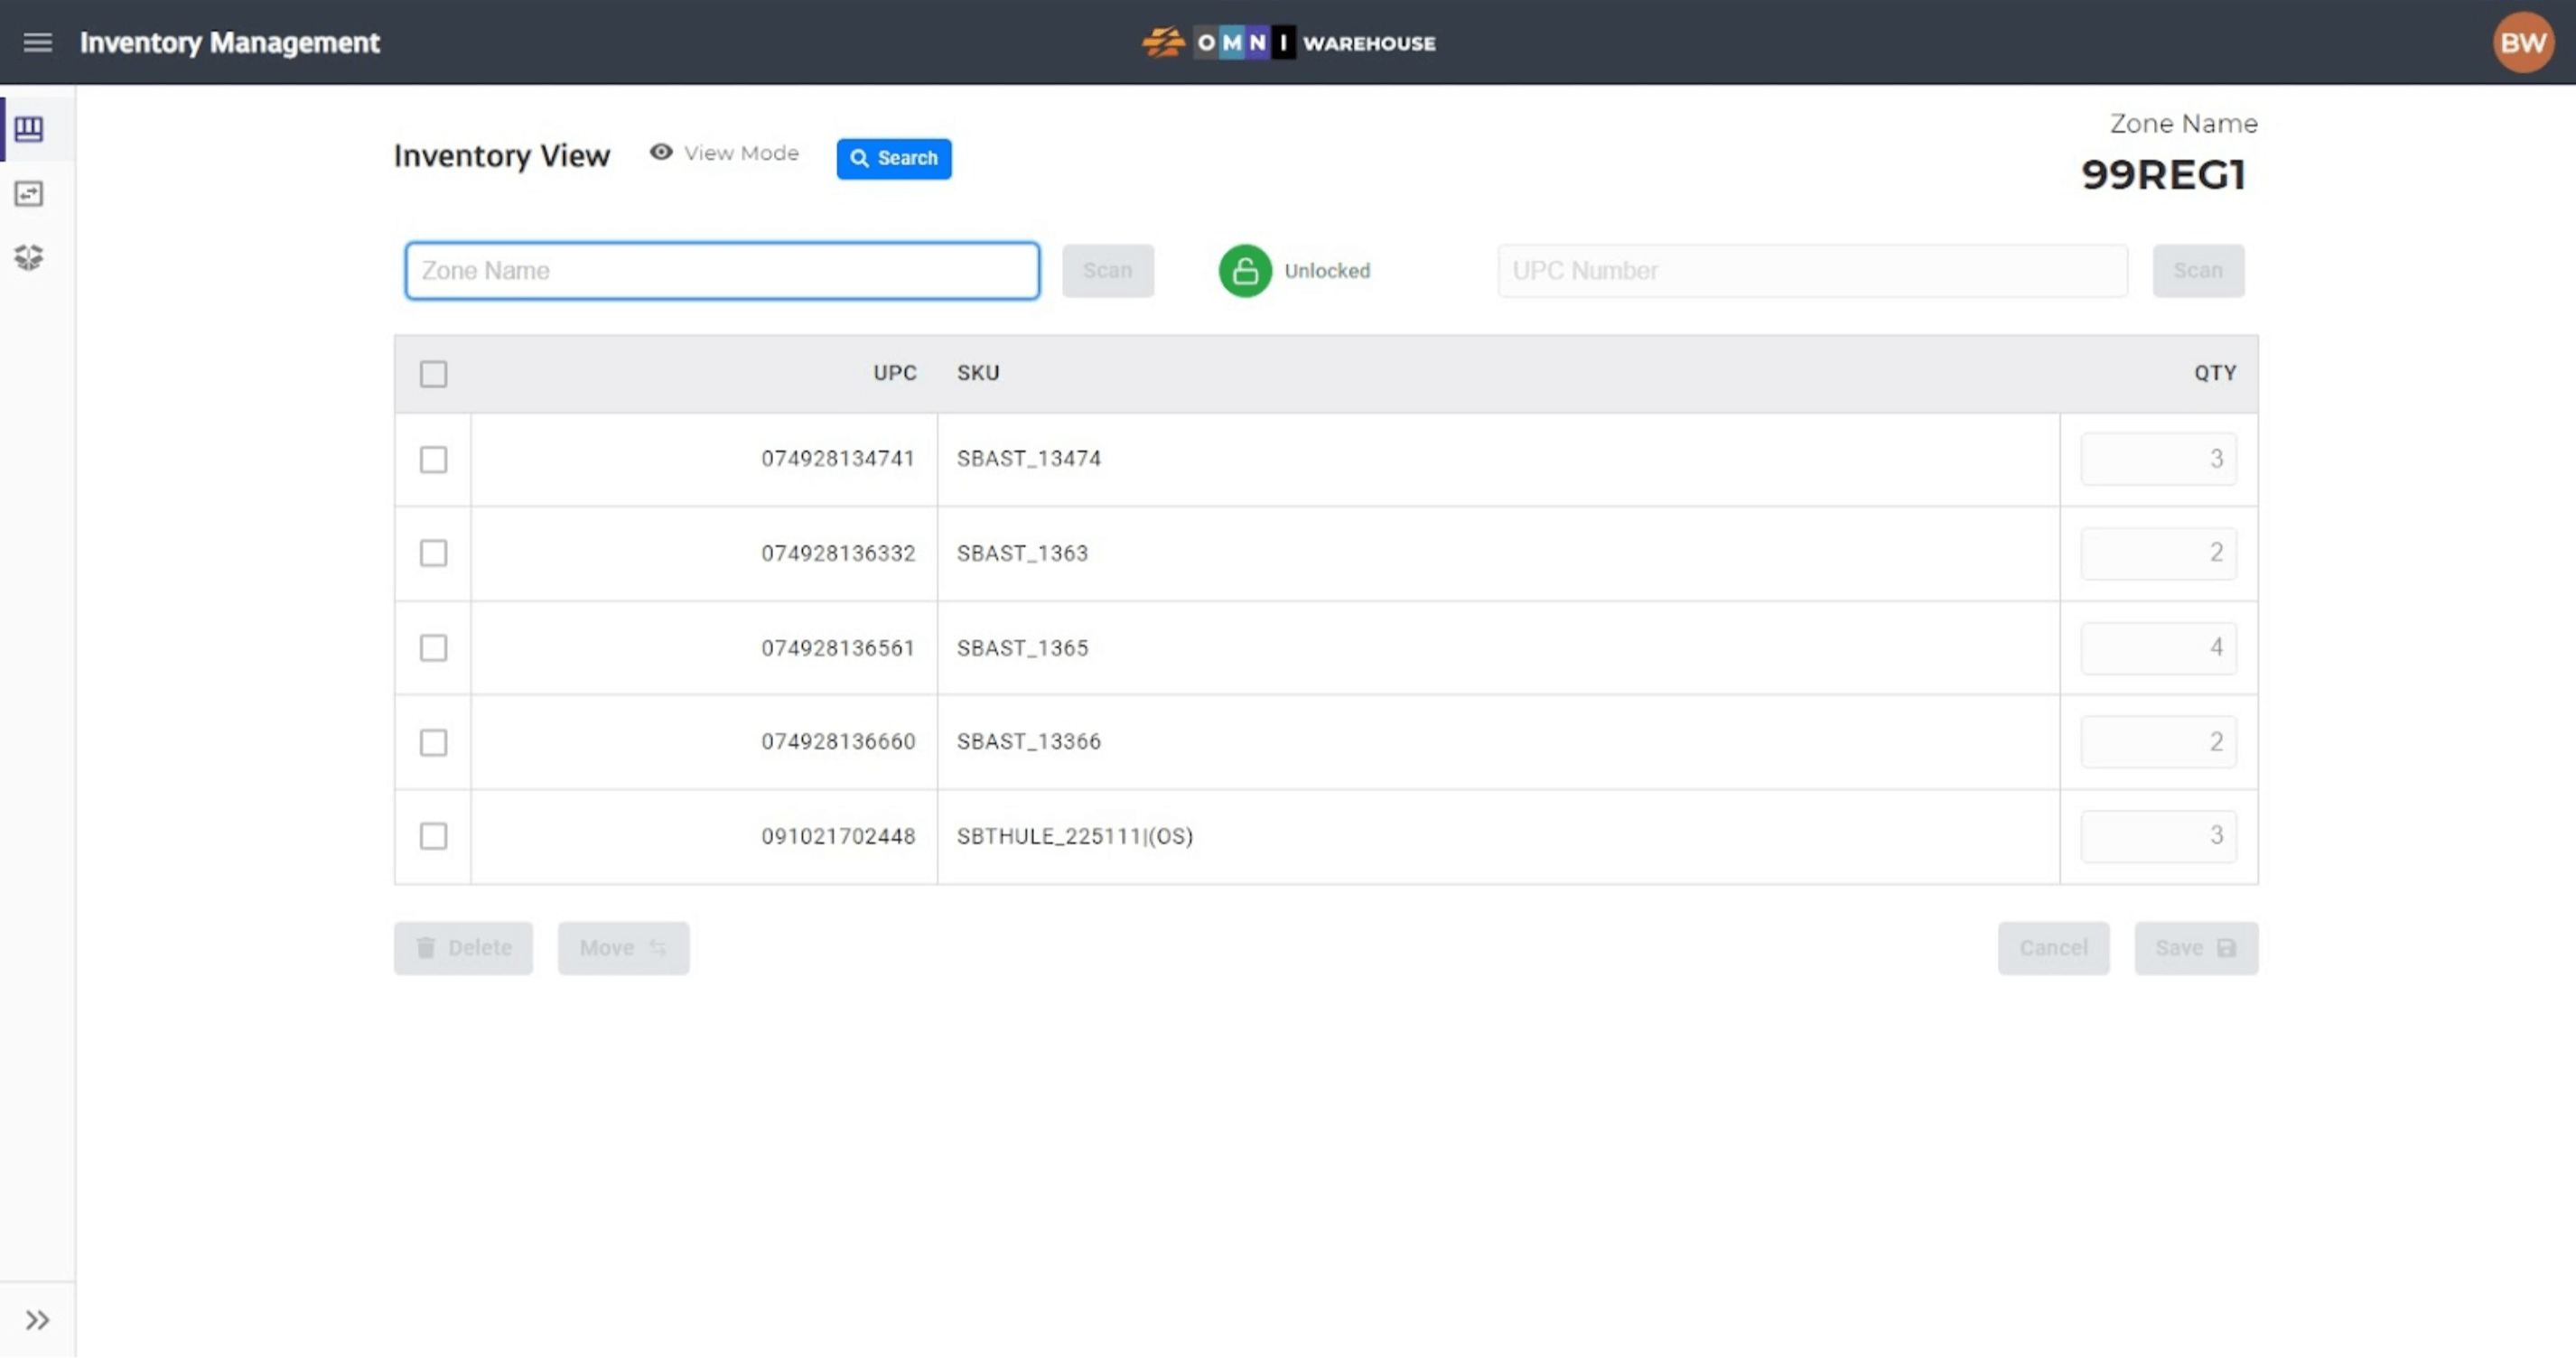
- As shown above, the default status of a zone is “View Mode” with an unlocked Zone Lock. As the name implies, no changes can be made by the user while in View Mode. A green lock button indicates that the zone is unlocked and a red lock button indicates that the zone is locked. Clicking on a lock button will change the status to the opposite state (i.e. an unlocked zone will become locked and a locked zone will become unlocked.) The zone status also changes from “View Mode” to “Edit Mode” when a Zone Lock is engaged, as shown below.
- Note: In addition to the green/red designation of the Zone Lock button, the padlock on the button also indicates the current status of the lock, with the text indicating whether the zone is unlocked or locked by a specific user.
4) Inventory Edits
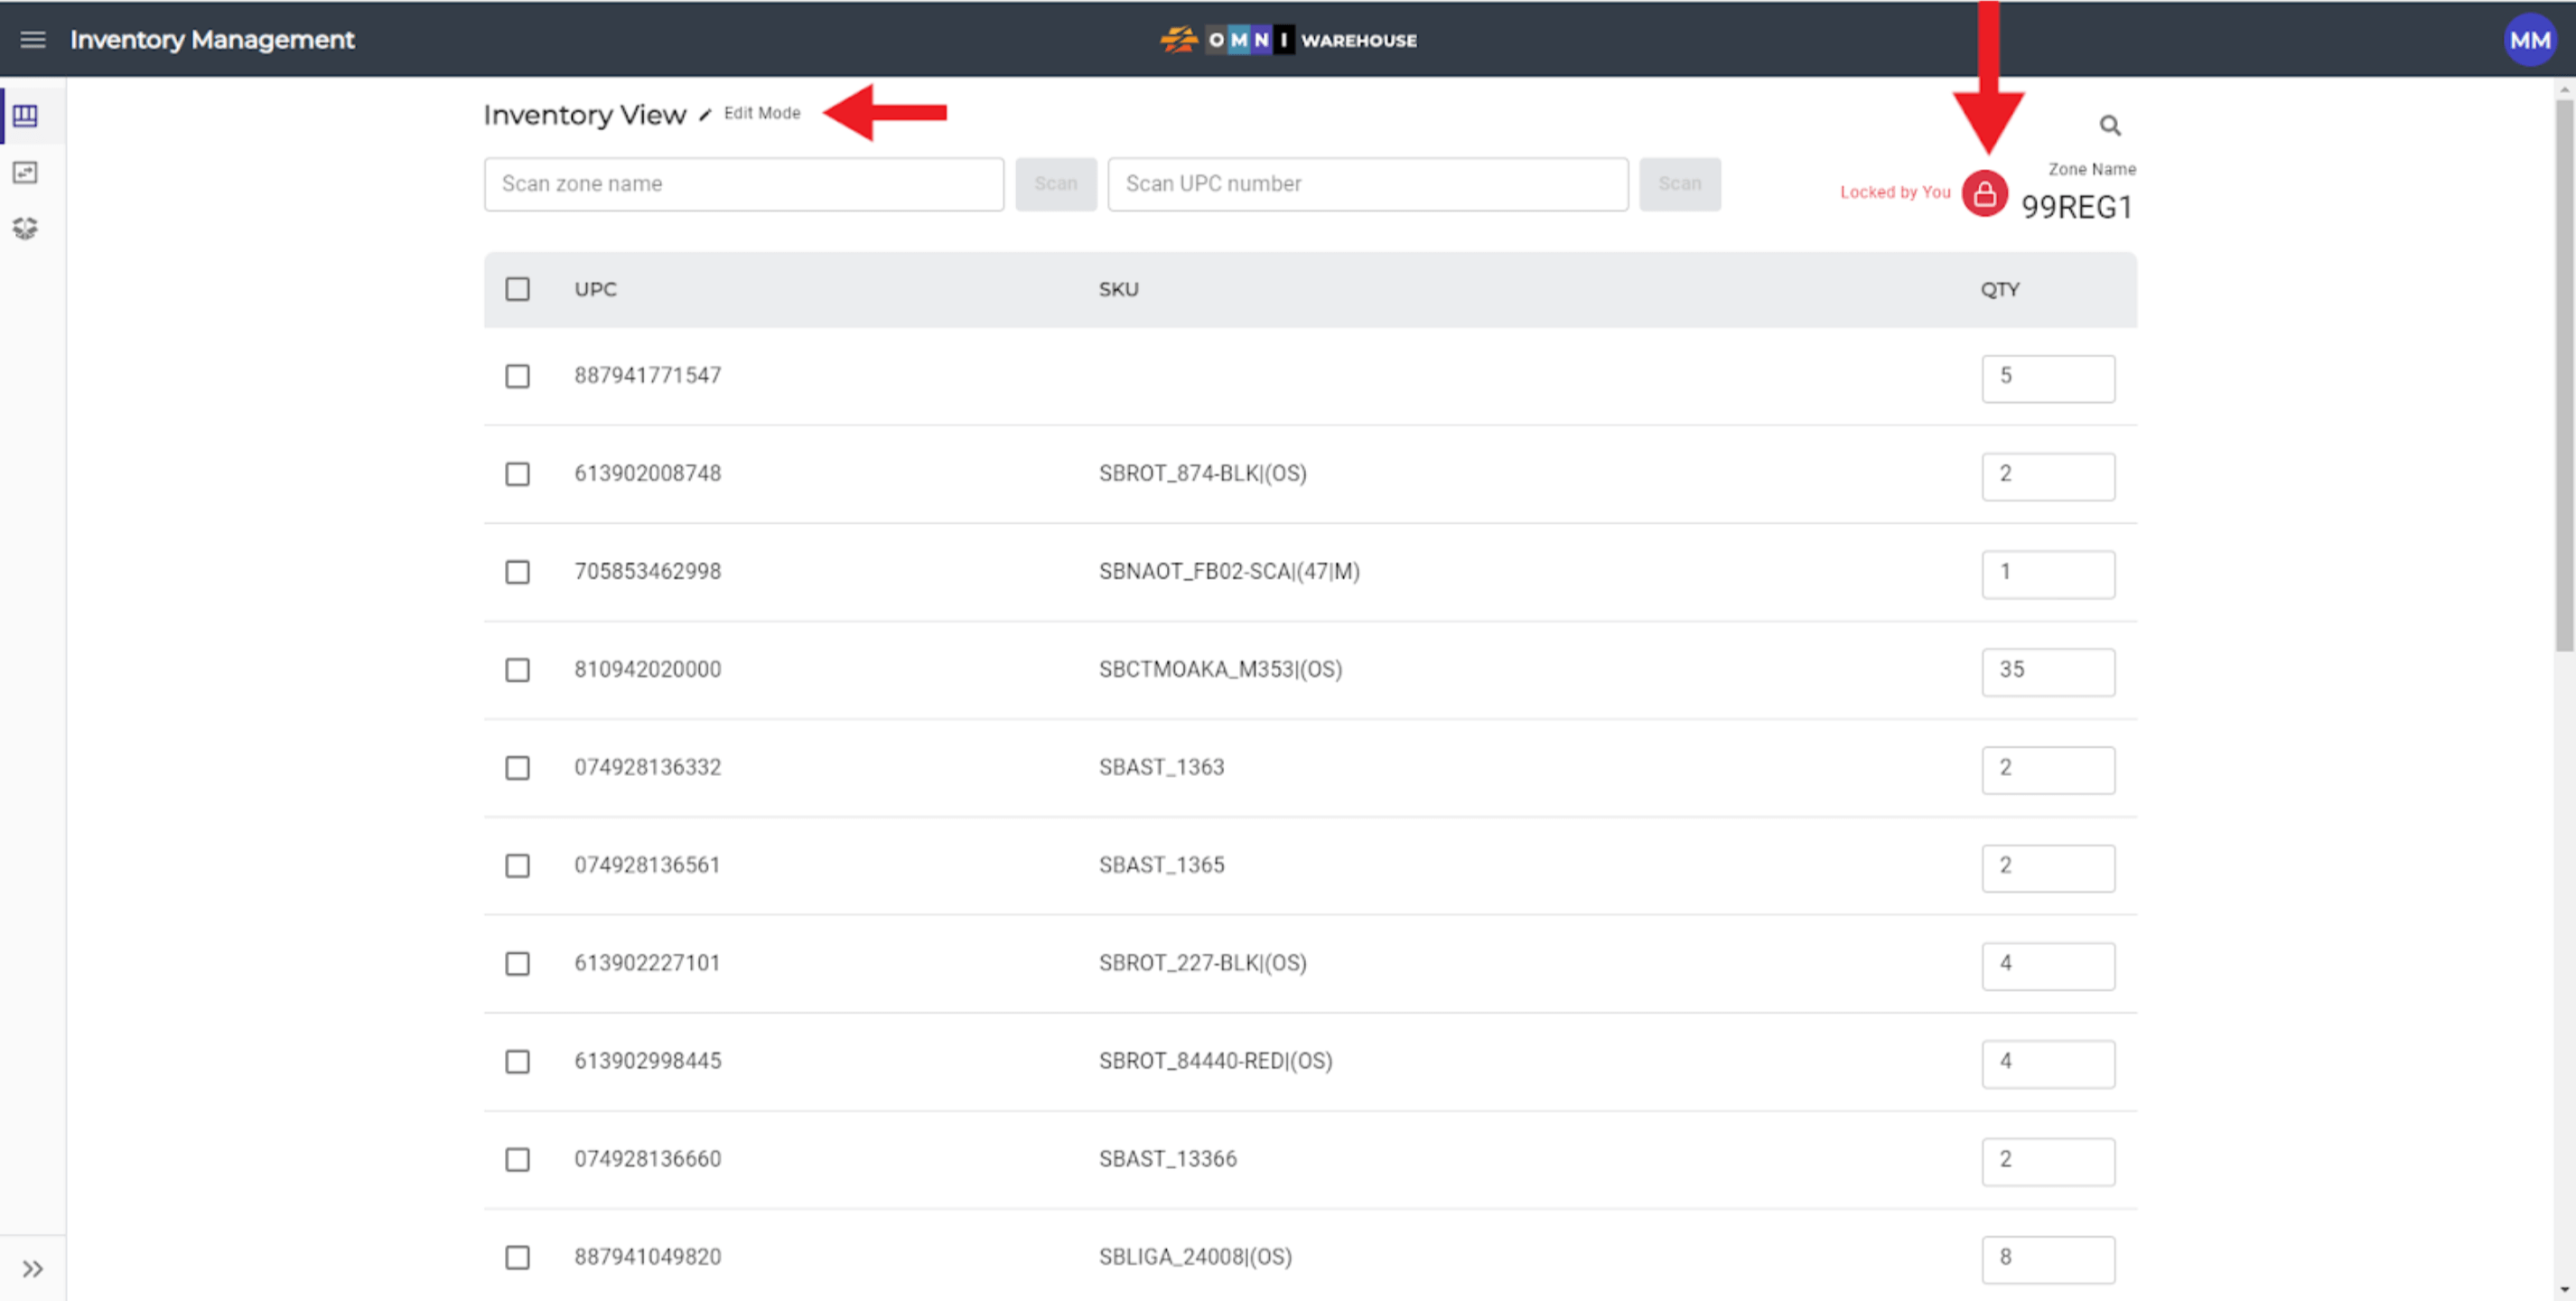
- To edit the inventory in a location, click on the Zone Lock button to lock the zone. The lock button will turn red and will display a locked padlock. When the Zone Lock is engaged, the zone status changes from “View mode” to “Edit Mode” allowing the user to make edits to an item quantity (QTY).
- In a locked zone, edits can be made to an item quantity (QTY) by either scanning a UPC into the UPC Number field or by manually adjusting the QTY field of an item. Scanned items are saved to the zone automatically.
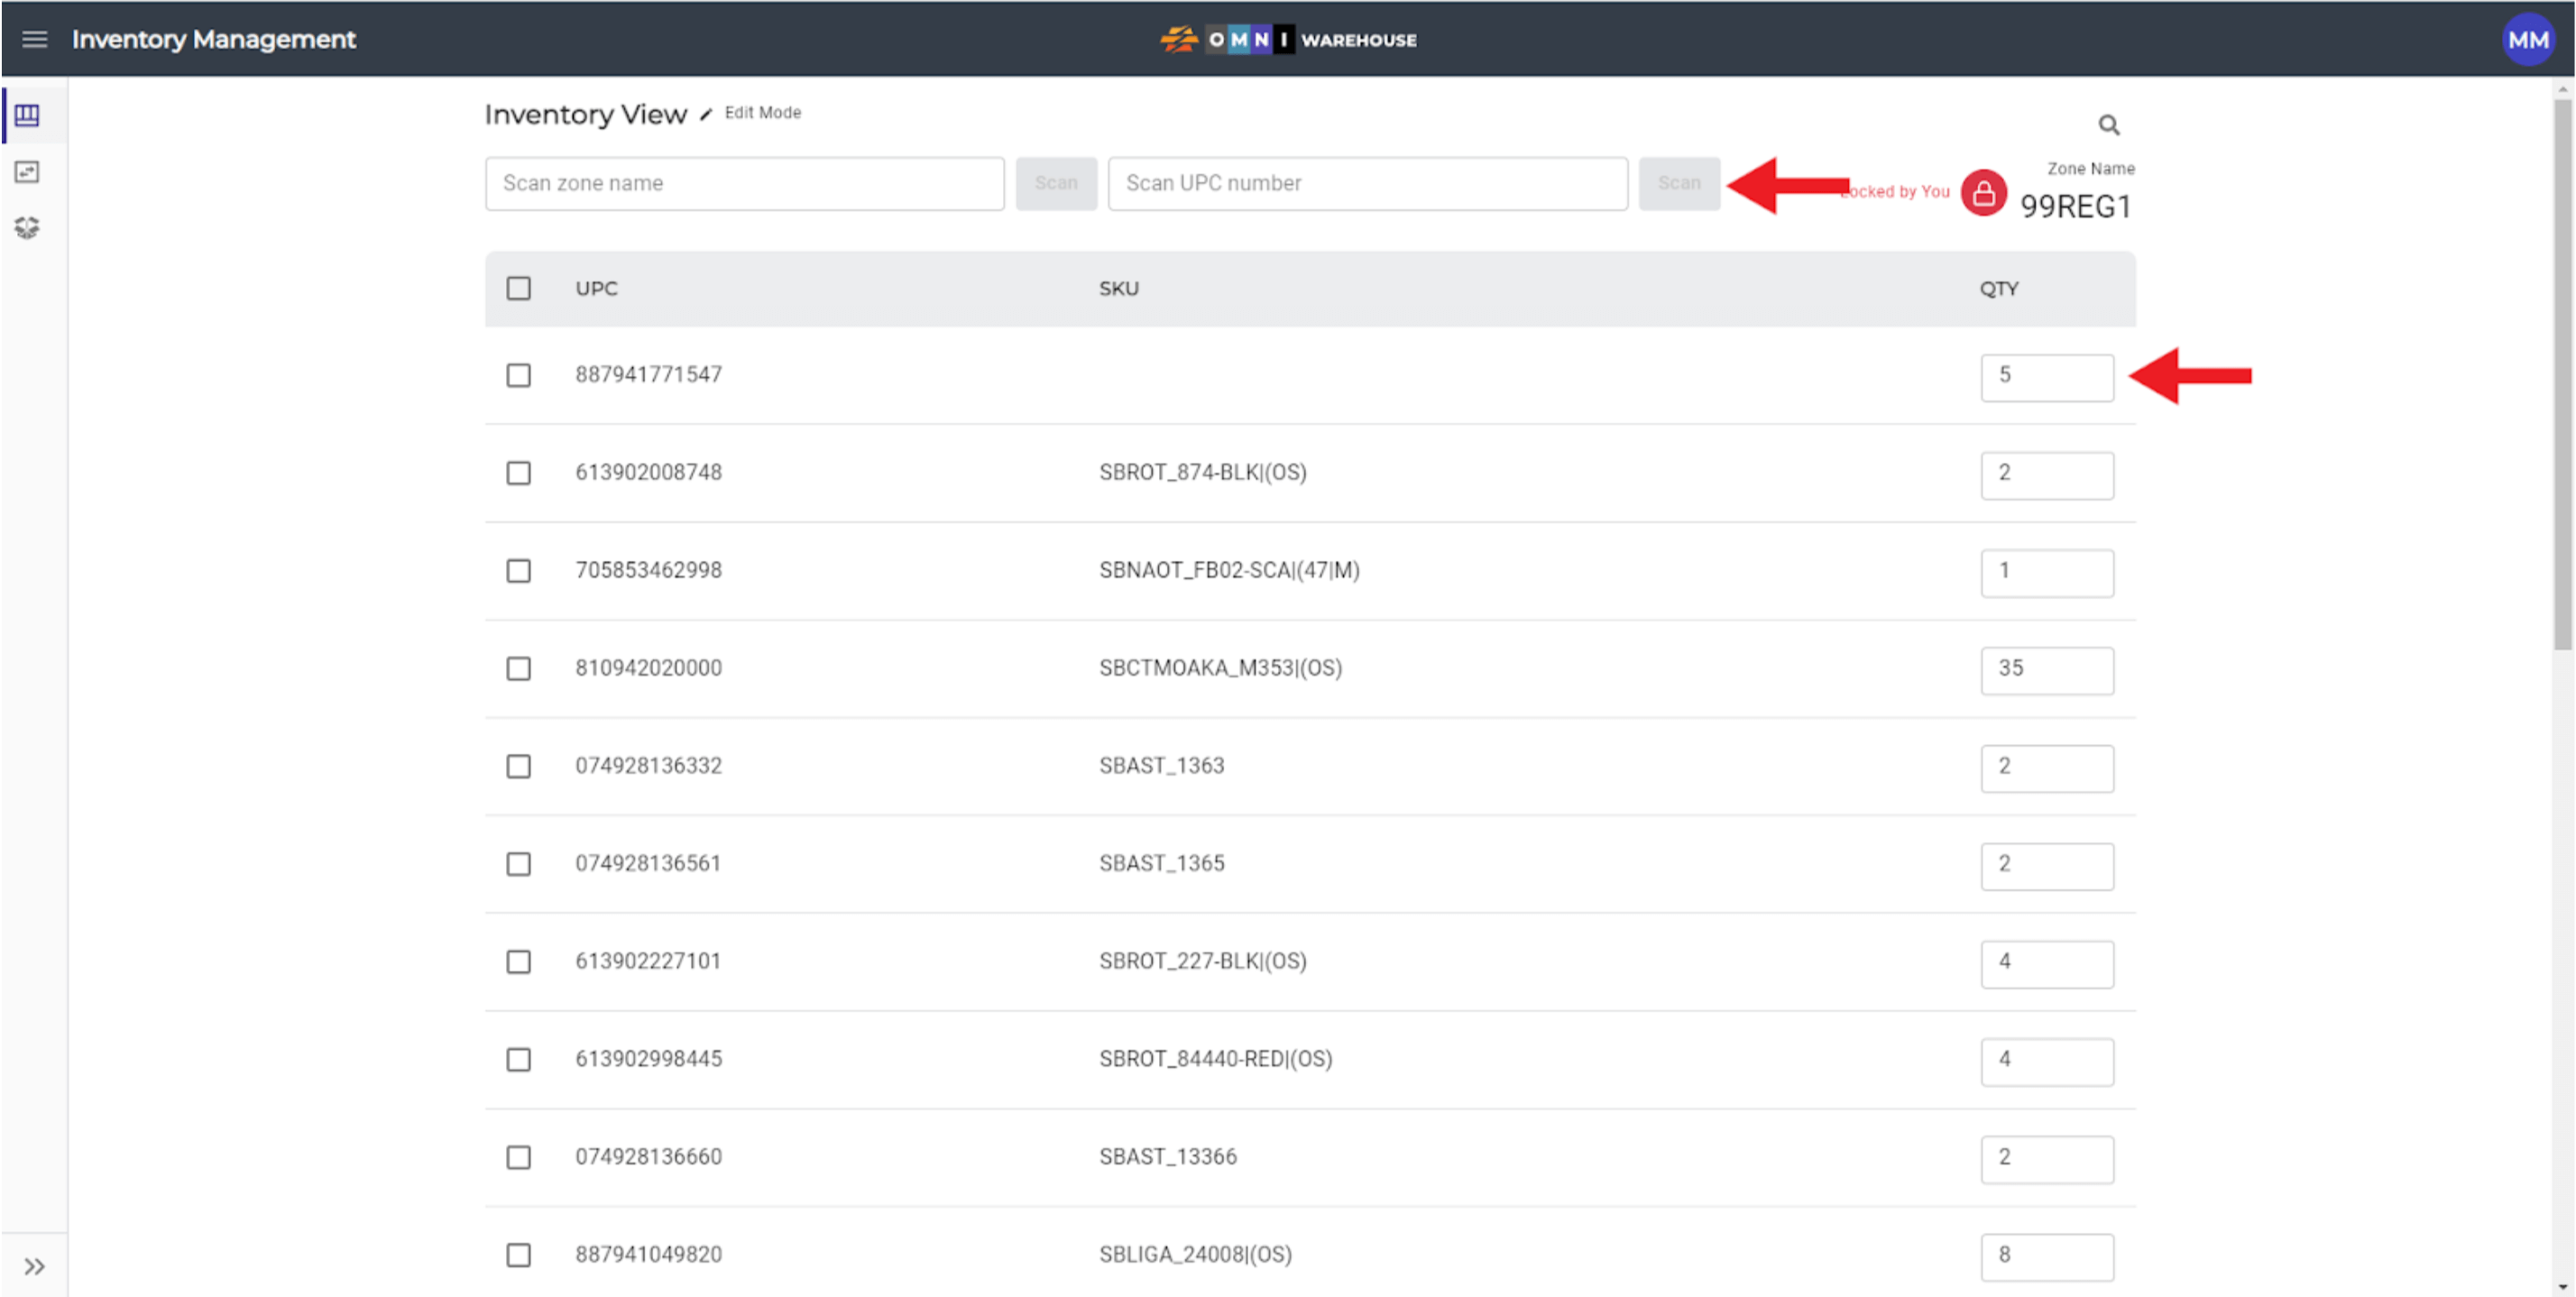
- To manually adjust the QTY field, click on the field and type the correct amount. To confirm manual edits click the Save icon or click Cancel to disregard edits.
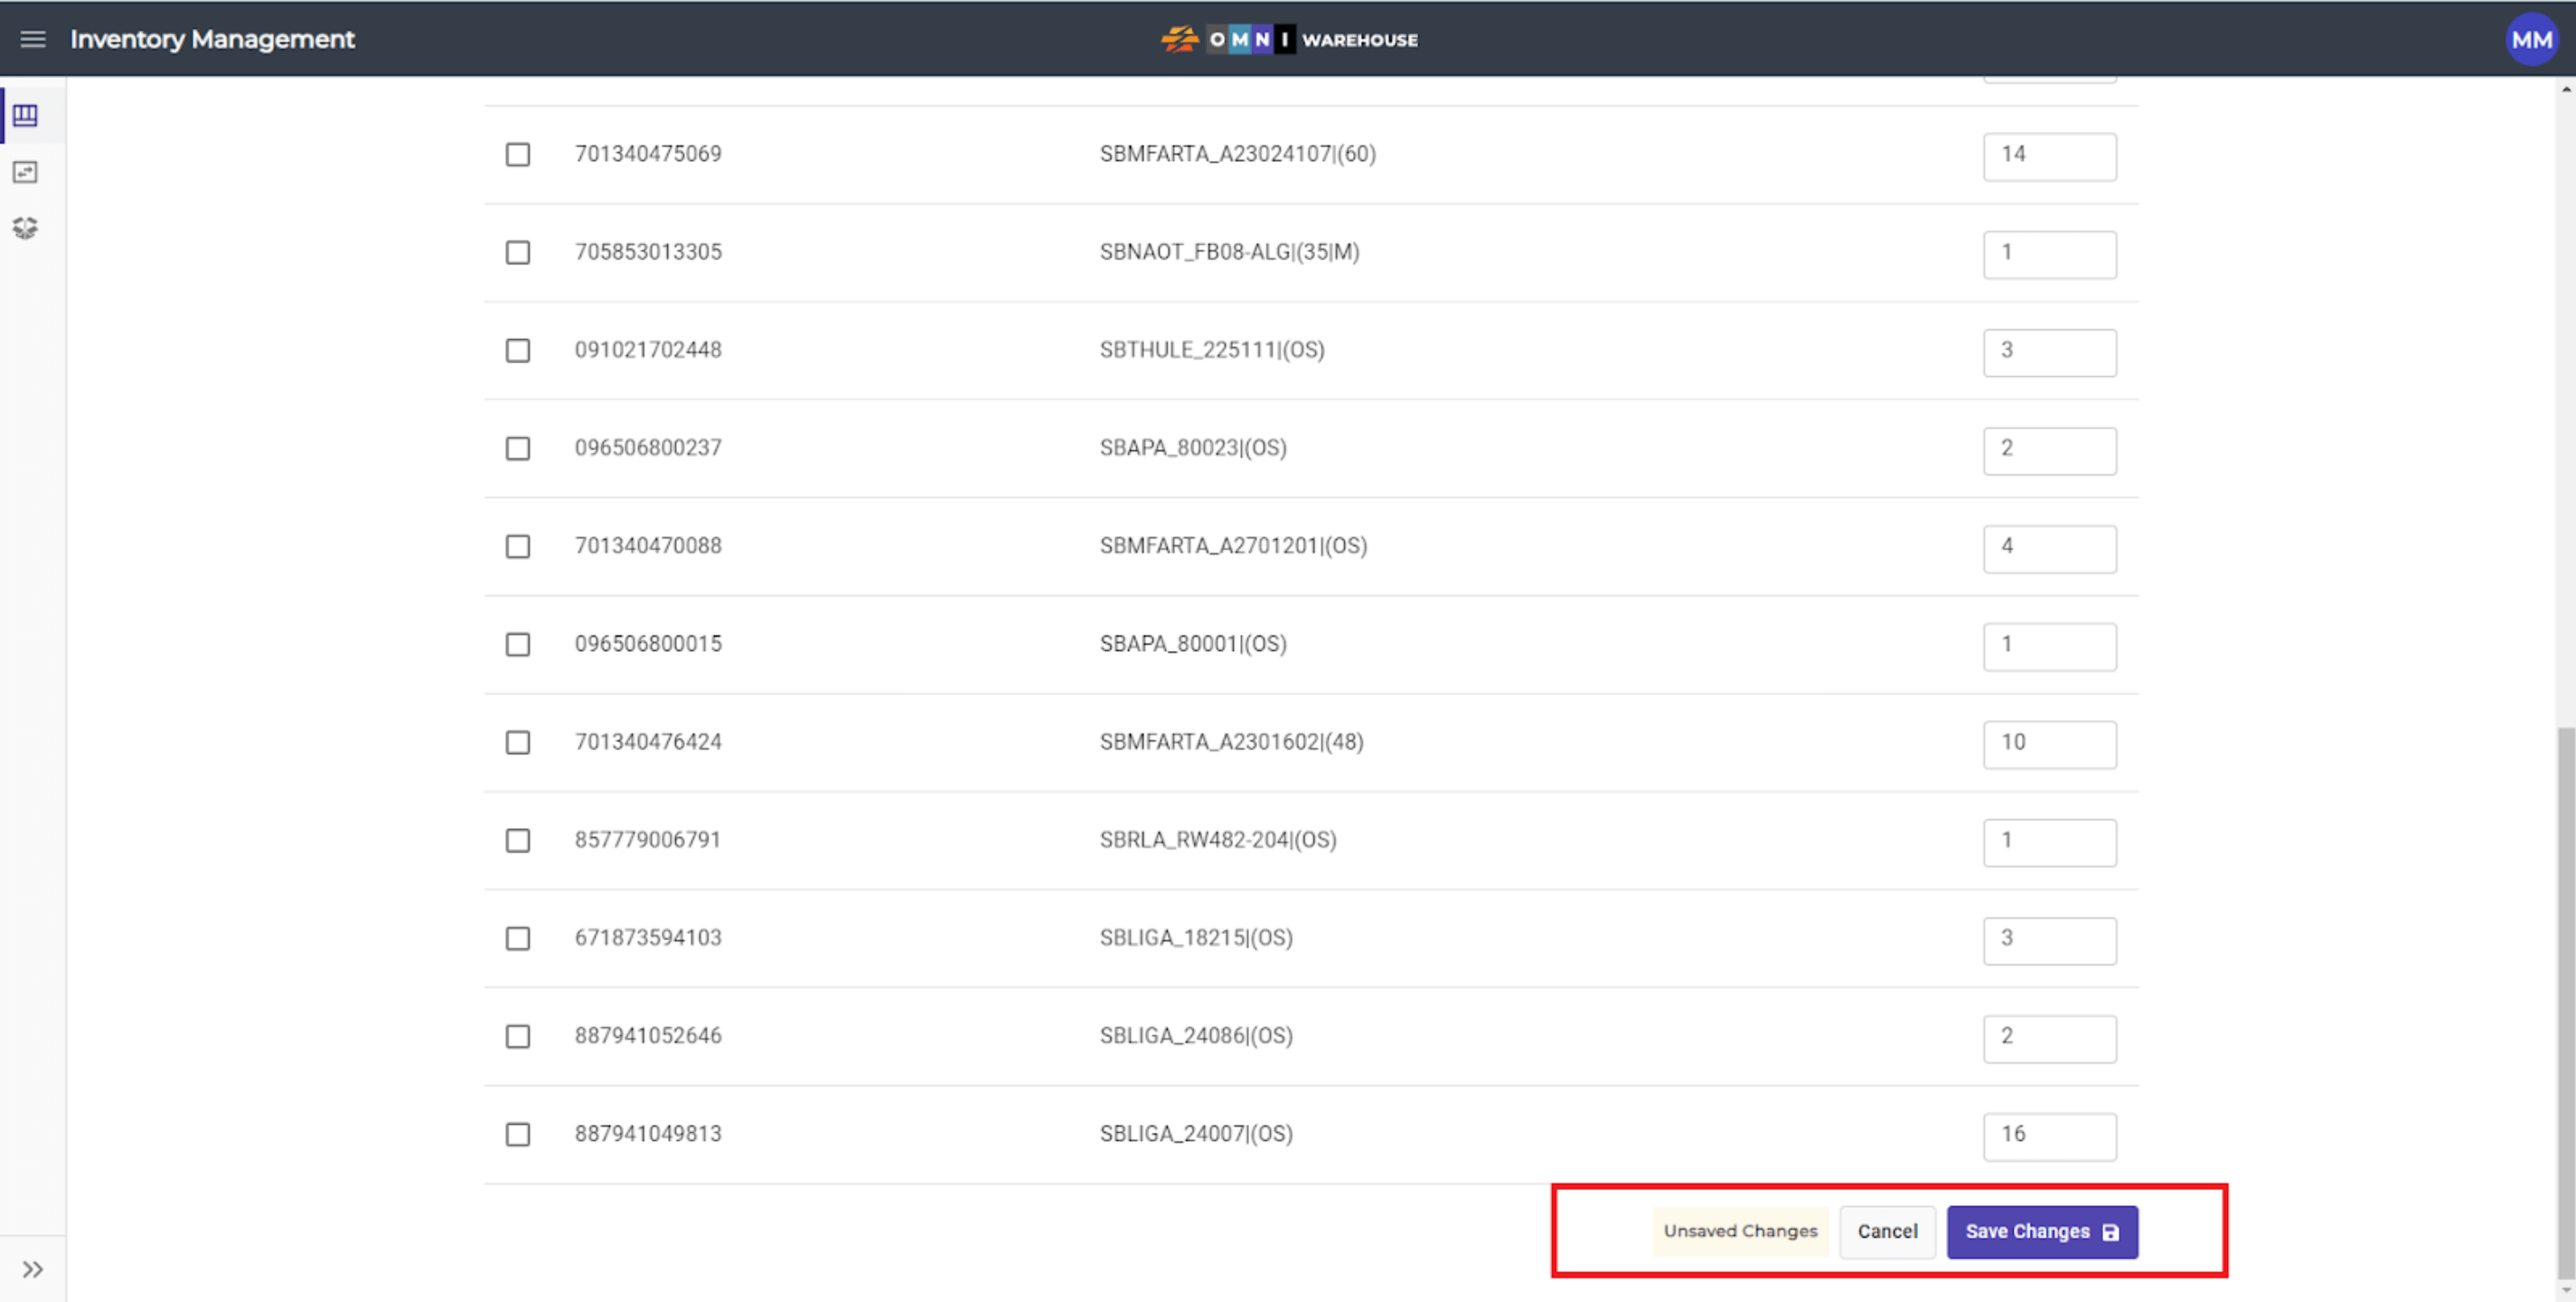
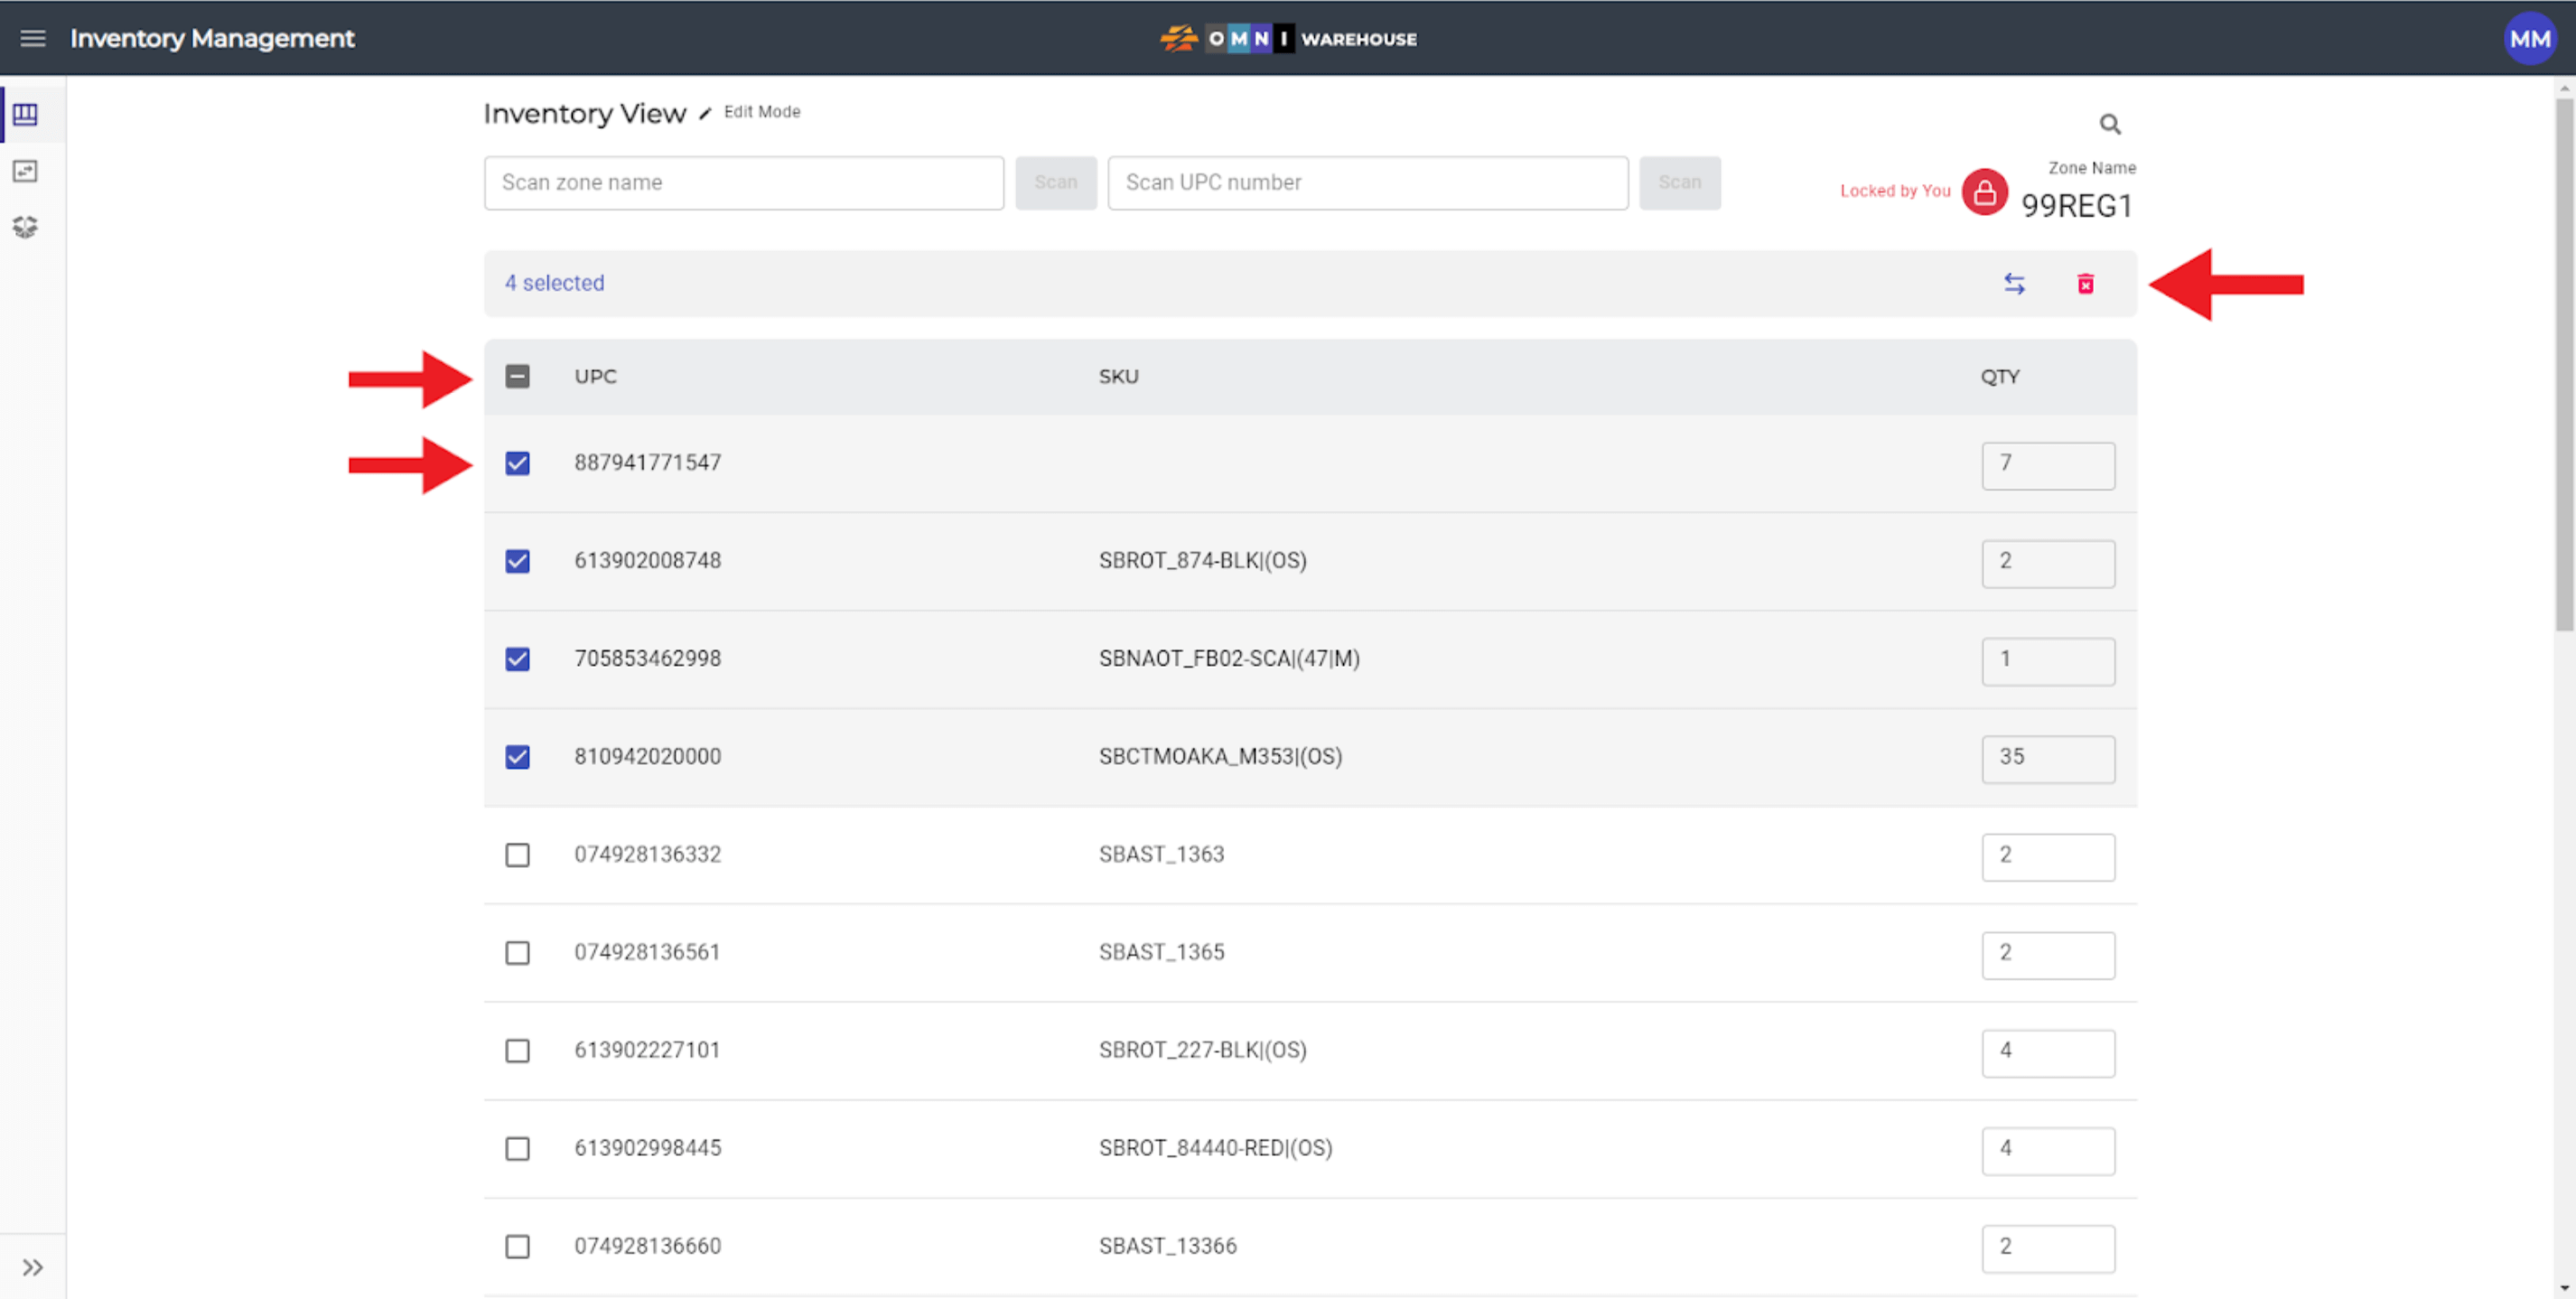
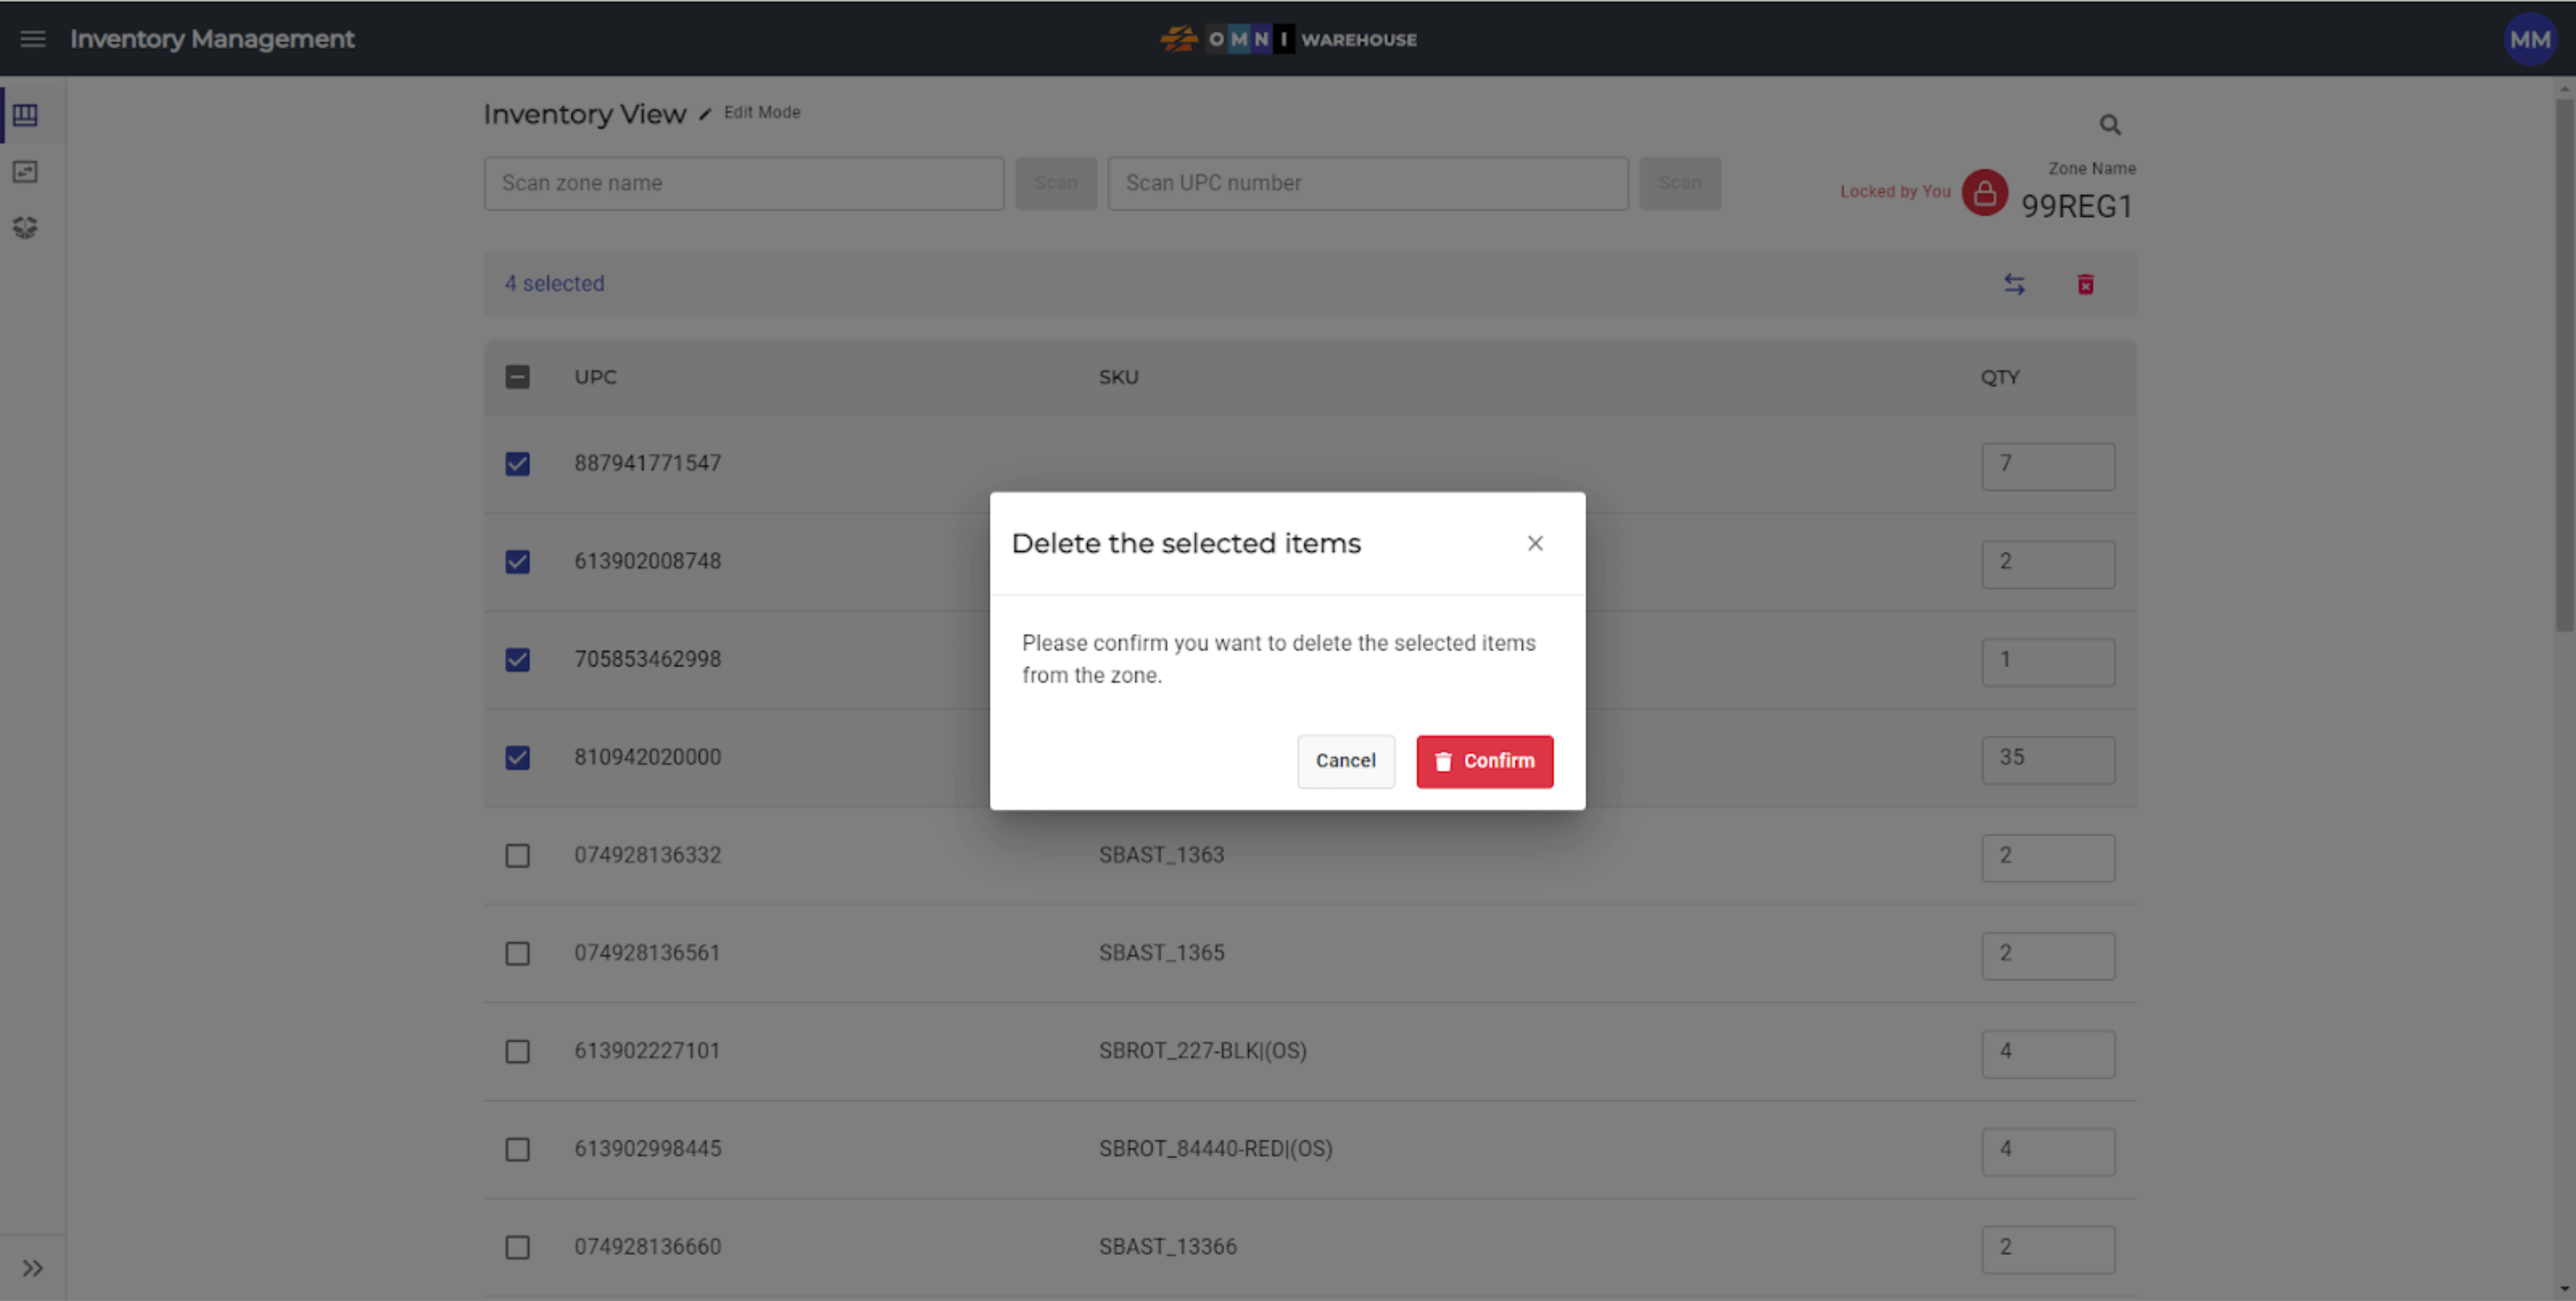
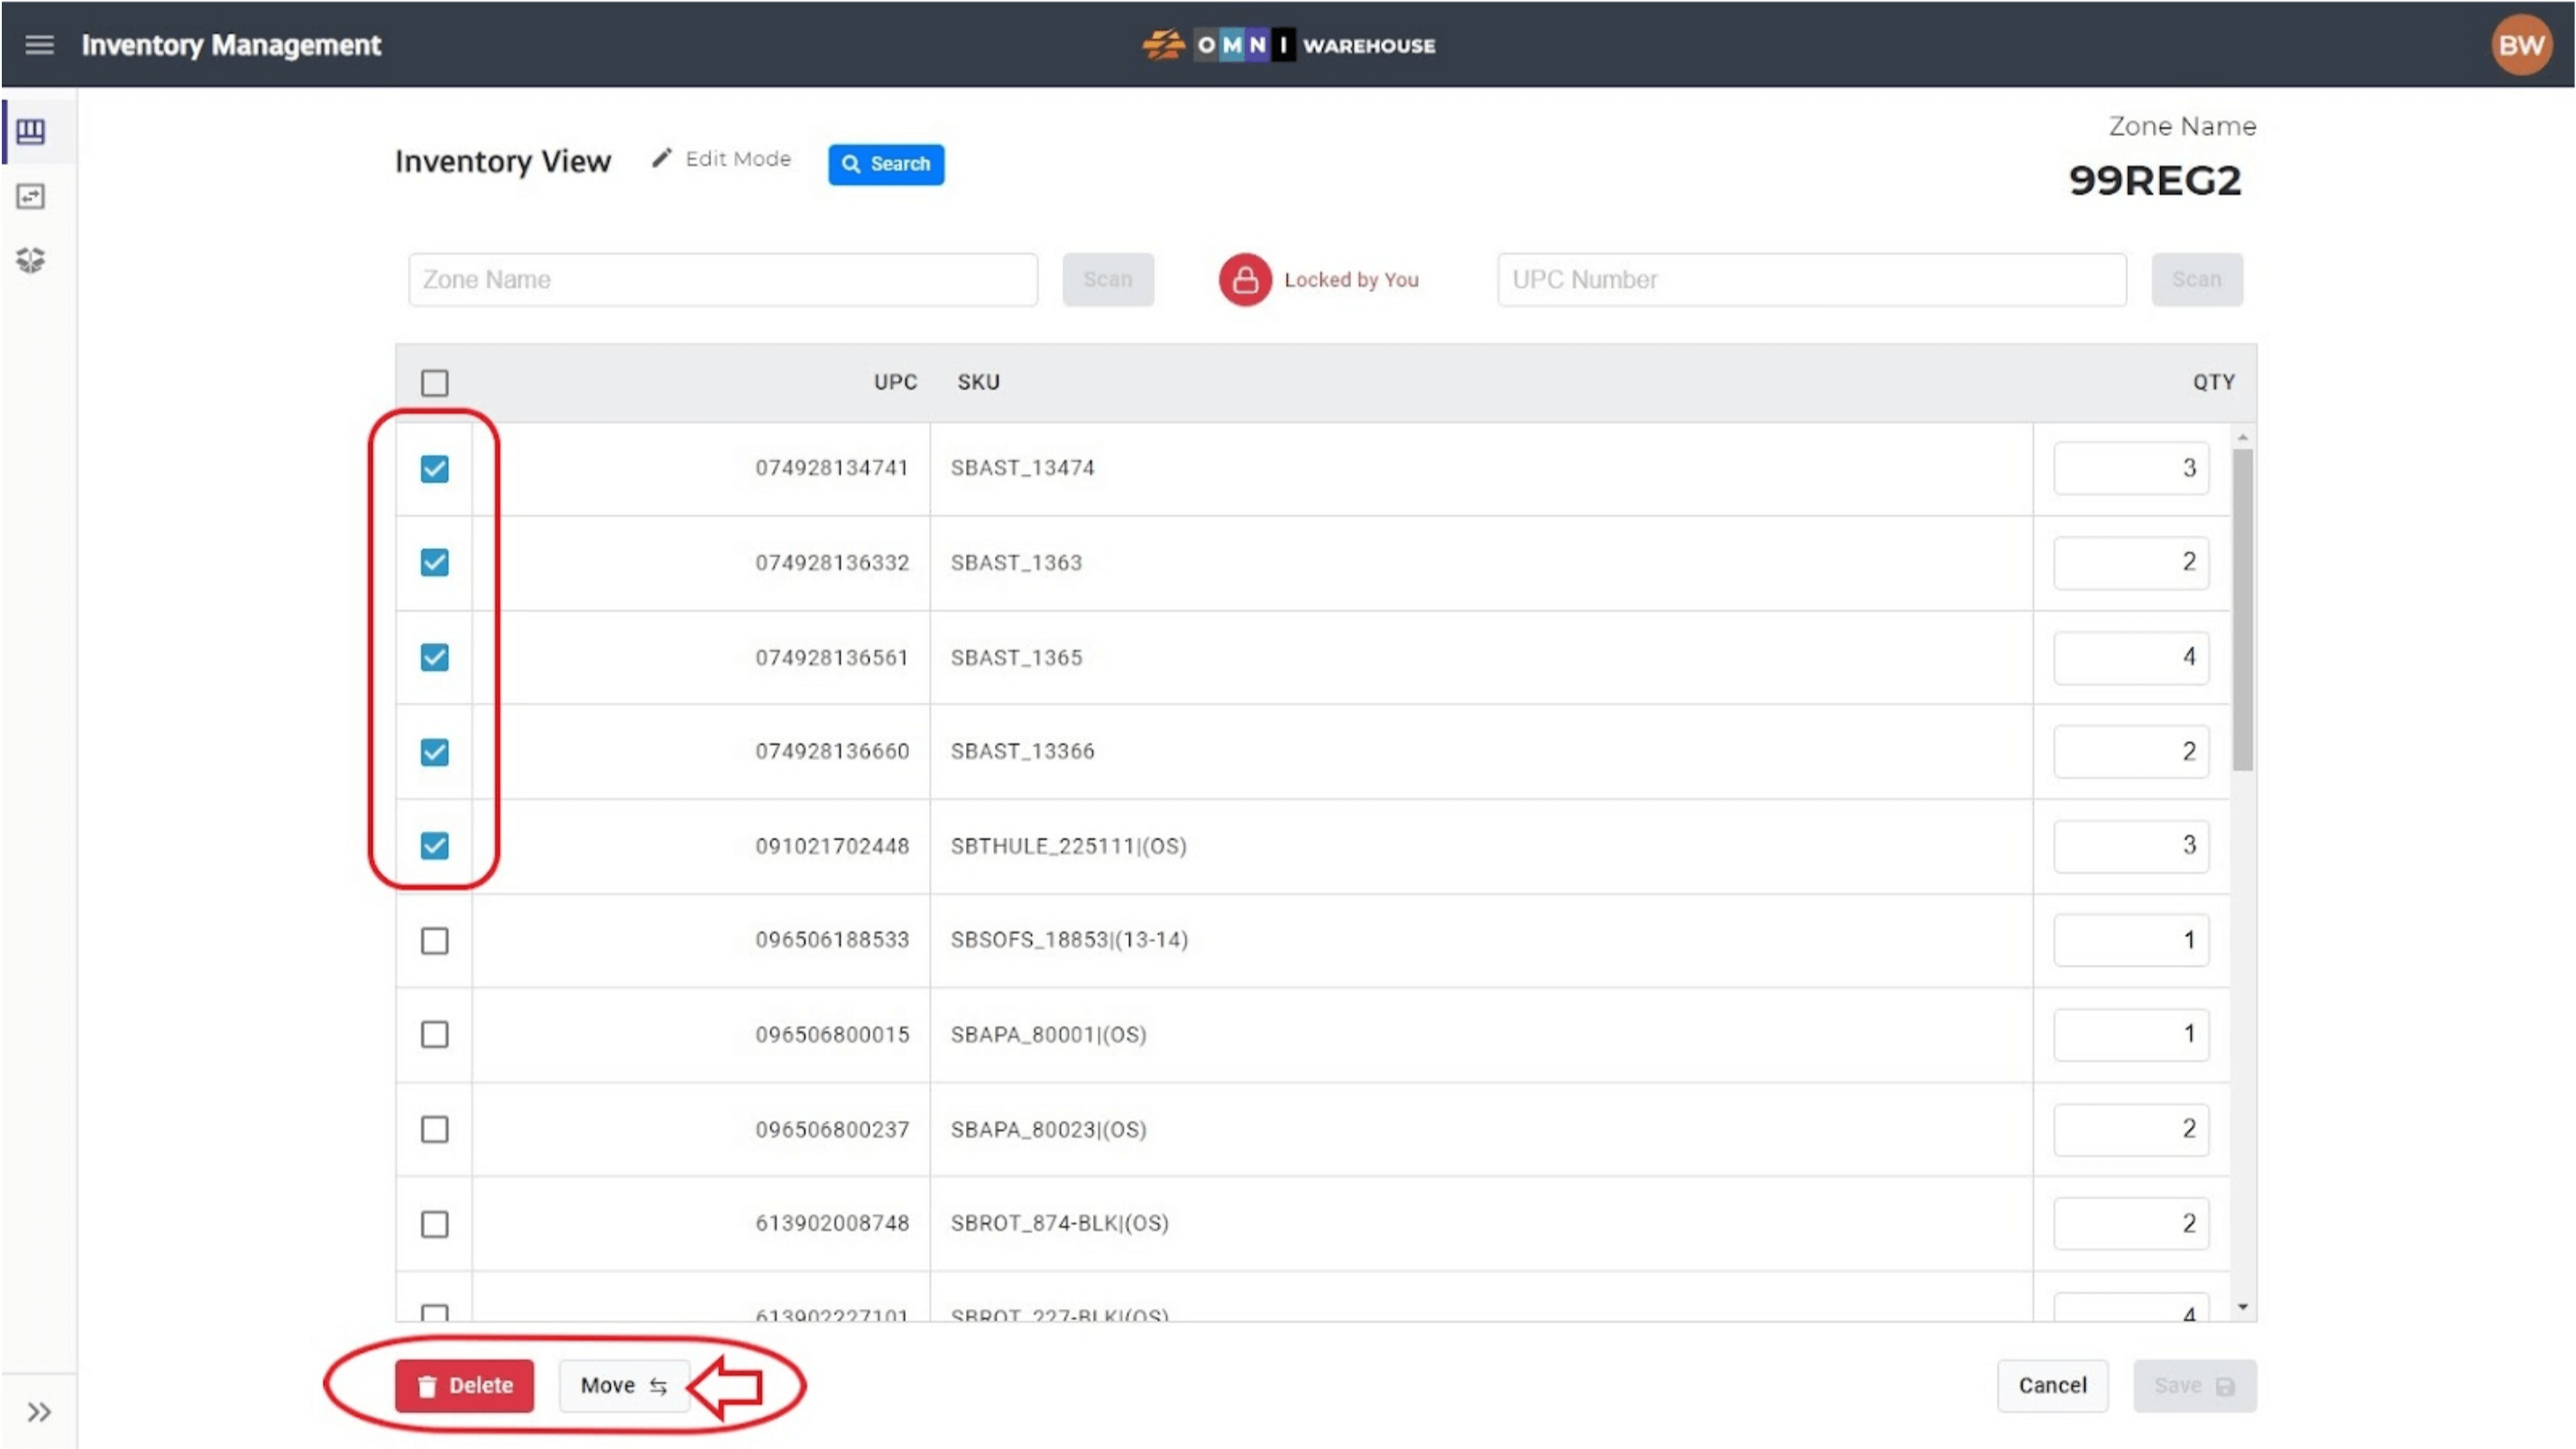
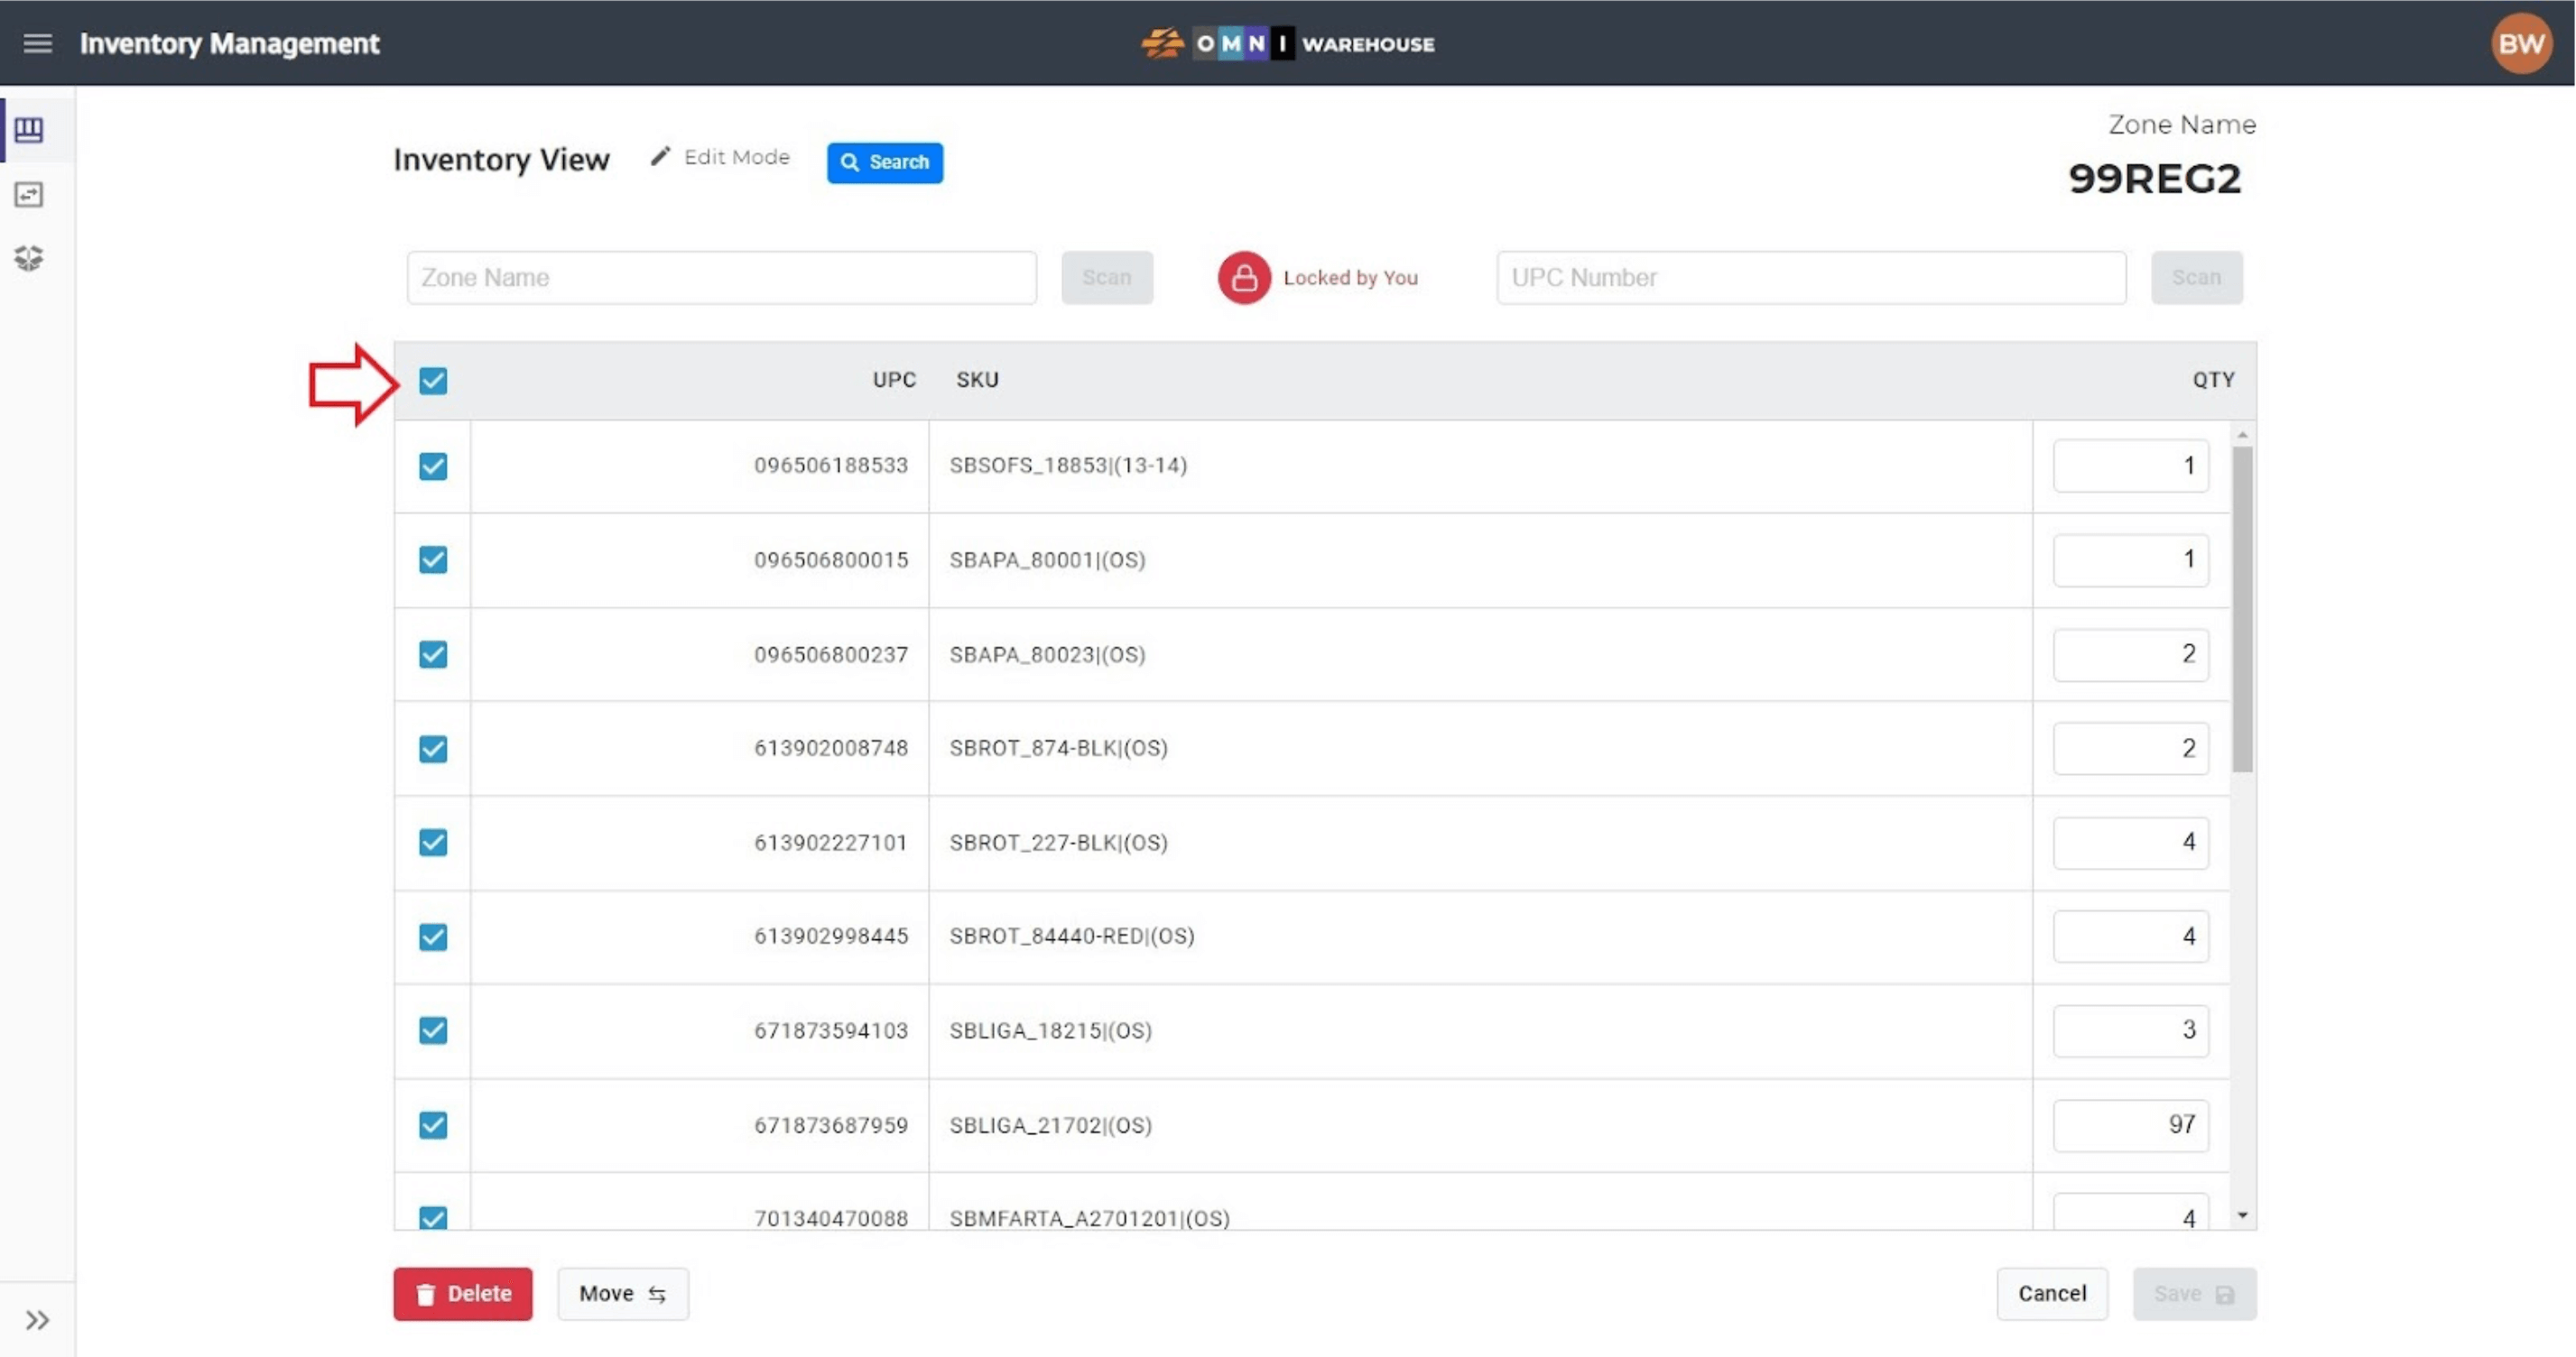
- To remove ALL quantities of an item from a zone the user can enter a 0 into the QTY field. Alternatively, the user can select the checkbox to the left of the item and then click the Delete button to remove the selected items from the zone. To remove ALL items from a zone, select ALL checkboxes and click the Delete button.
- A separate dialog box will pop-up to confirm or cancel the delete.
Note: This action cannot be undone! Proceed with caution.
- After all edits are completed, click the Zone Lock button to unlock the zone. The button will turn green and the zone will display an unlocked padlock.
5) Renaming a Zone
- To rename a zone, click on the Zone Lock button to lock the zone and change the zone status to “Edit Mode”.

- Click on the Zone Name on the upper right-hand side to rename the zone.
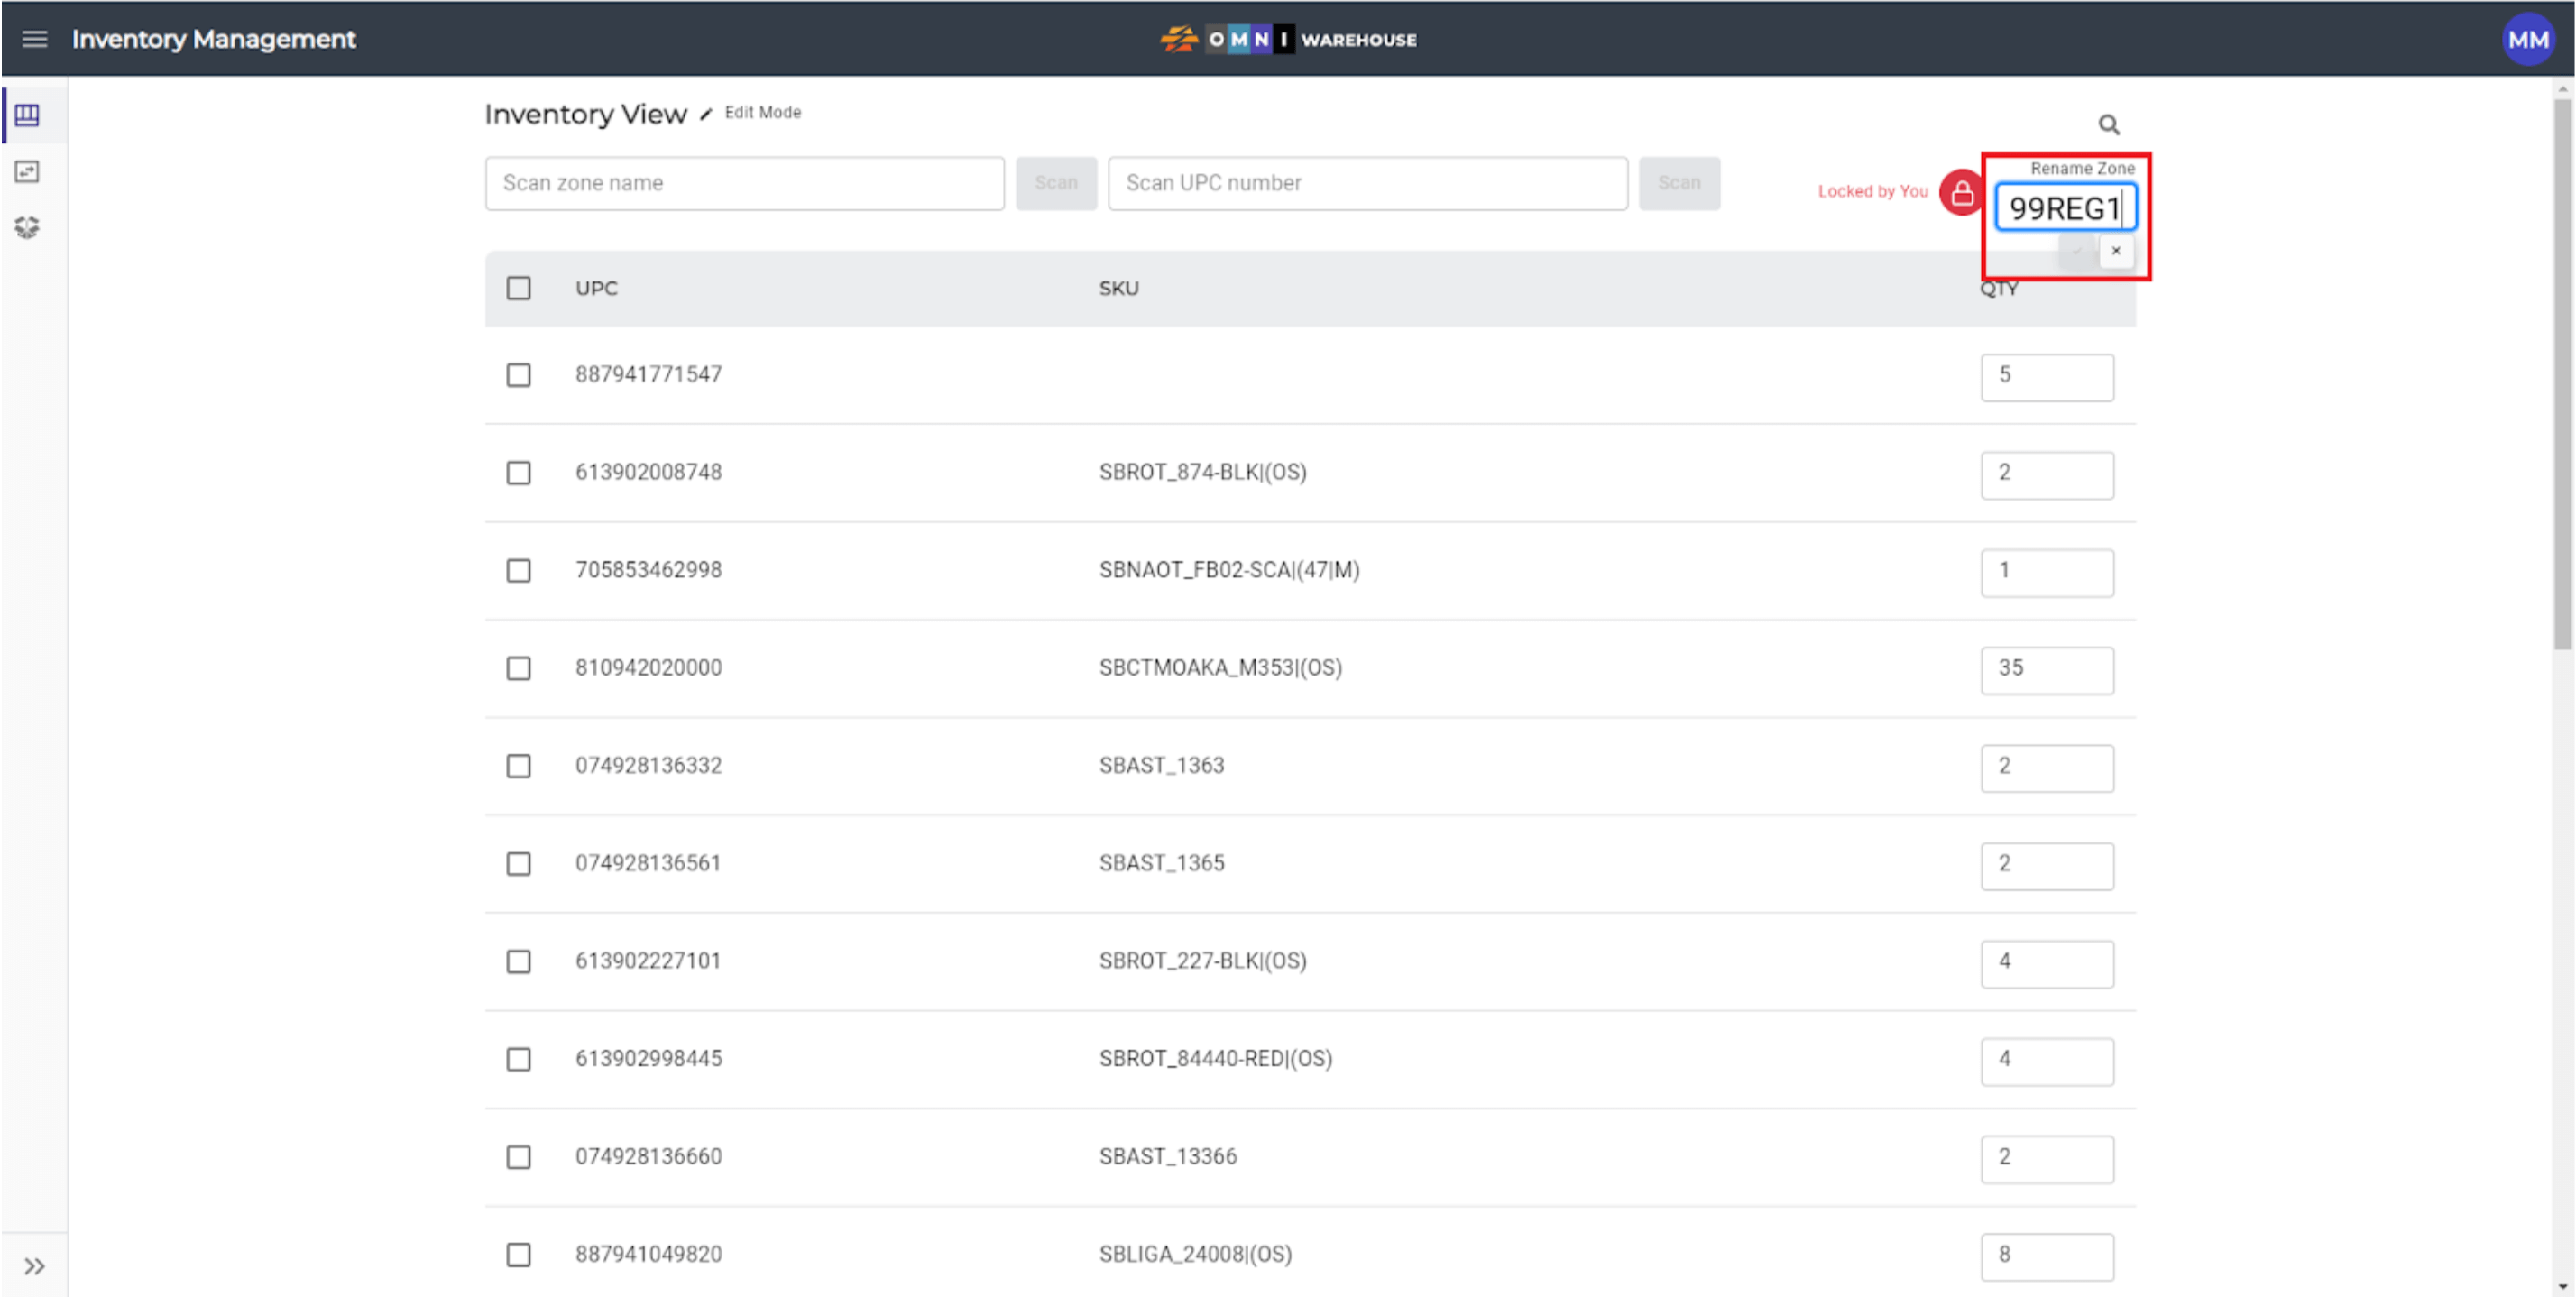
- Type the new Zone name into the field and click the ✔ or to cancel the rename, click the X. In the example below Zone 99REG1 is being renamed to 99REG2. Note: Zone names MUST follow a Number-Alpha-Number format.
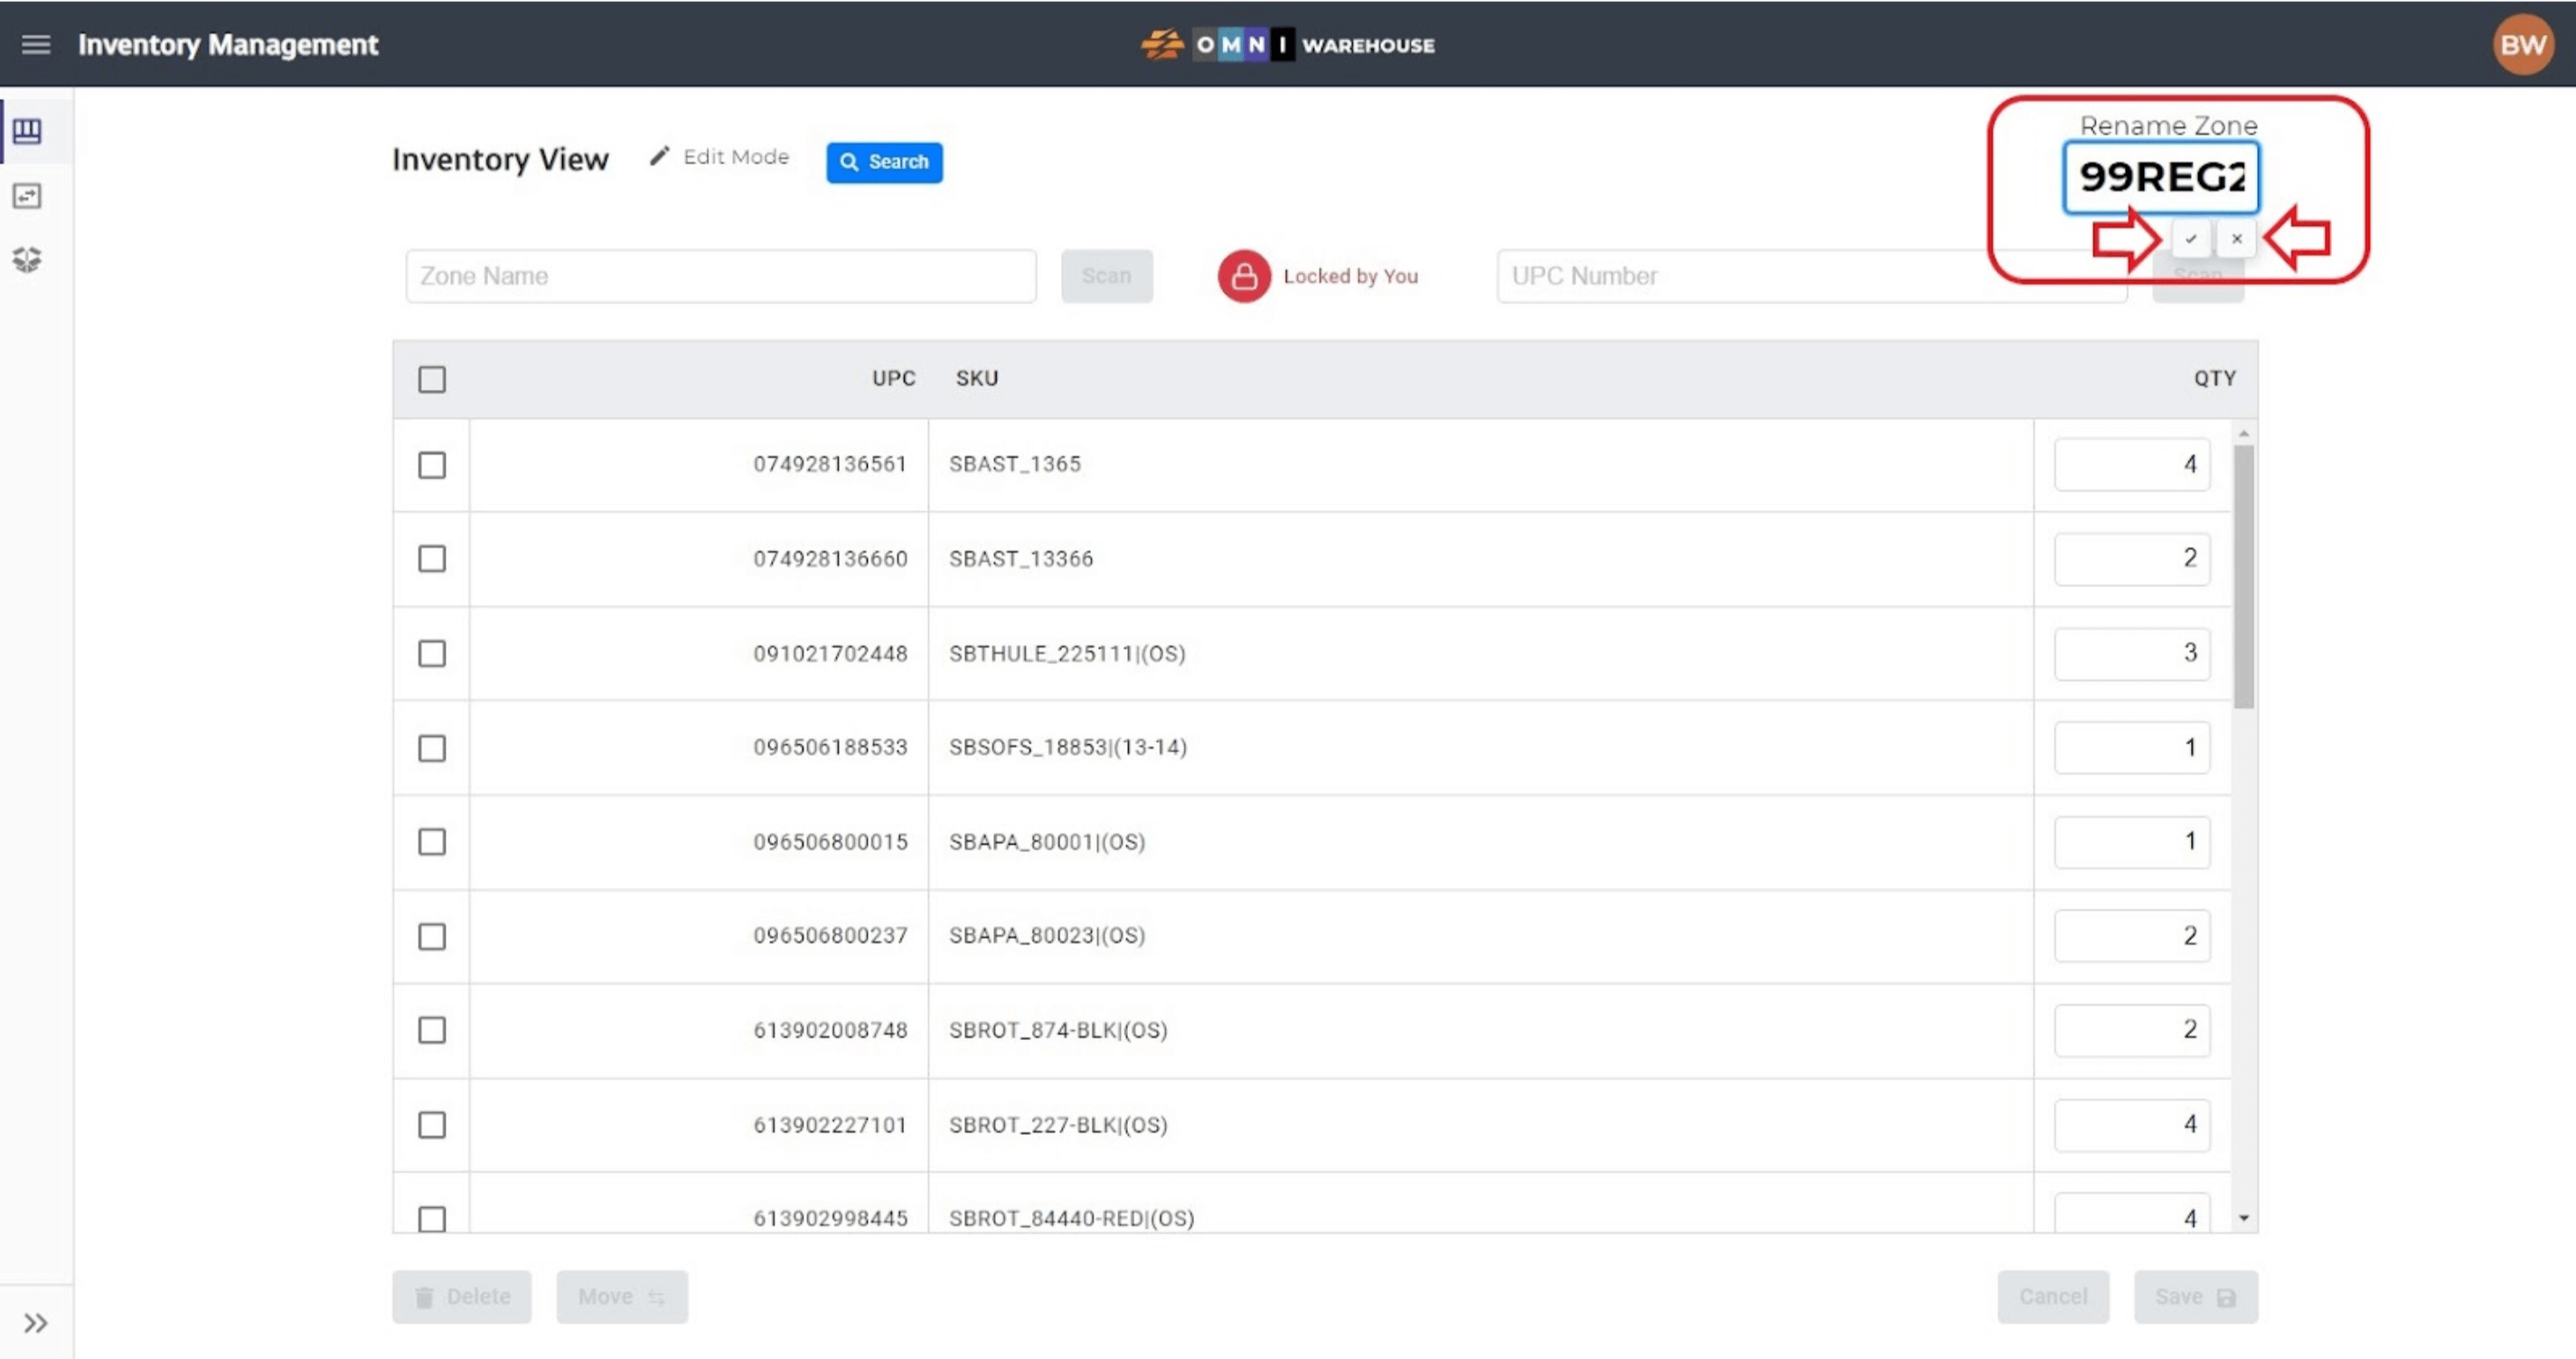
- After clicking the ✔, the current zone will no longer show any items as those items are now in the new location. Unlock the zone by clicking the red Zone Lock button.

- Scan or type the new zone name into the Zone Name field. The new zone will display all of the items that were in the original location. In the example below, 99REG1 has been renamed to 99REG2.
- Note: Renaming a zone containing inventory with the name of an existing zone that contains other inventory will merge the two inventory sets into one. For example, when renaming 99REG1 to 99REG2, the inventory previously in 99REG1 will merge with the inventory that is in 99REG2; all inventory from both zones will now display as being in 99REG2. In other words, renaming a zone is the same as moving all inventory from one zone into another zone.
6) Moving Items
- Select the Zone to move items from and click the Zone Lock button to lock the zone and change the zone status to “Edit Mode”.
- Select the items to be moved and click the Move button located under the Zone Name to the left of the Delete button. Note: This function only allows ALL quantities of a selected item to be moved from one zone to another. To move less than all of an item’s quantity, select the Inventory Move tool from the Inventory Management Sidebar Menu. Instructions for that tool can be found later on in this manual. In the example below the top 5 items have been selected.
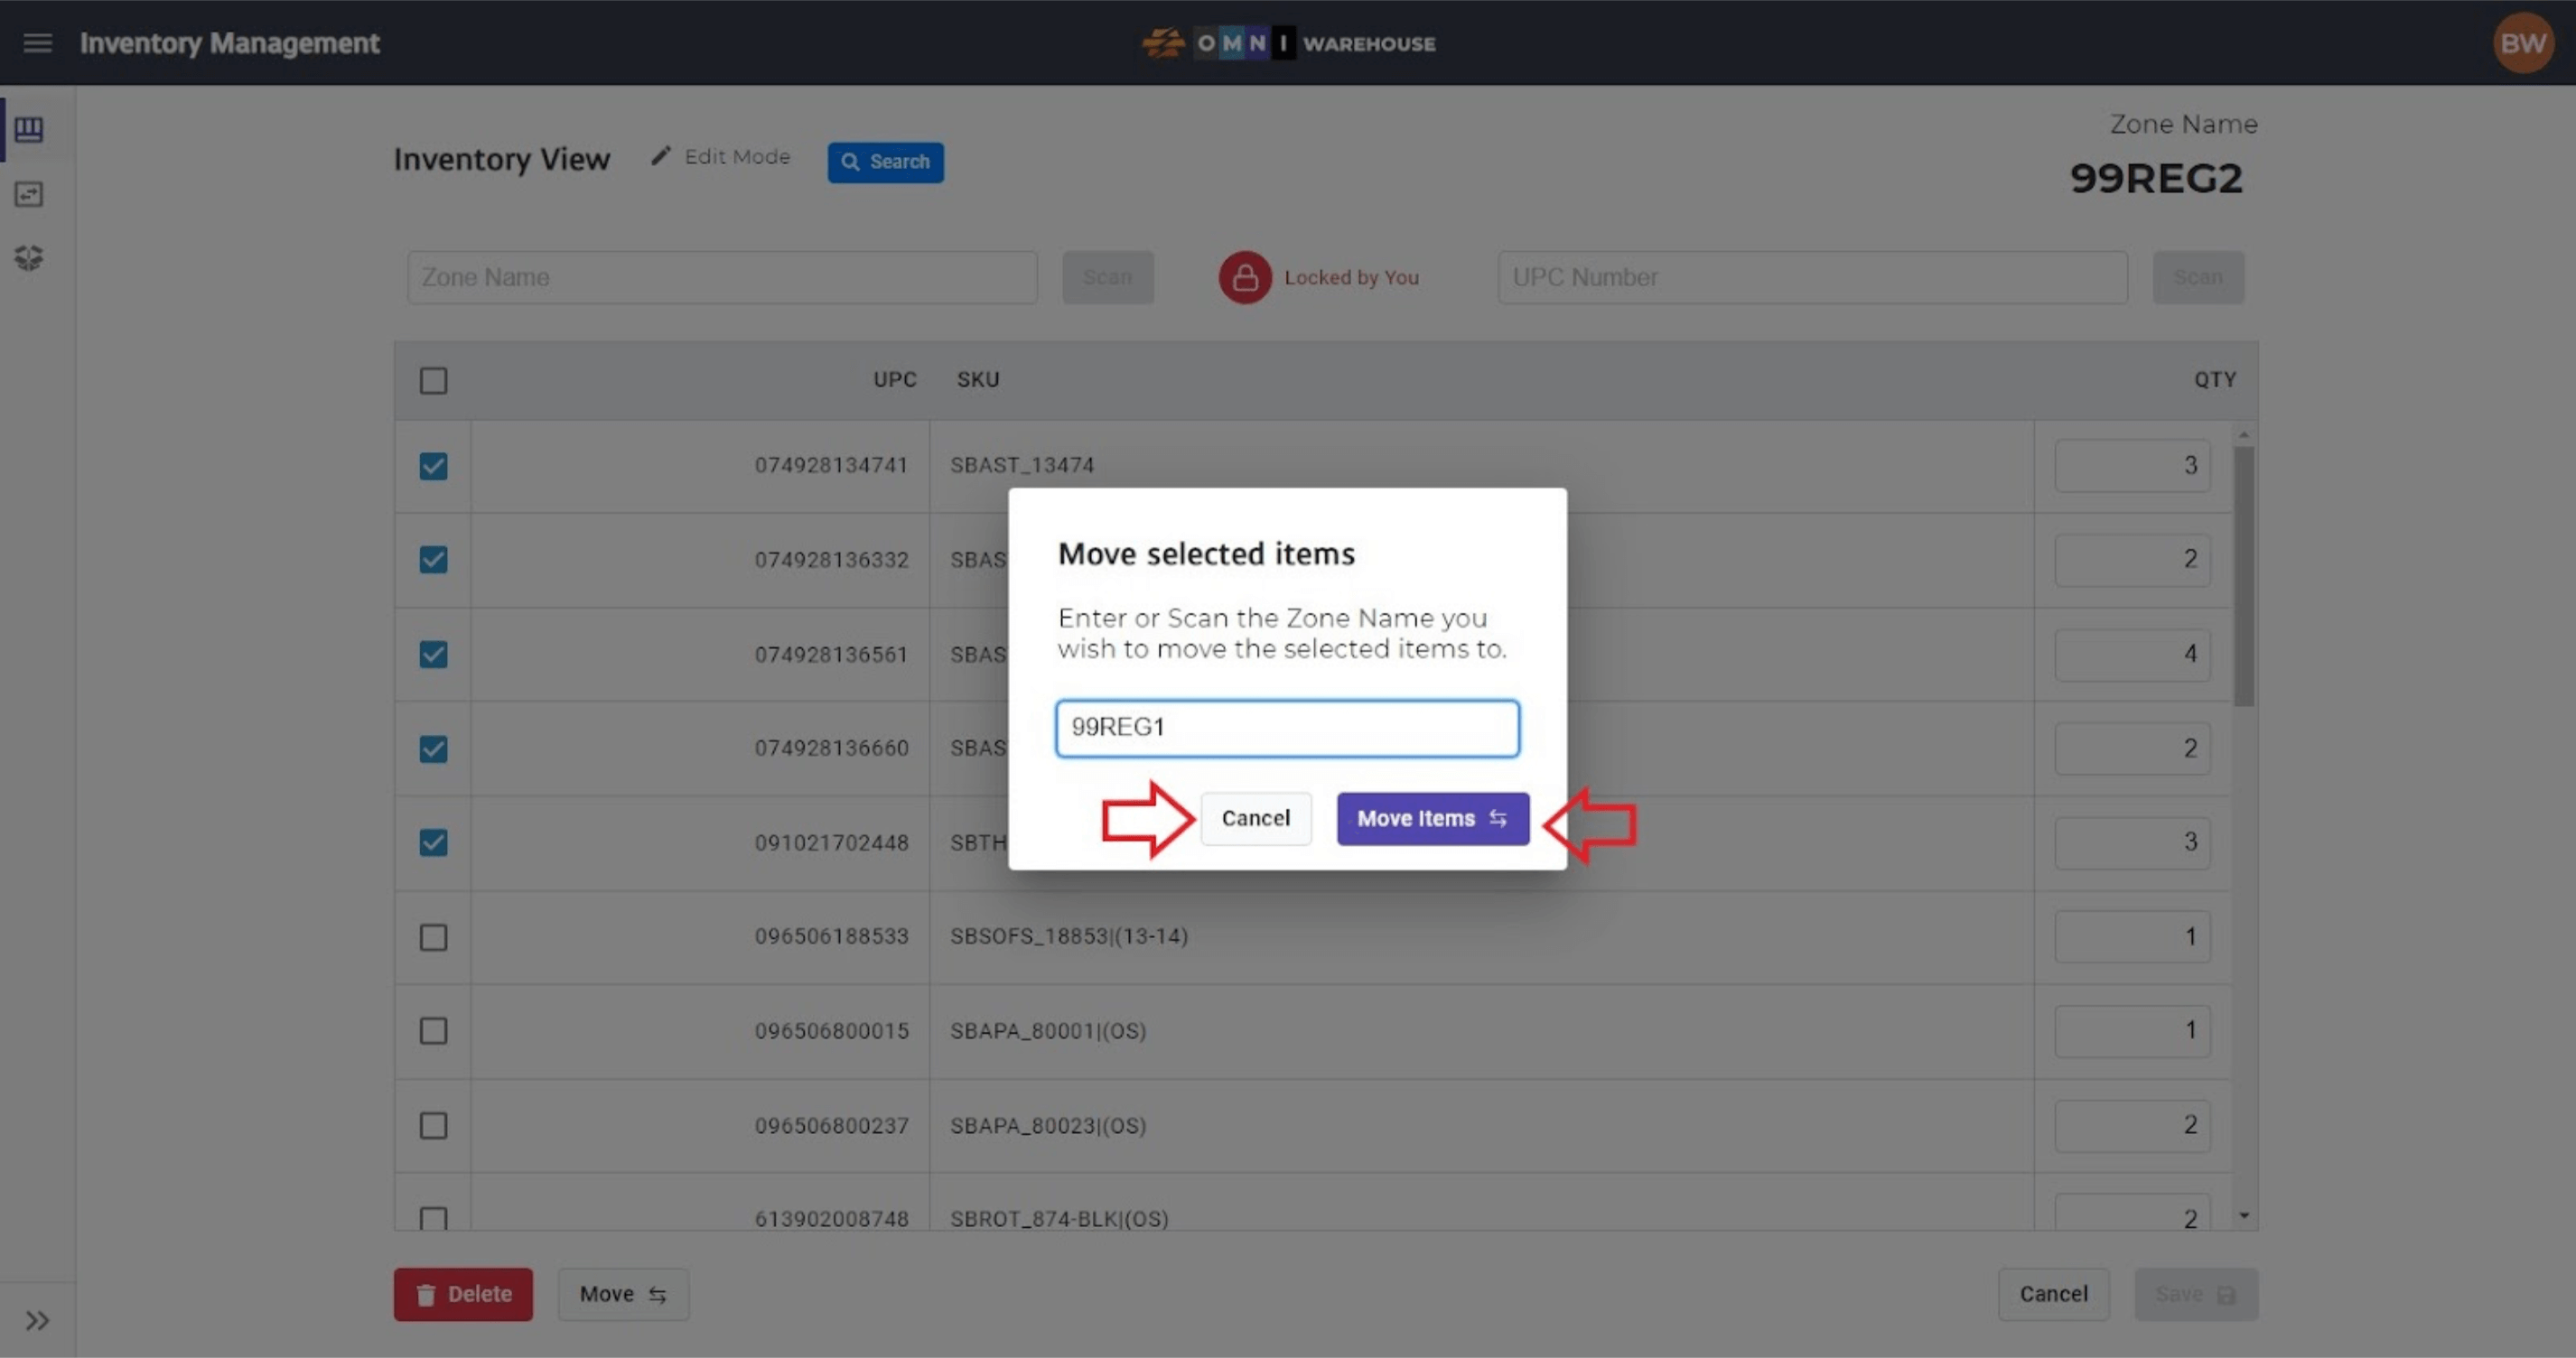
- After the user clicks the Move button, a separate dialog box will pop-up. Type the new zone into the Zone Name field in the Move Selected Items dialog box and click the Move Items button. To cancel the move, click the Cancel button. In the example below, items are being moved from 99REG2 into 99REG1.
- Once the Move Items button is clicked, the items will no longer be seen in the current zone as they have been moved into the new zone. Click the Zone Lock button to unlock the zone.
- To verify the move, simply scan or type the new zone into the Zone Name field. In the example below, observe that the 5 items have successfully been moved from 99REG2 into 99REG1. Note that ALL quantity for the items was moved, as stated above in item 6b.
- To move ALL items from a location, use the Select All box to select all items and follow the same steps as above.
B) Inventory Move
The Inventory Move page enables the movement of scanned items from one zone to another zone. This ensures that every item in the warehouse has an electronic movement history. However, it should be noted that it is the responsibility of the user to make sure that the items are physically placed into the correct zone.
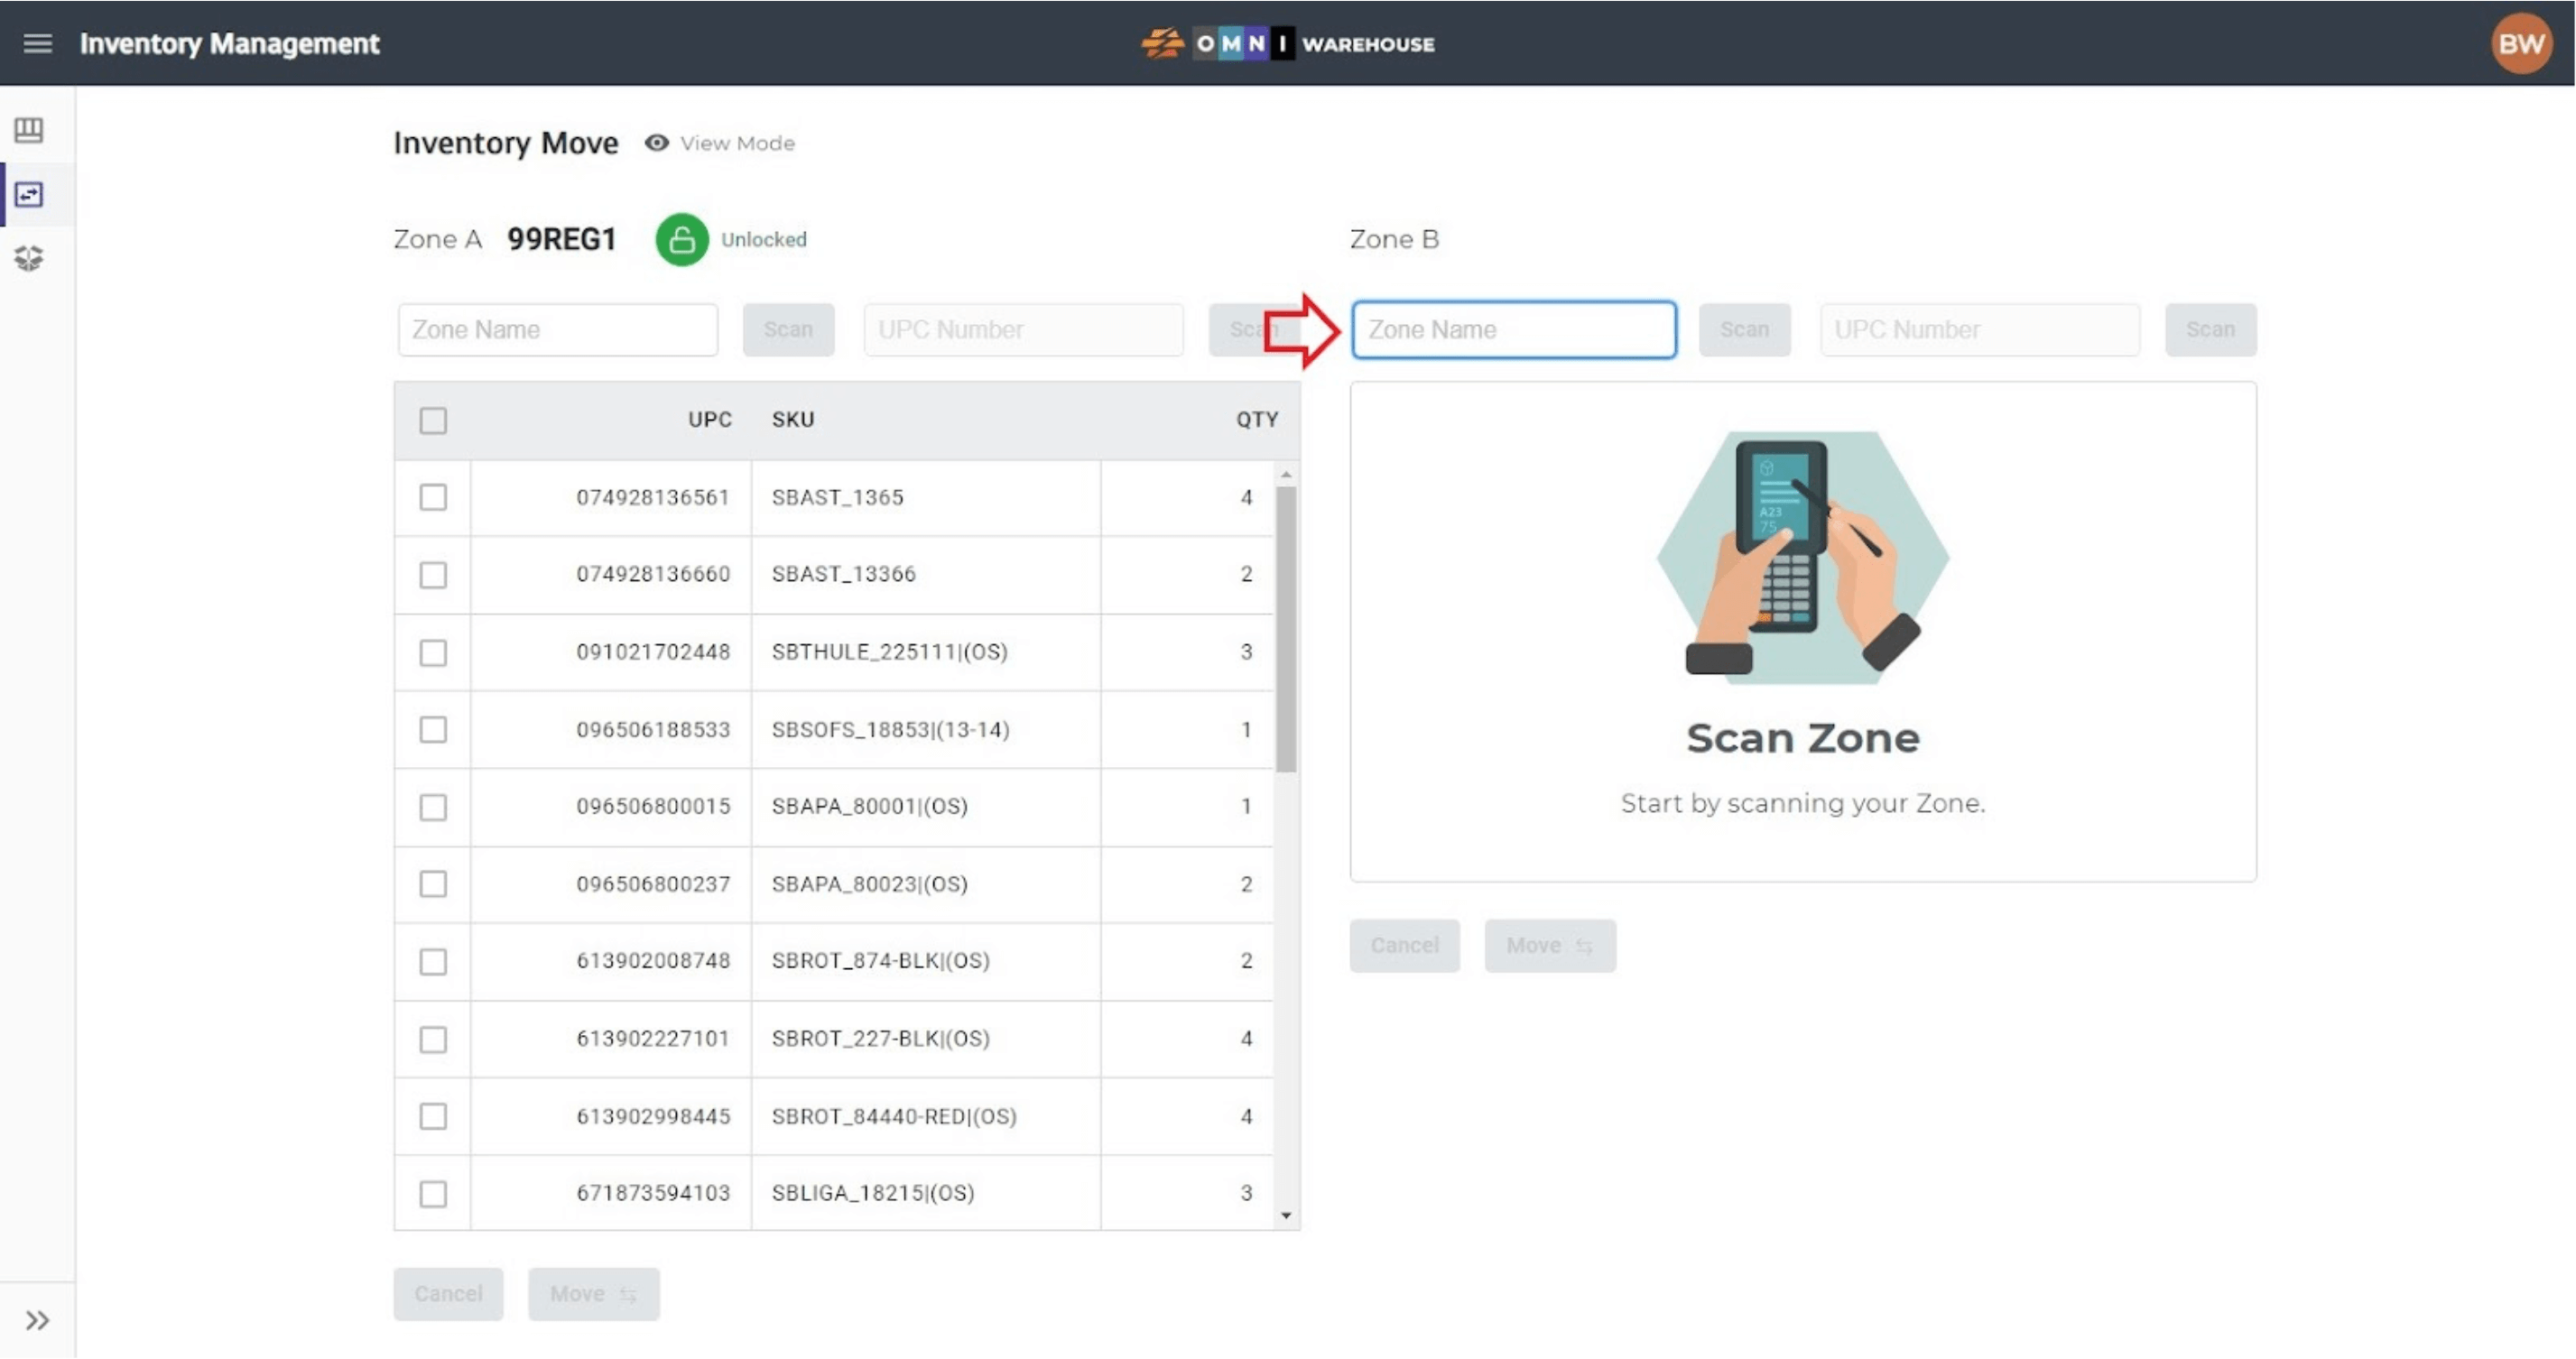
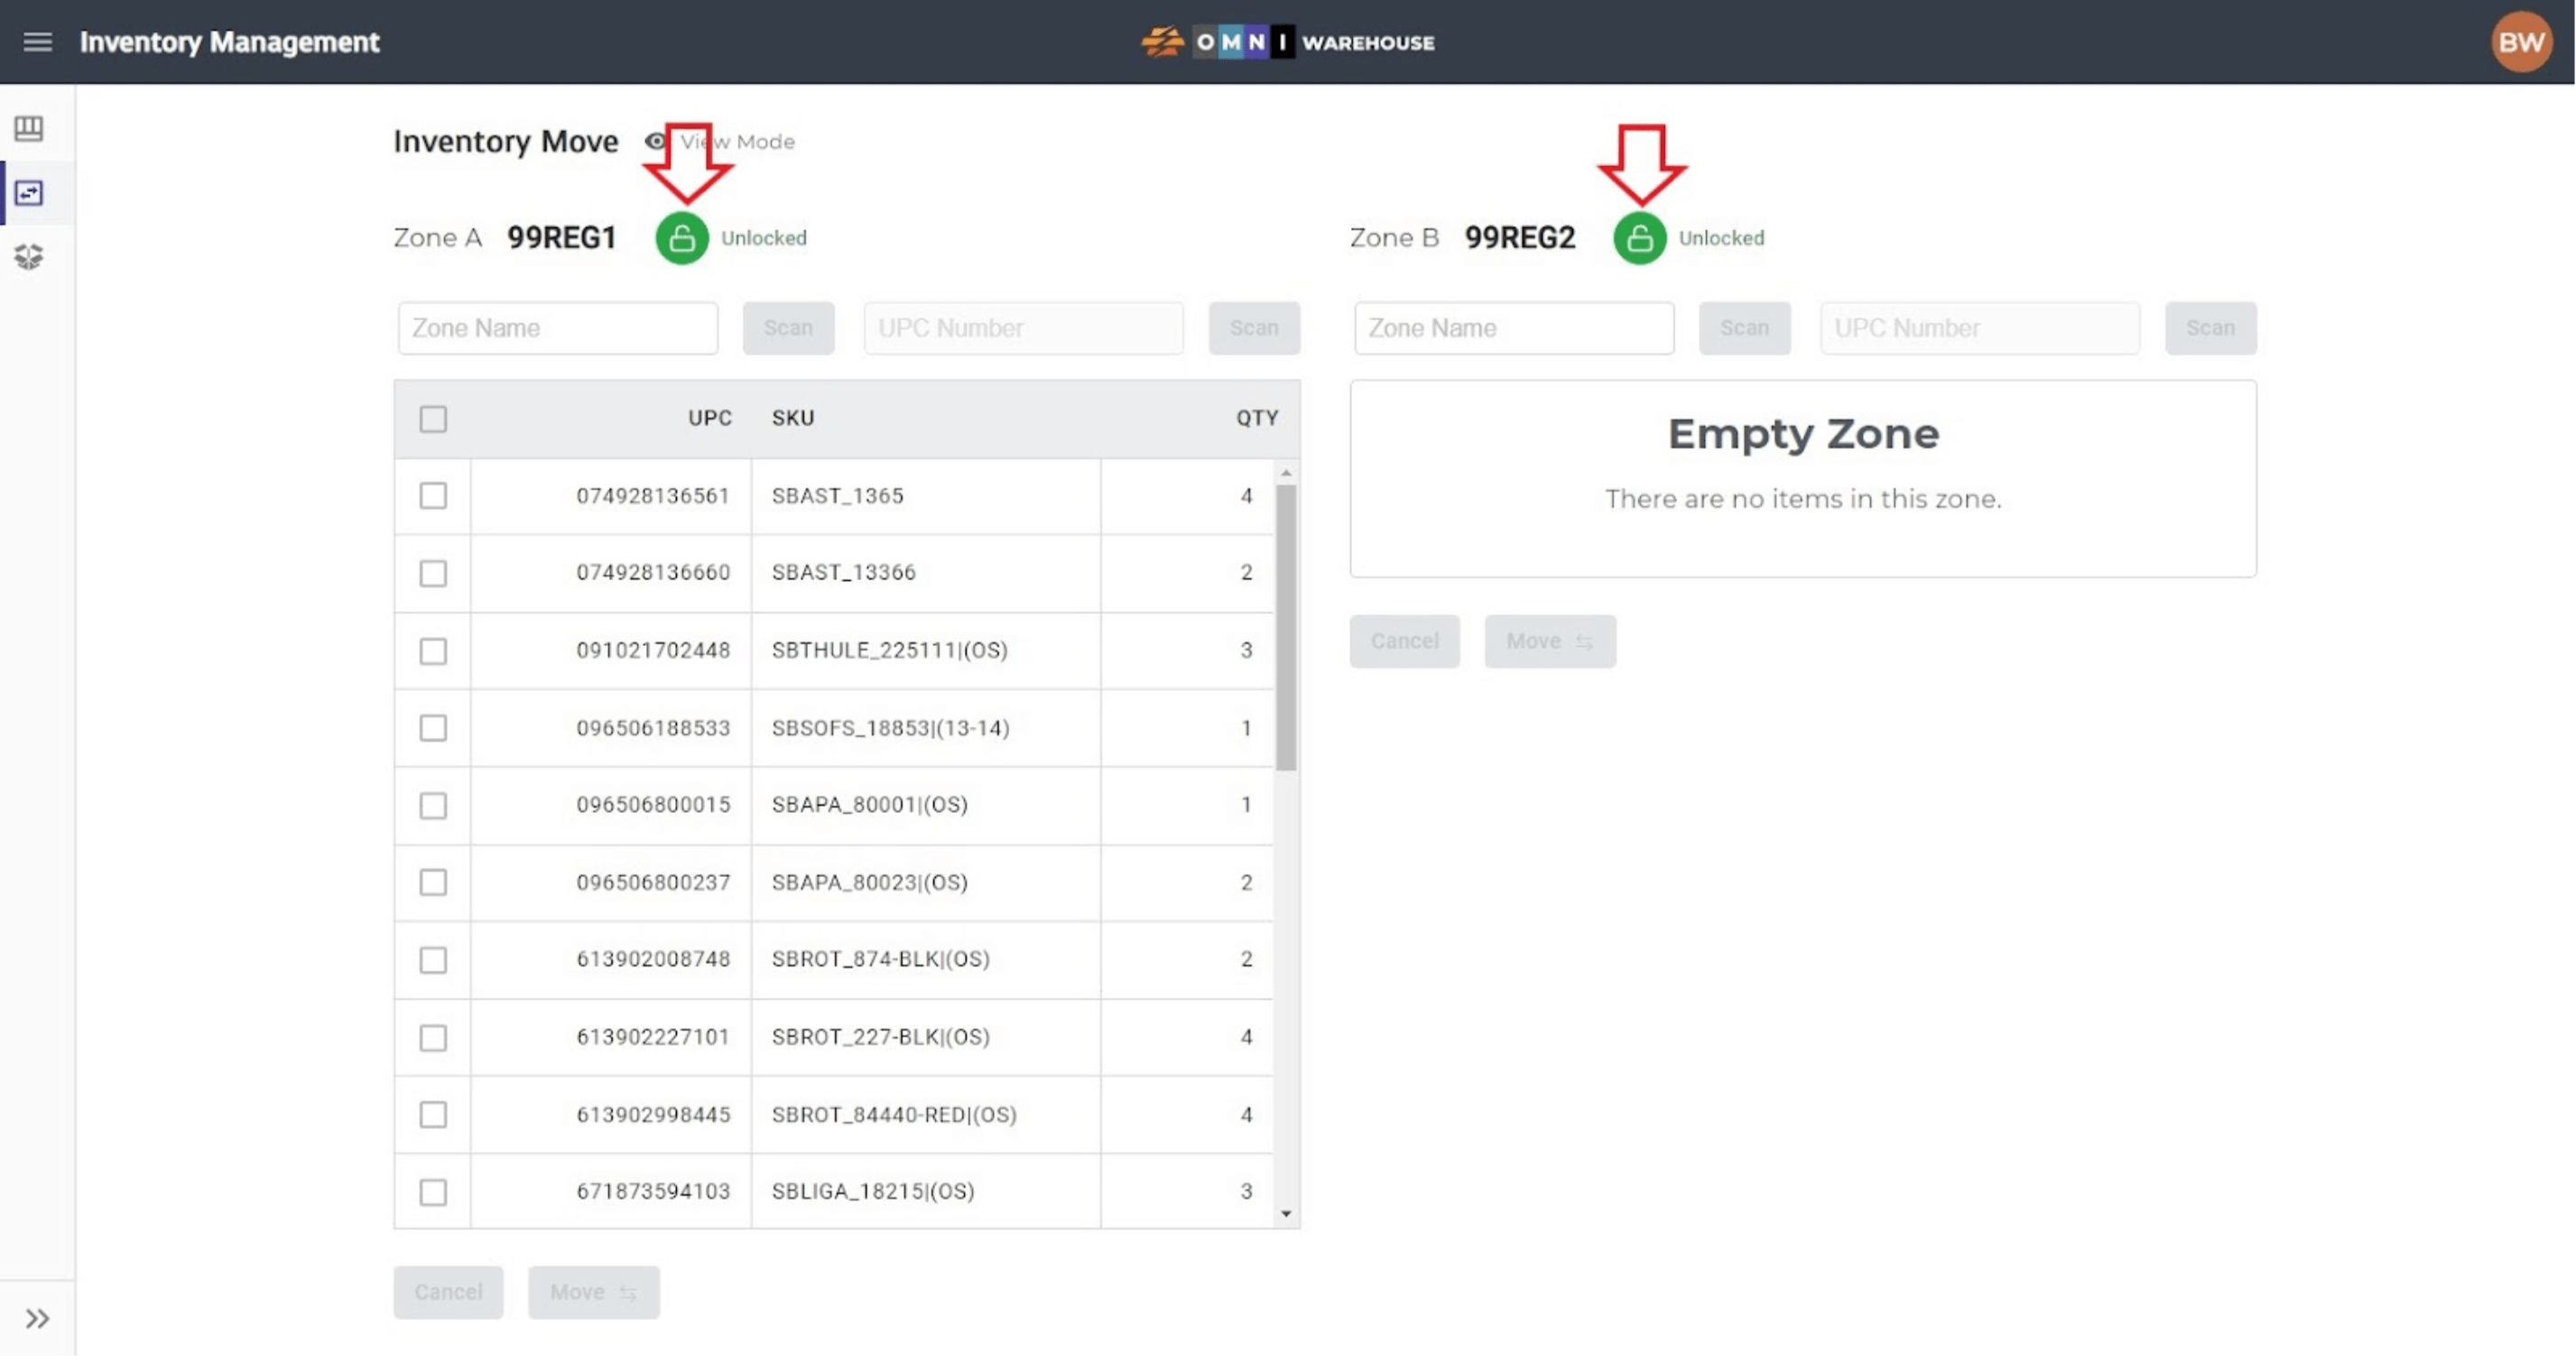
- Select the Inventory Move page from the Inventory Management Sidebar Menu. Scan the zone that contains the items to be moved into the Zone Name field of “Zone A” on the left side of the screen. The contents of the zone will appear on the same side of the screen.

- Scan the zone where the items will be moved into the Zone Name field of “Zone B” on the right side of the screen. The items that are currently in this zone will appear on the right side of the screen.
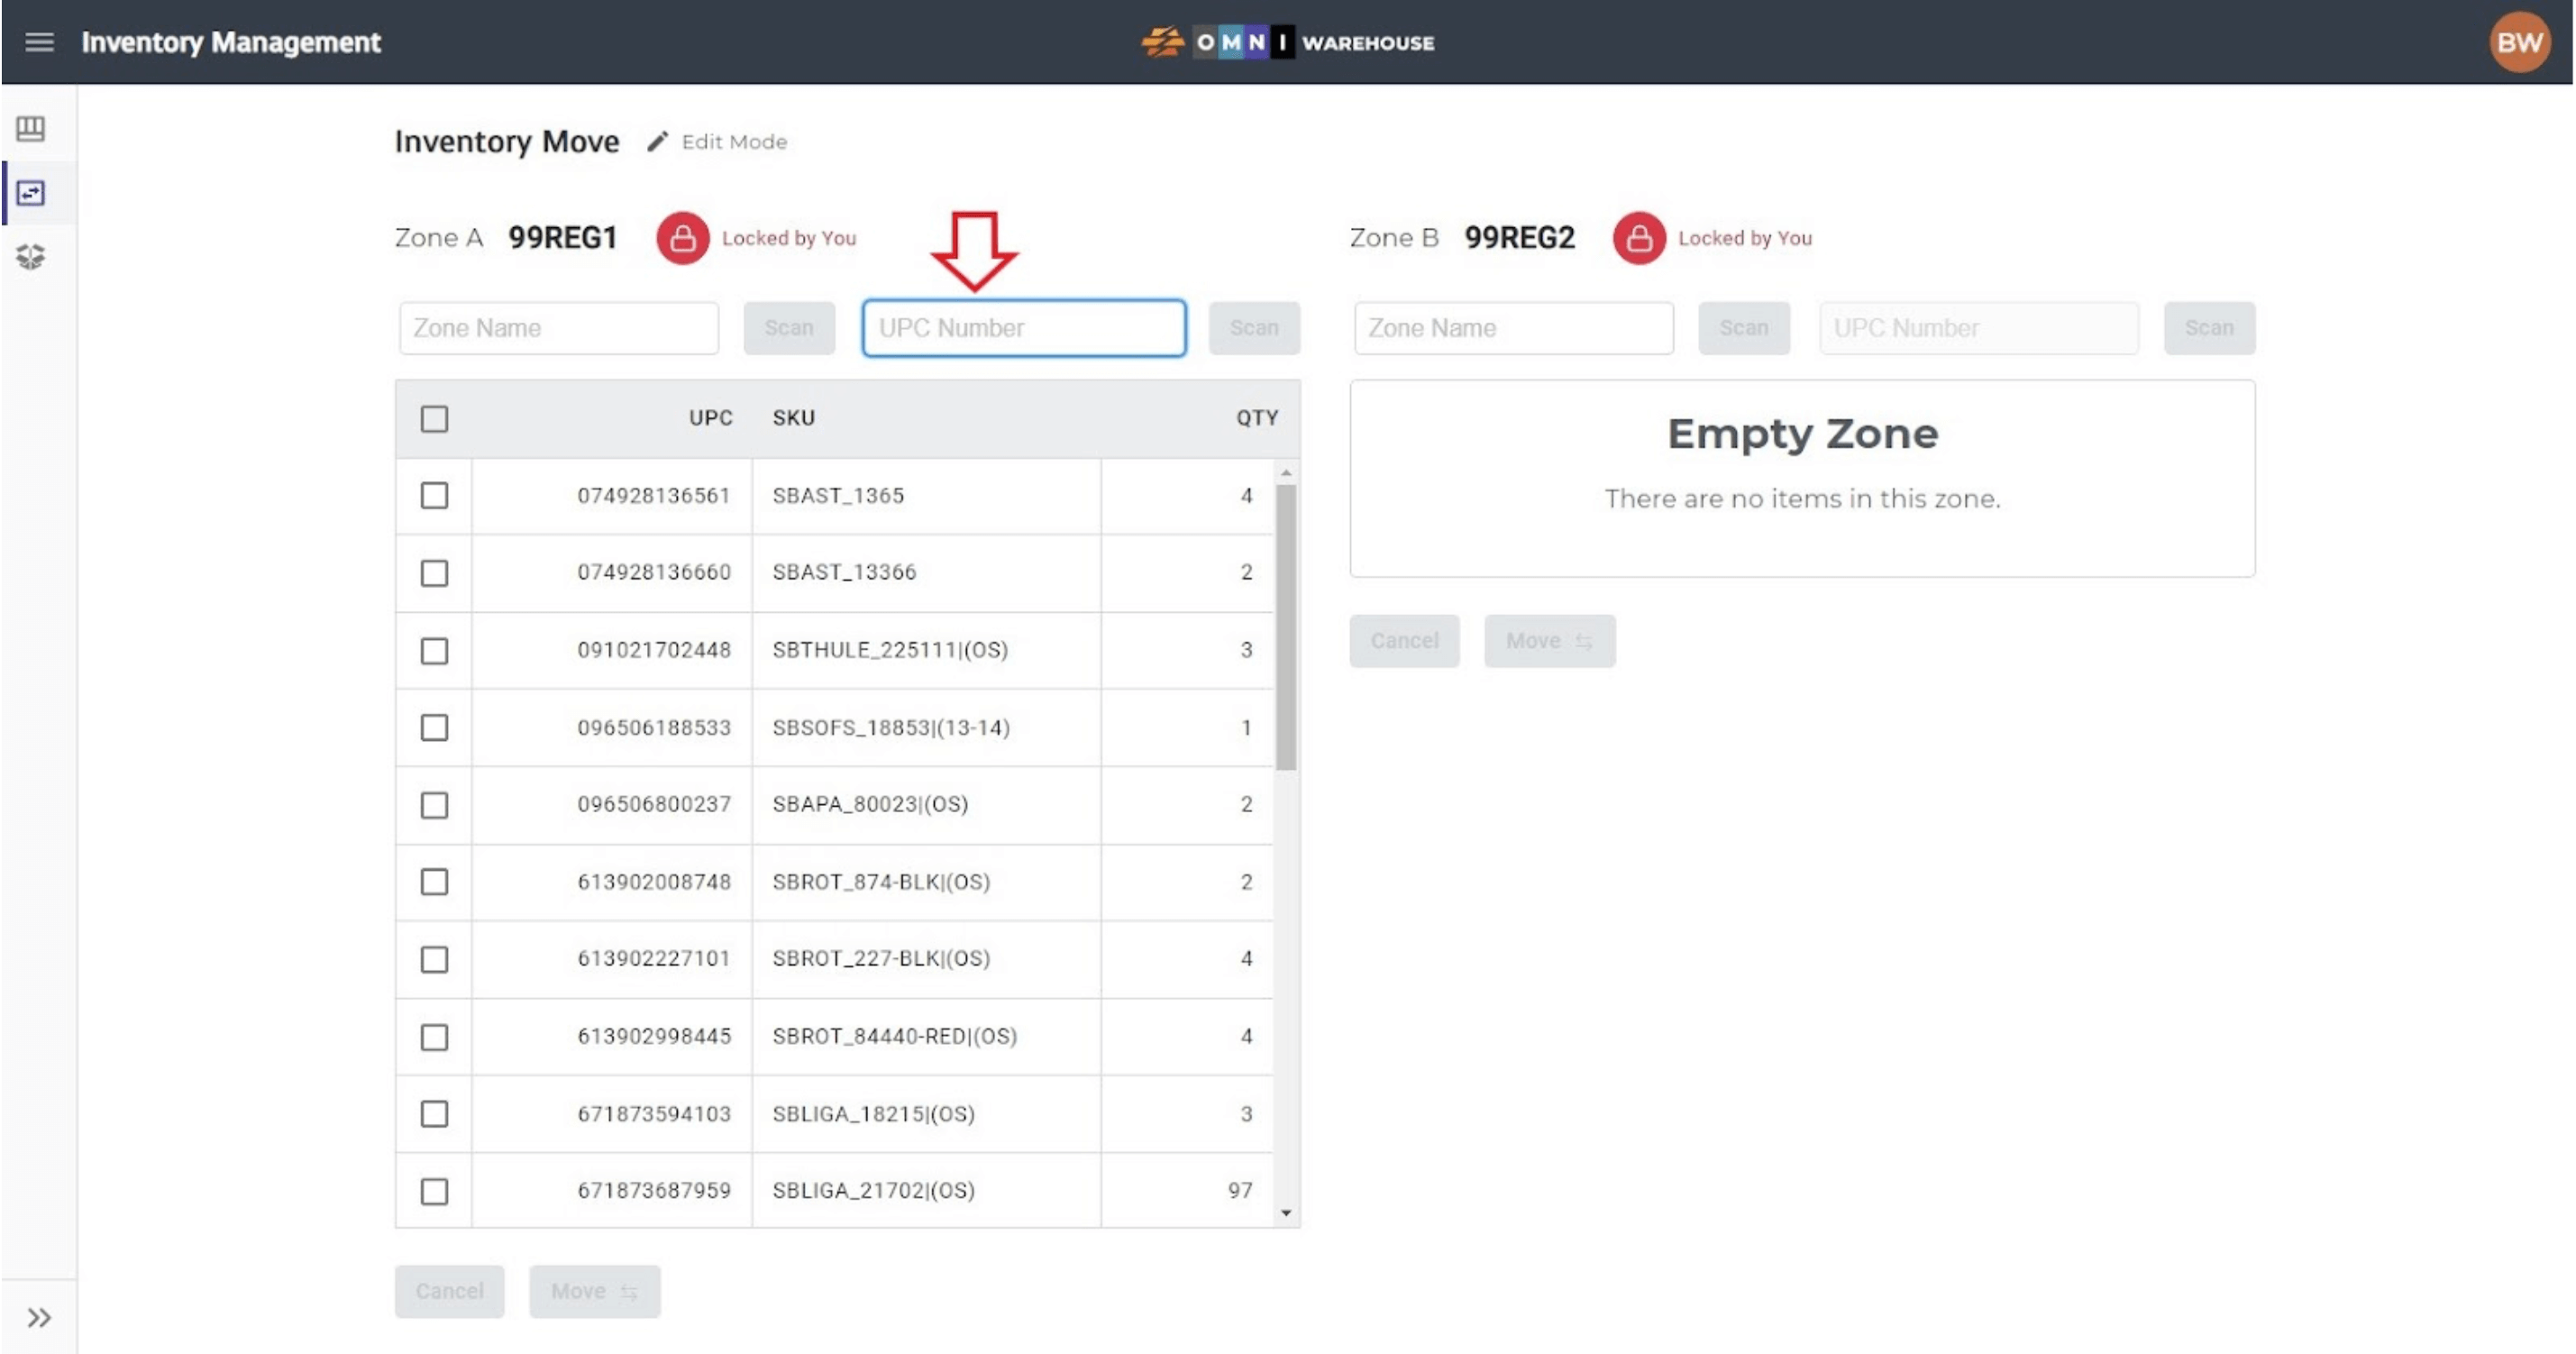
- Lock both zones by clicking the Zone Lock button for each zone.
- Scan the item(s) that need to be moved into the “Zone A” UPC Number field on the left side. As items are scanned from the current zone on the left side, they will appear in the new zone on the right side.
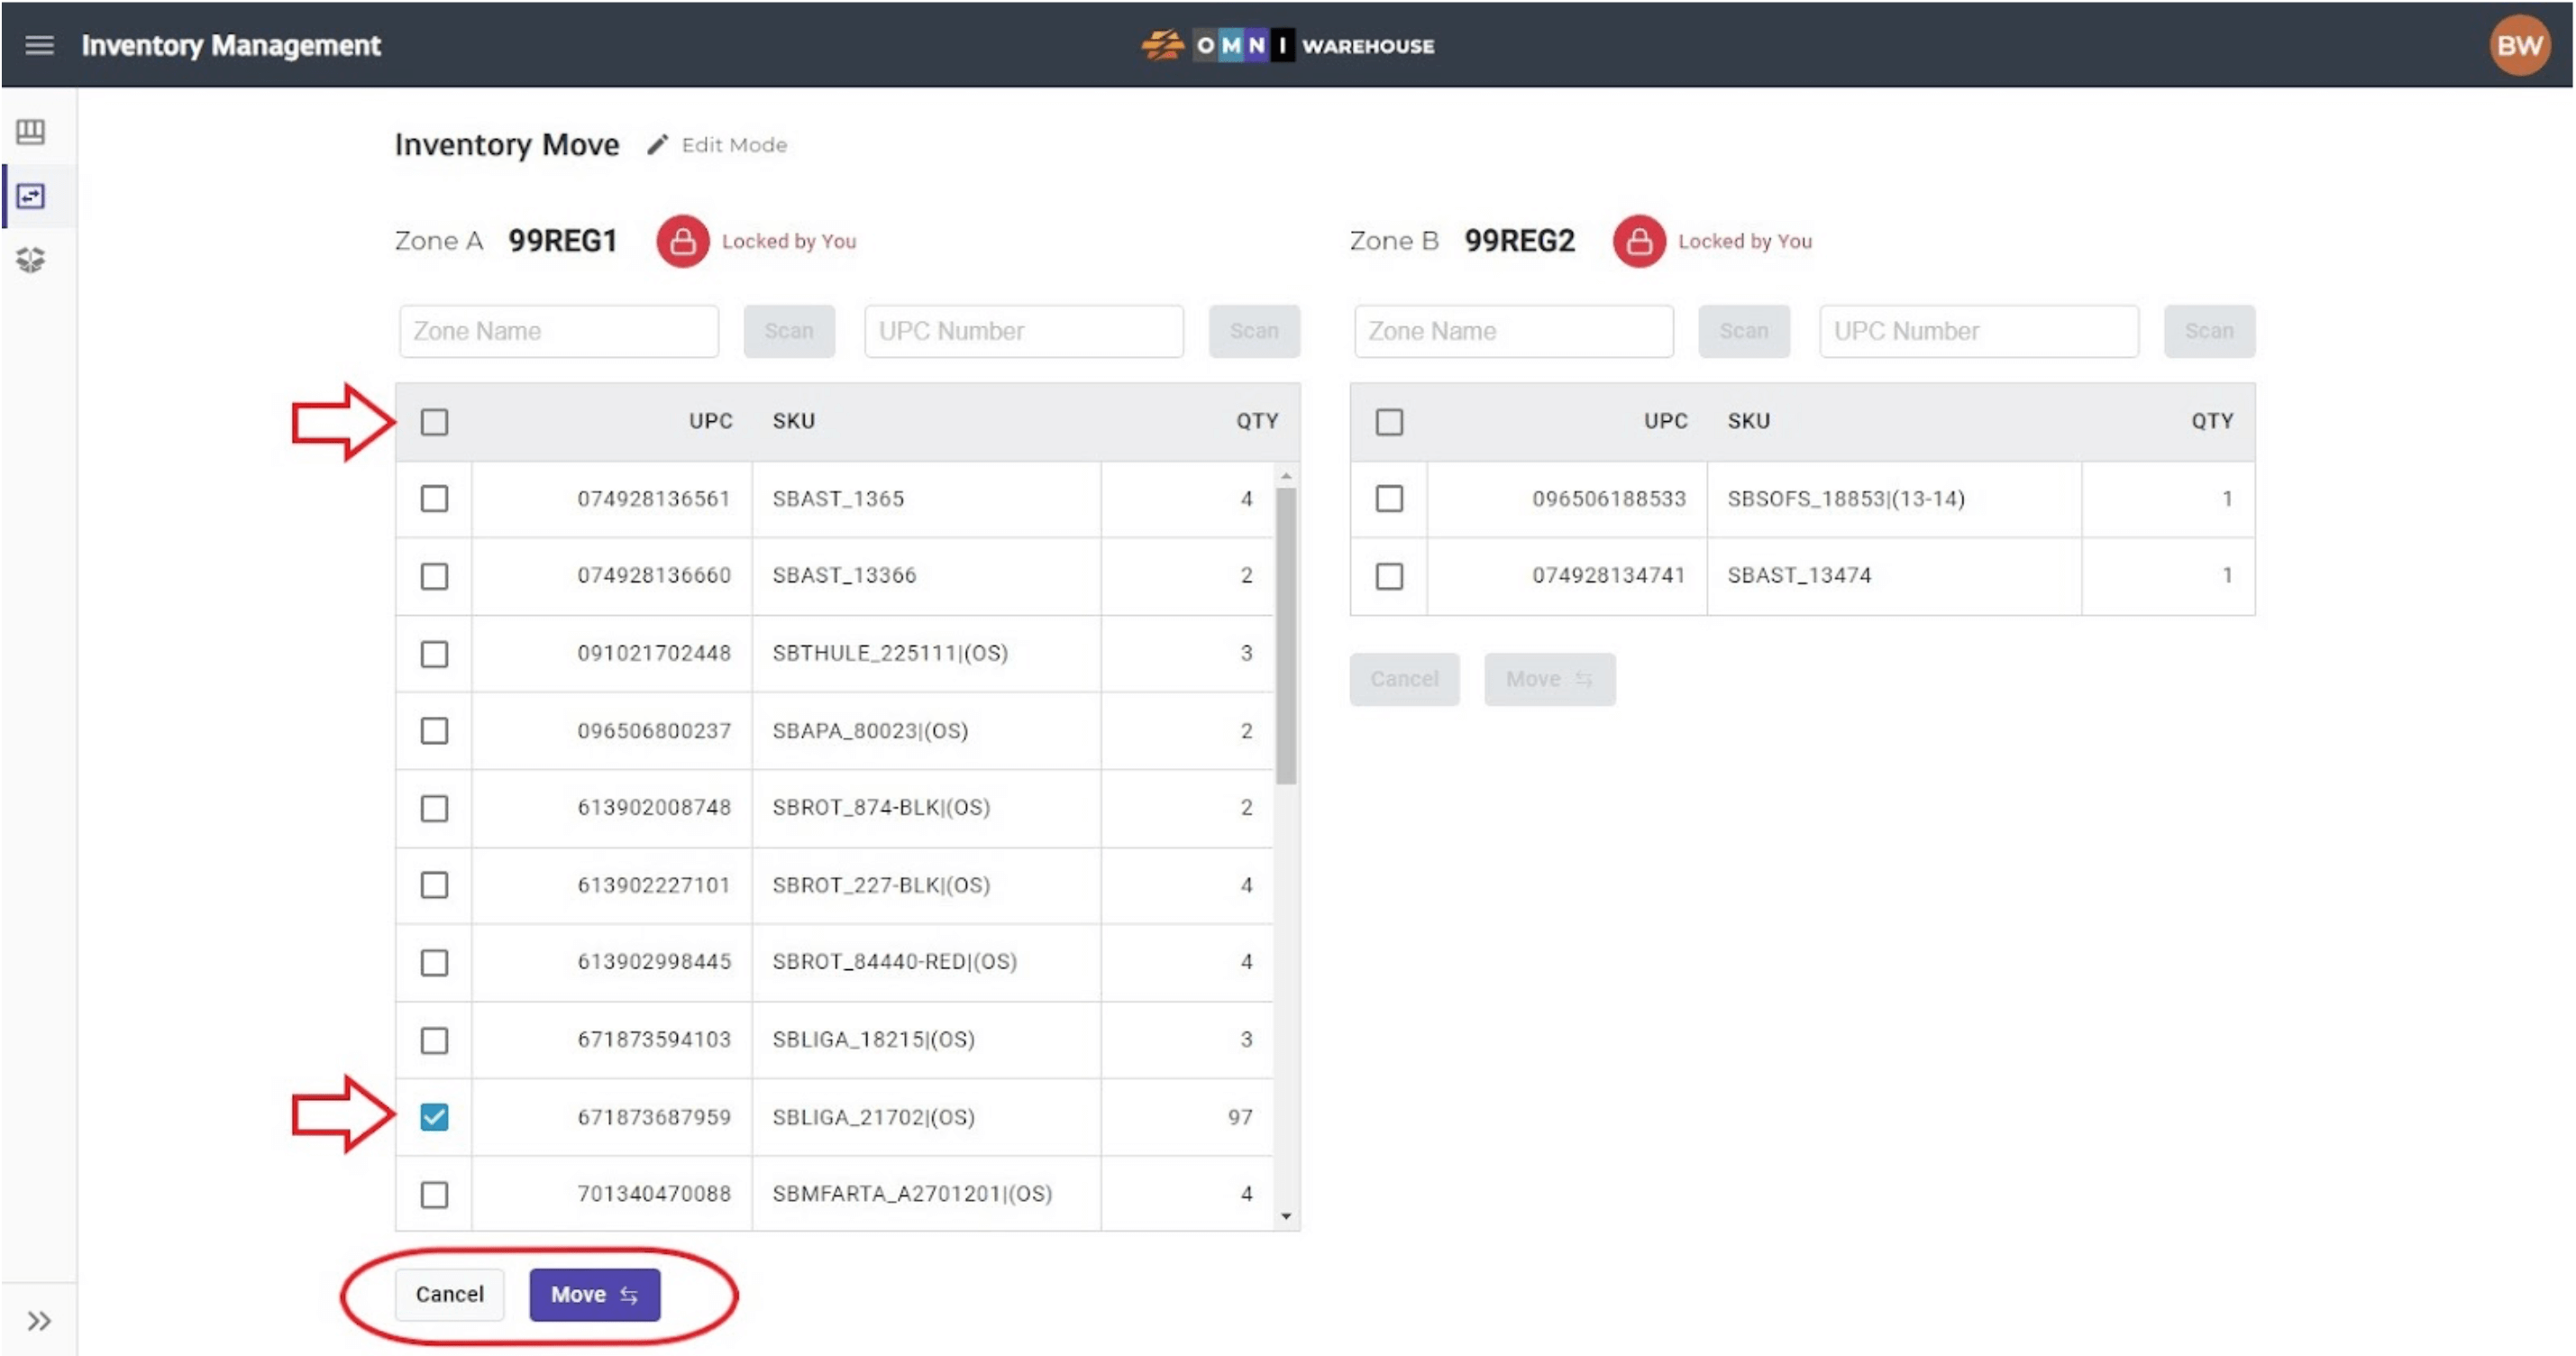
- To move ALL of the quantity of an item, select the item and use the Move button. As with Inventory View, all items can also be selected using the Select All box at the top.
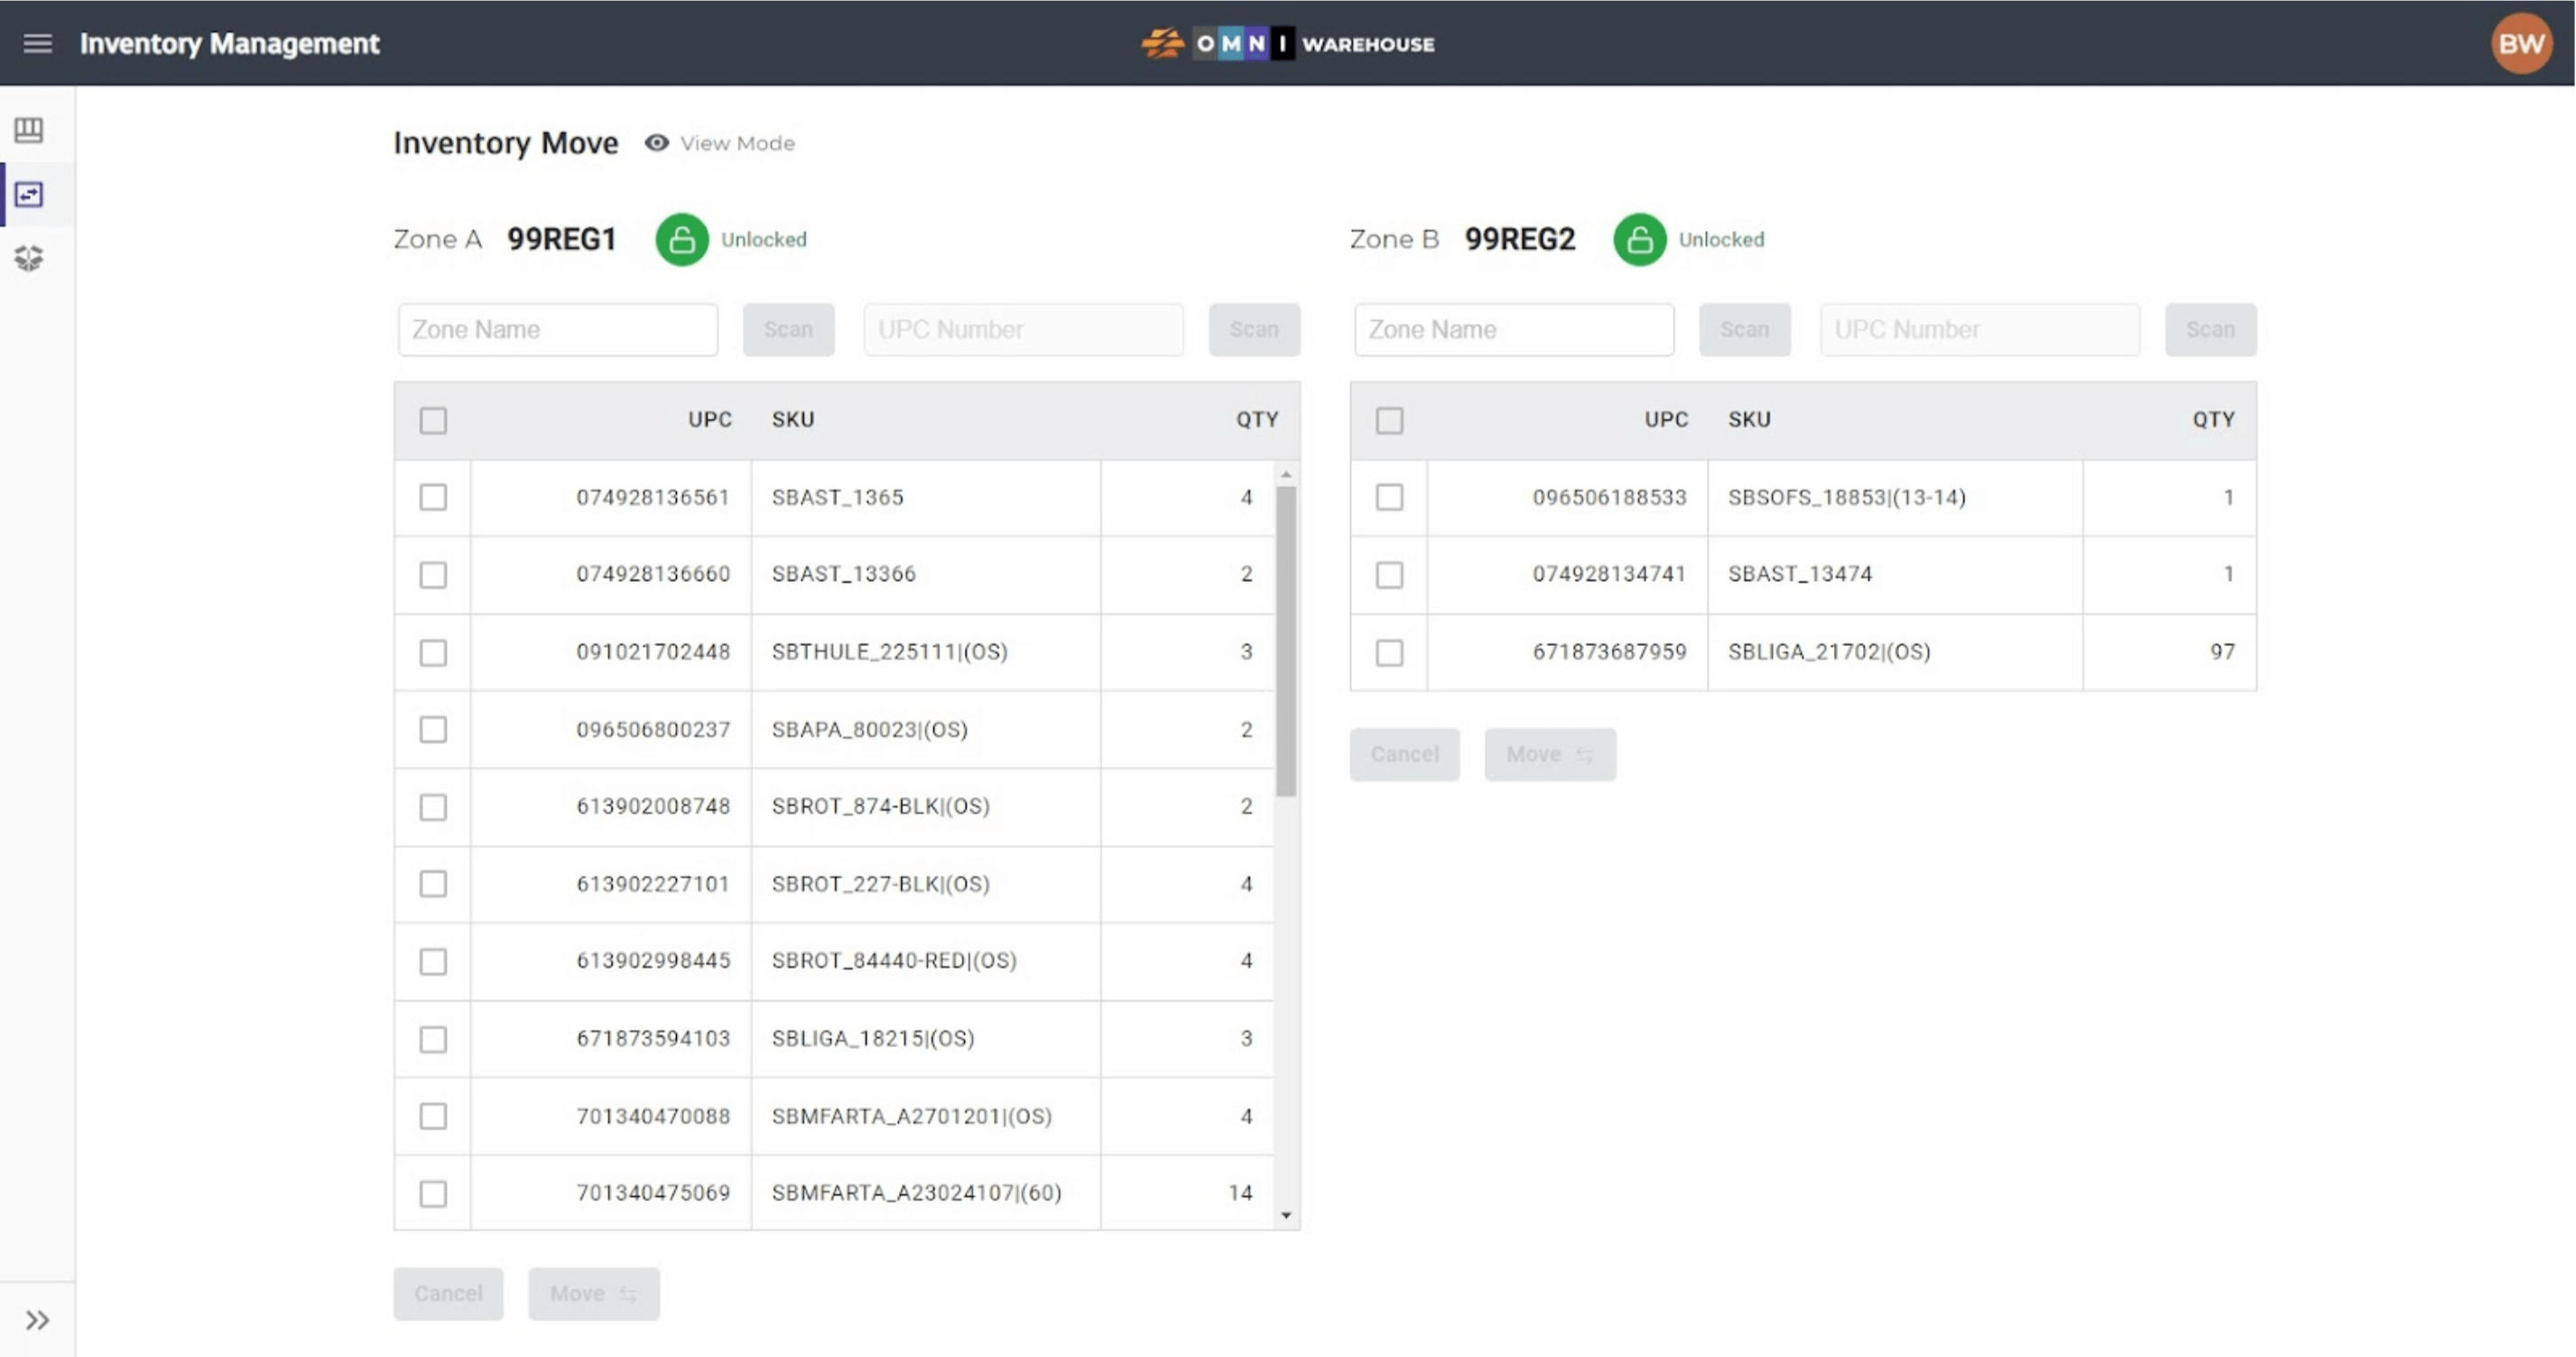
- Once scanning is complete and the items have been physically moved, click on both of the Zone Lock buttons to unlock the zones.
C) Picking
The Picking page is used during the pick-pack process to retrieve items from zones and ready them for shipment. Before beginning, make sure to have a laptop (or tablet) and a scanner on hand. Proceed to the zone where the first item is located. If there are multiple zones to pick from, place the laptop on a rolling cart in order to allow ease of access while picking from locations.
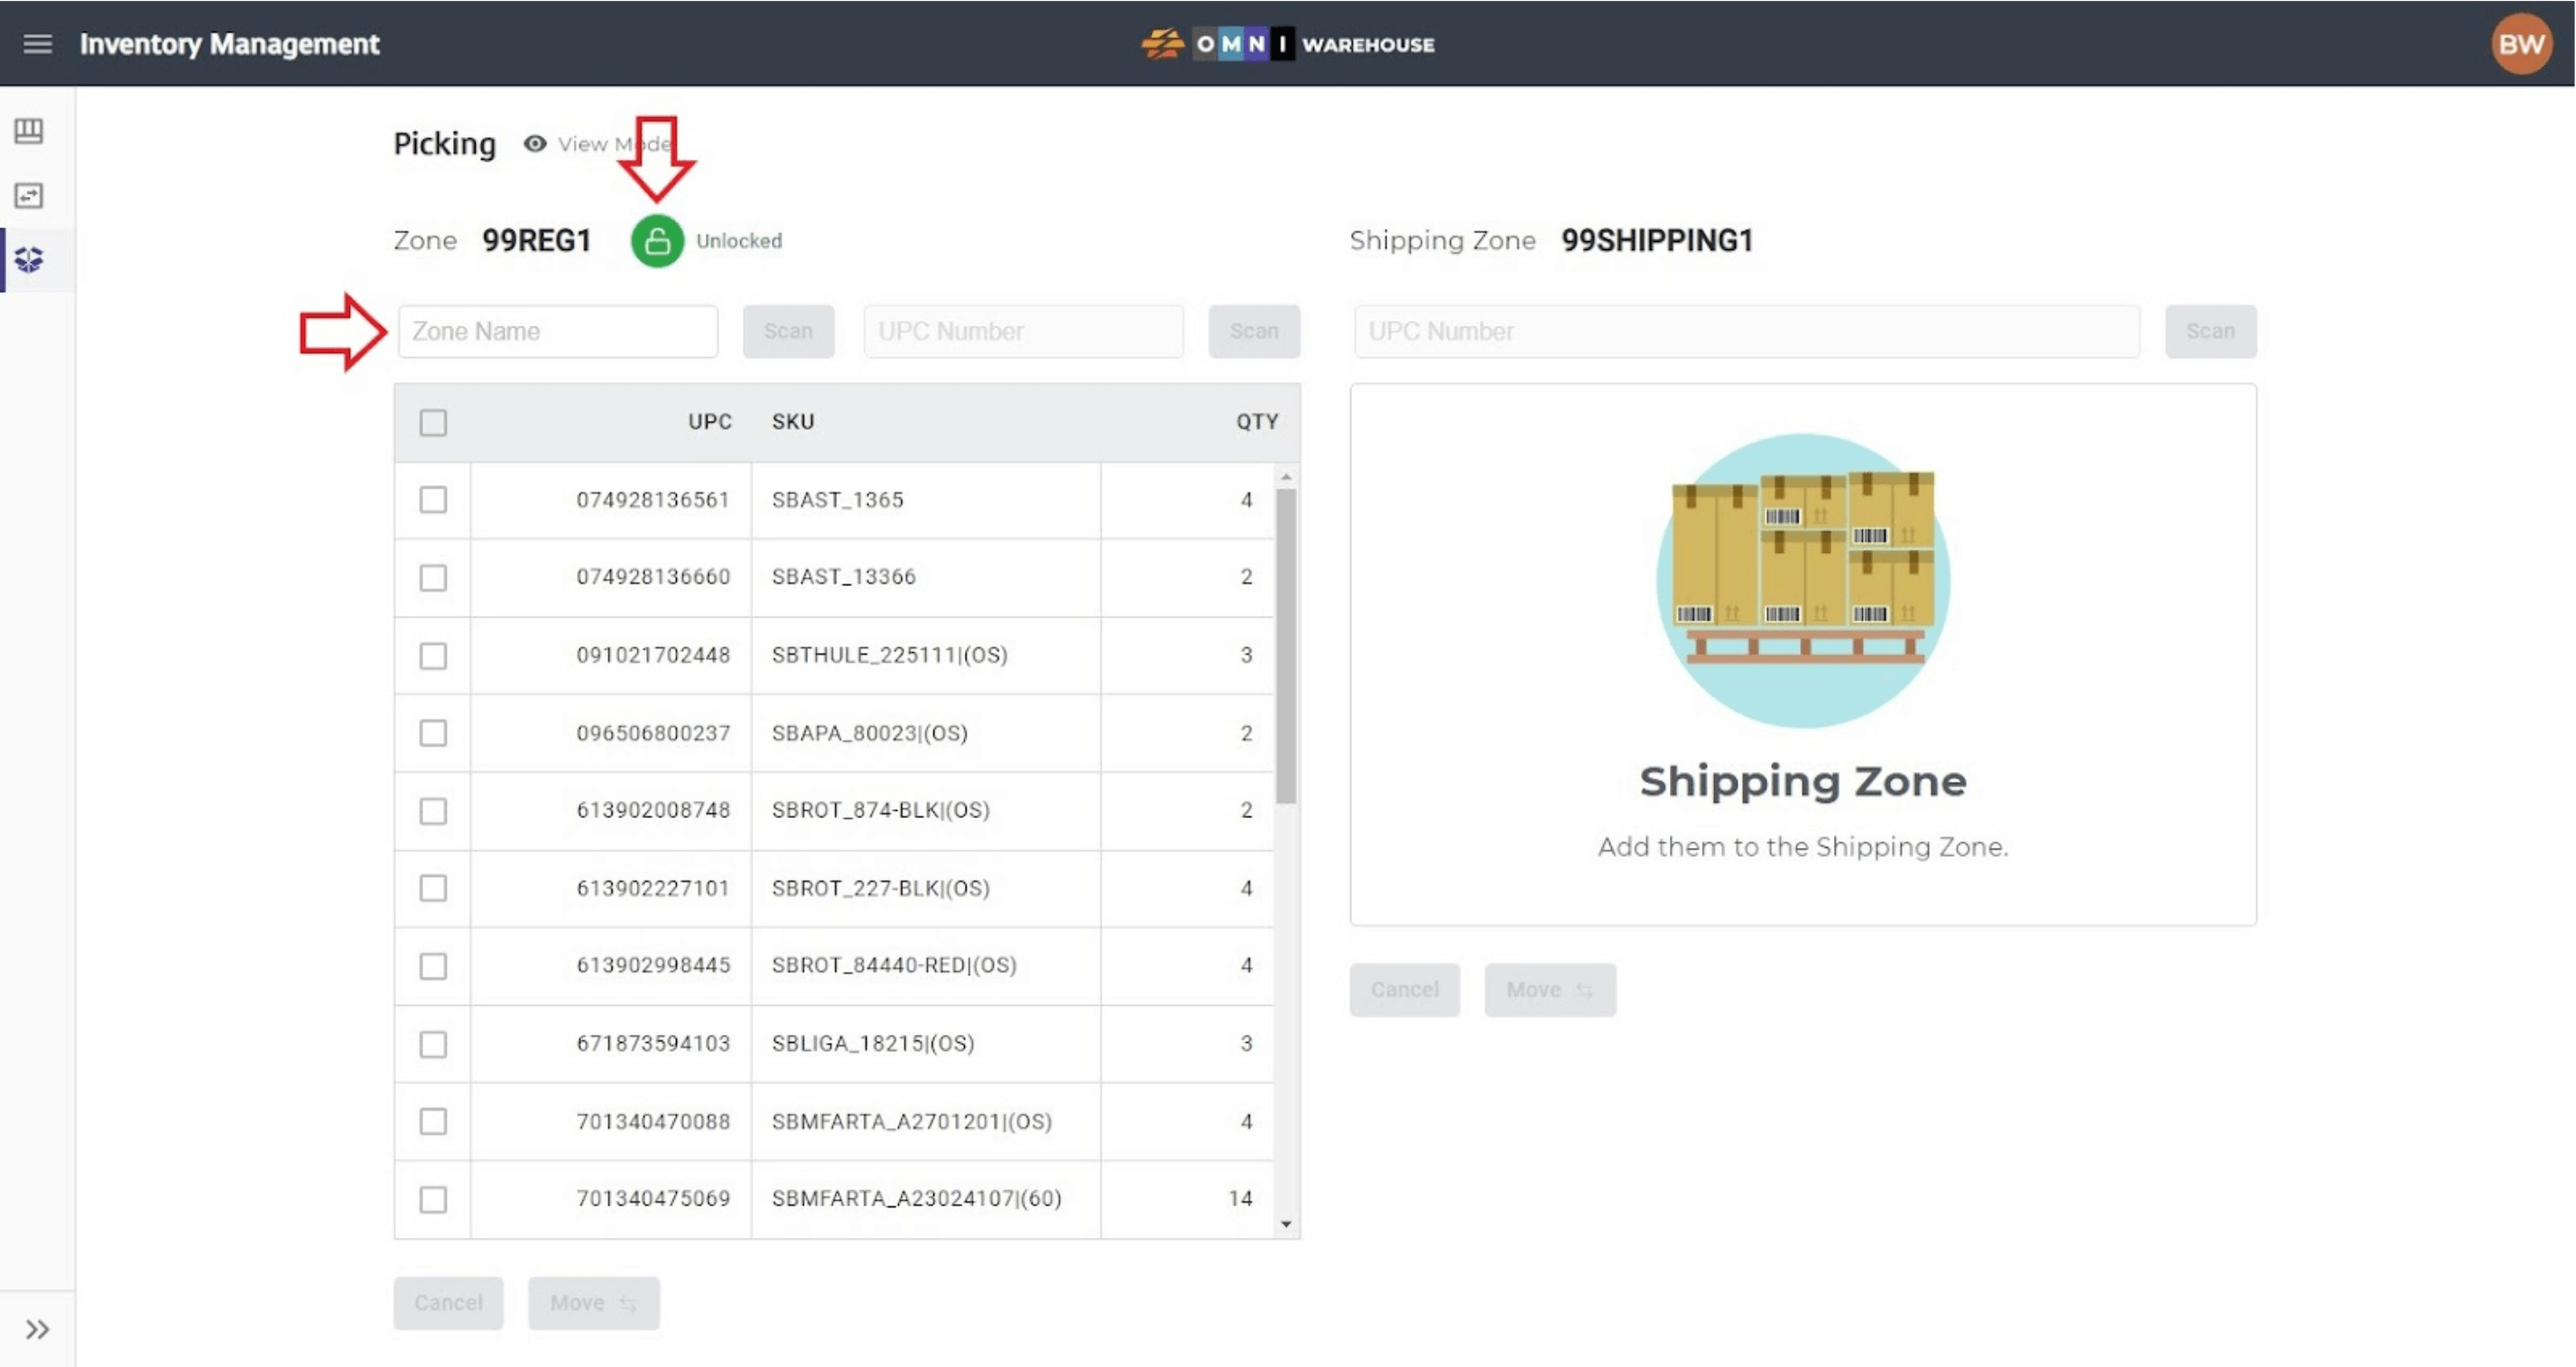
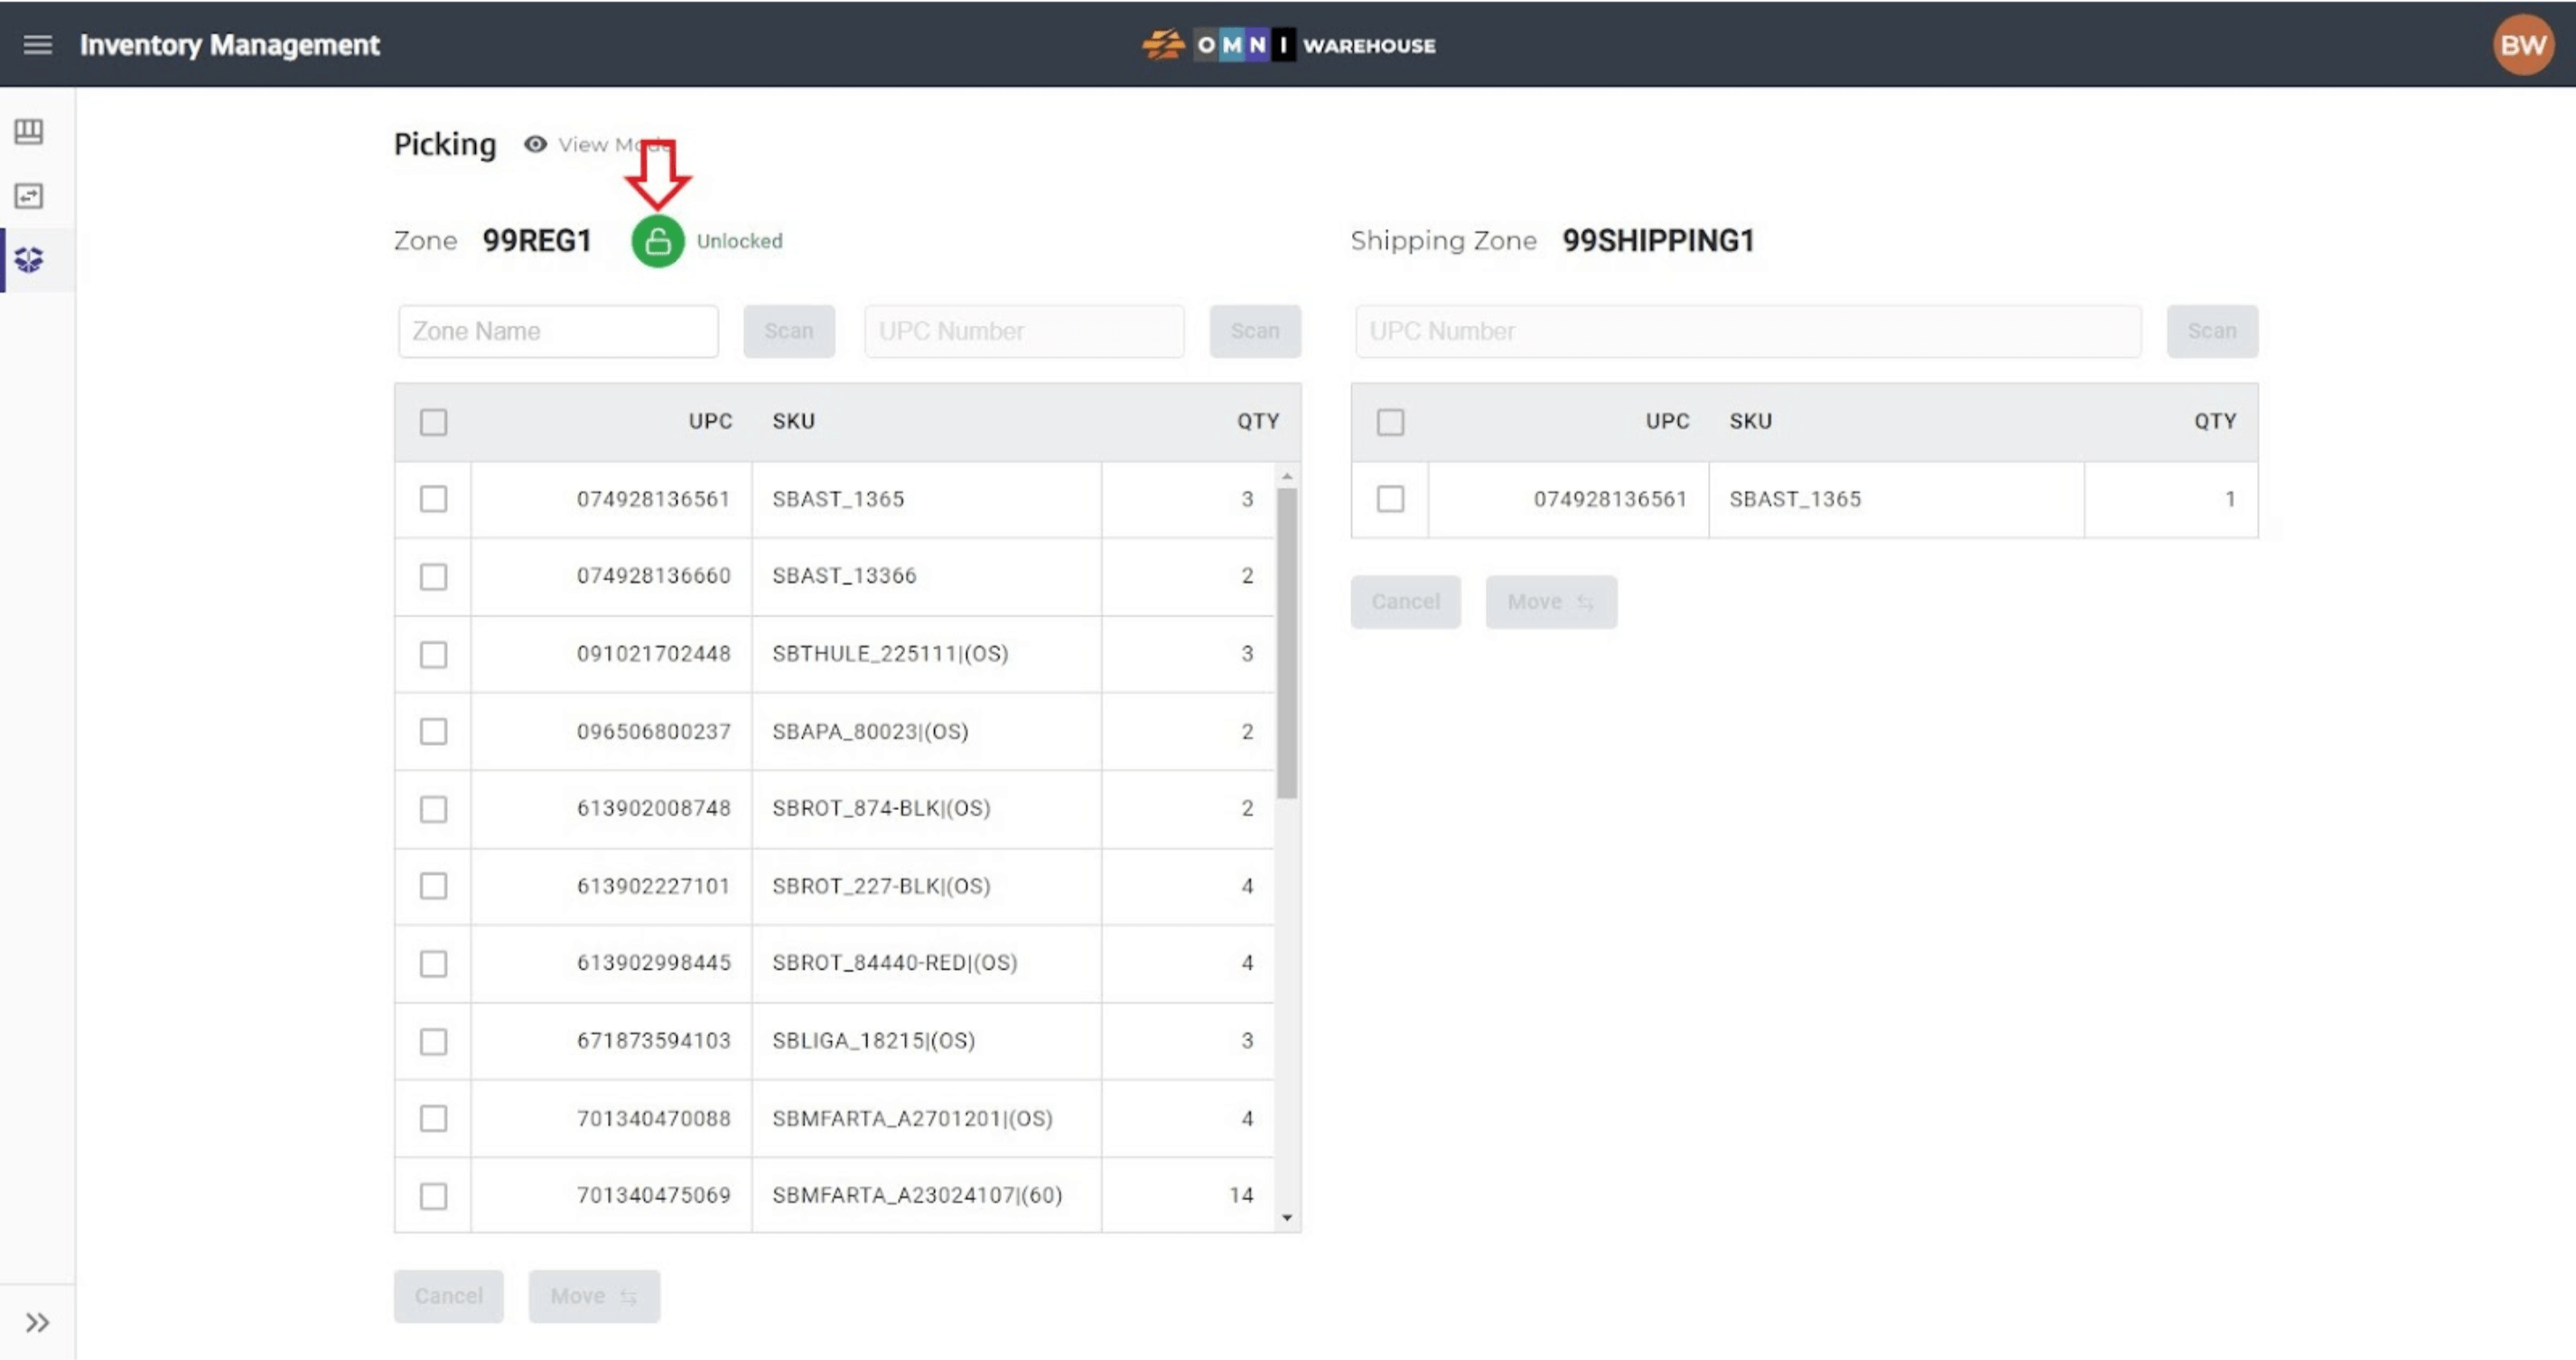
- Select the Picking page from the Inventory Management Sidebar Menu. Note that the left side of the page is labeled “Zone” and that the right side of the screen is labeled “Shipping Zone” which defaults as zone 99Shipping1. The “Zone” side will list the items that are in the zone that items are being picked from. The “Shipping Zone” side will list the items that have been scanned from the picking location into the Shipping Zone.

- Scan the zone where items are being picked into the Zone Name field. The items in the zone will be listed on the left side of the page. To begin scanning items, lock the zone by clicking the Zone Lock button. As mentioned earlier in the “Zone Locks” section of this manual, locking zones prevents other users from making edits to the zone including scanning items into the Shipping Zone.
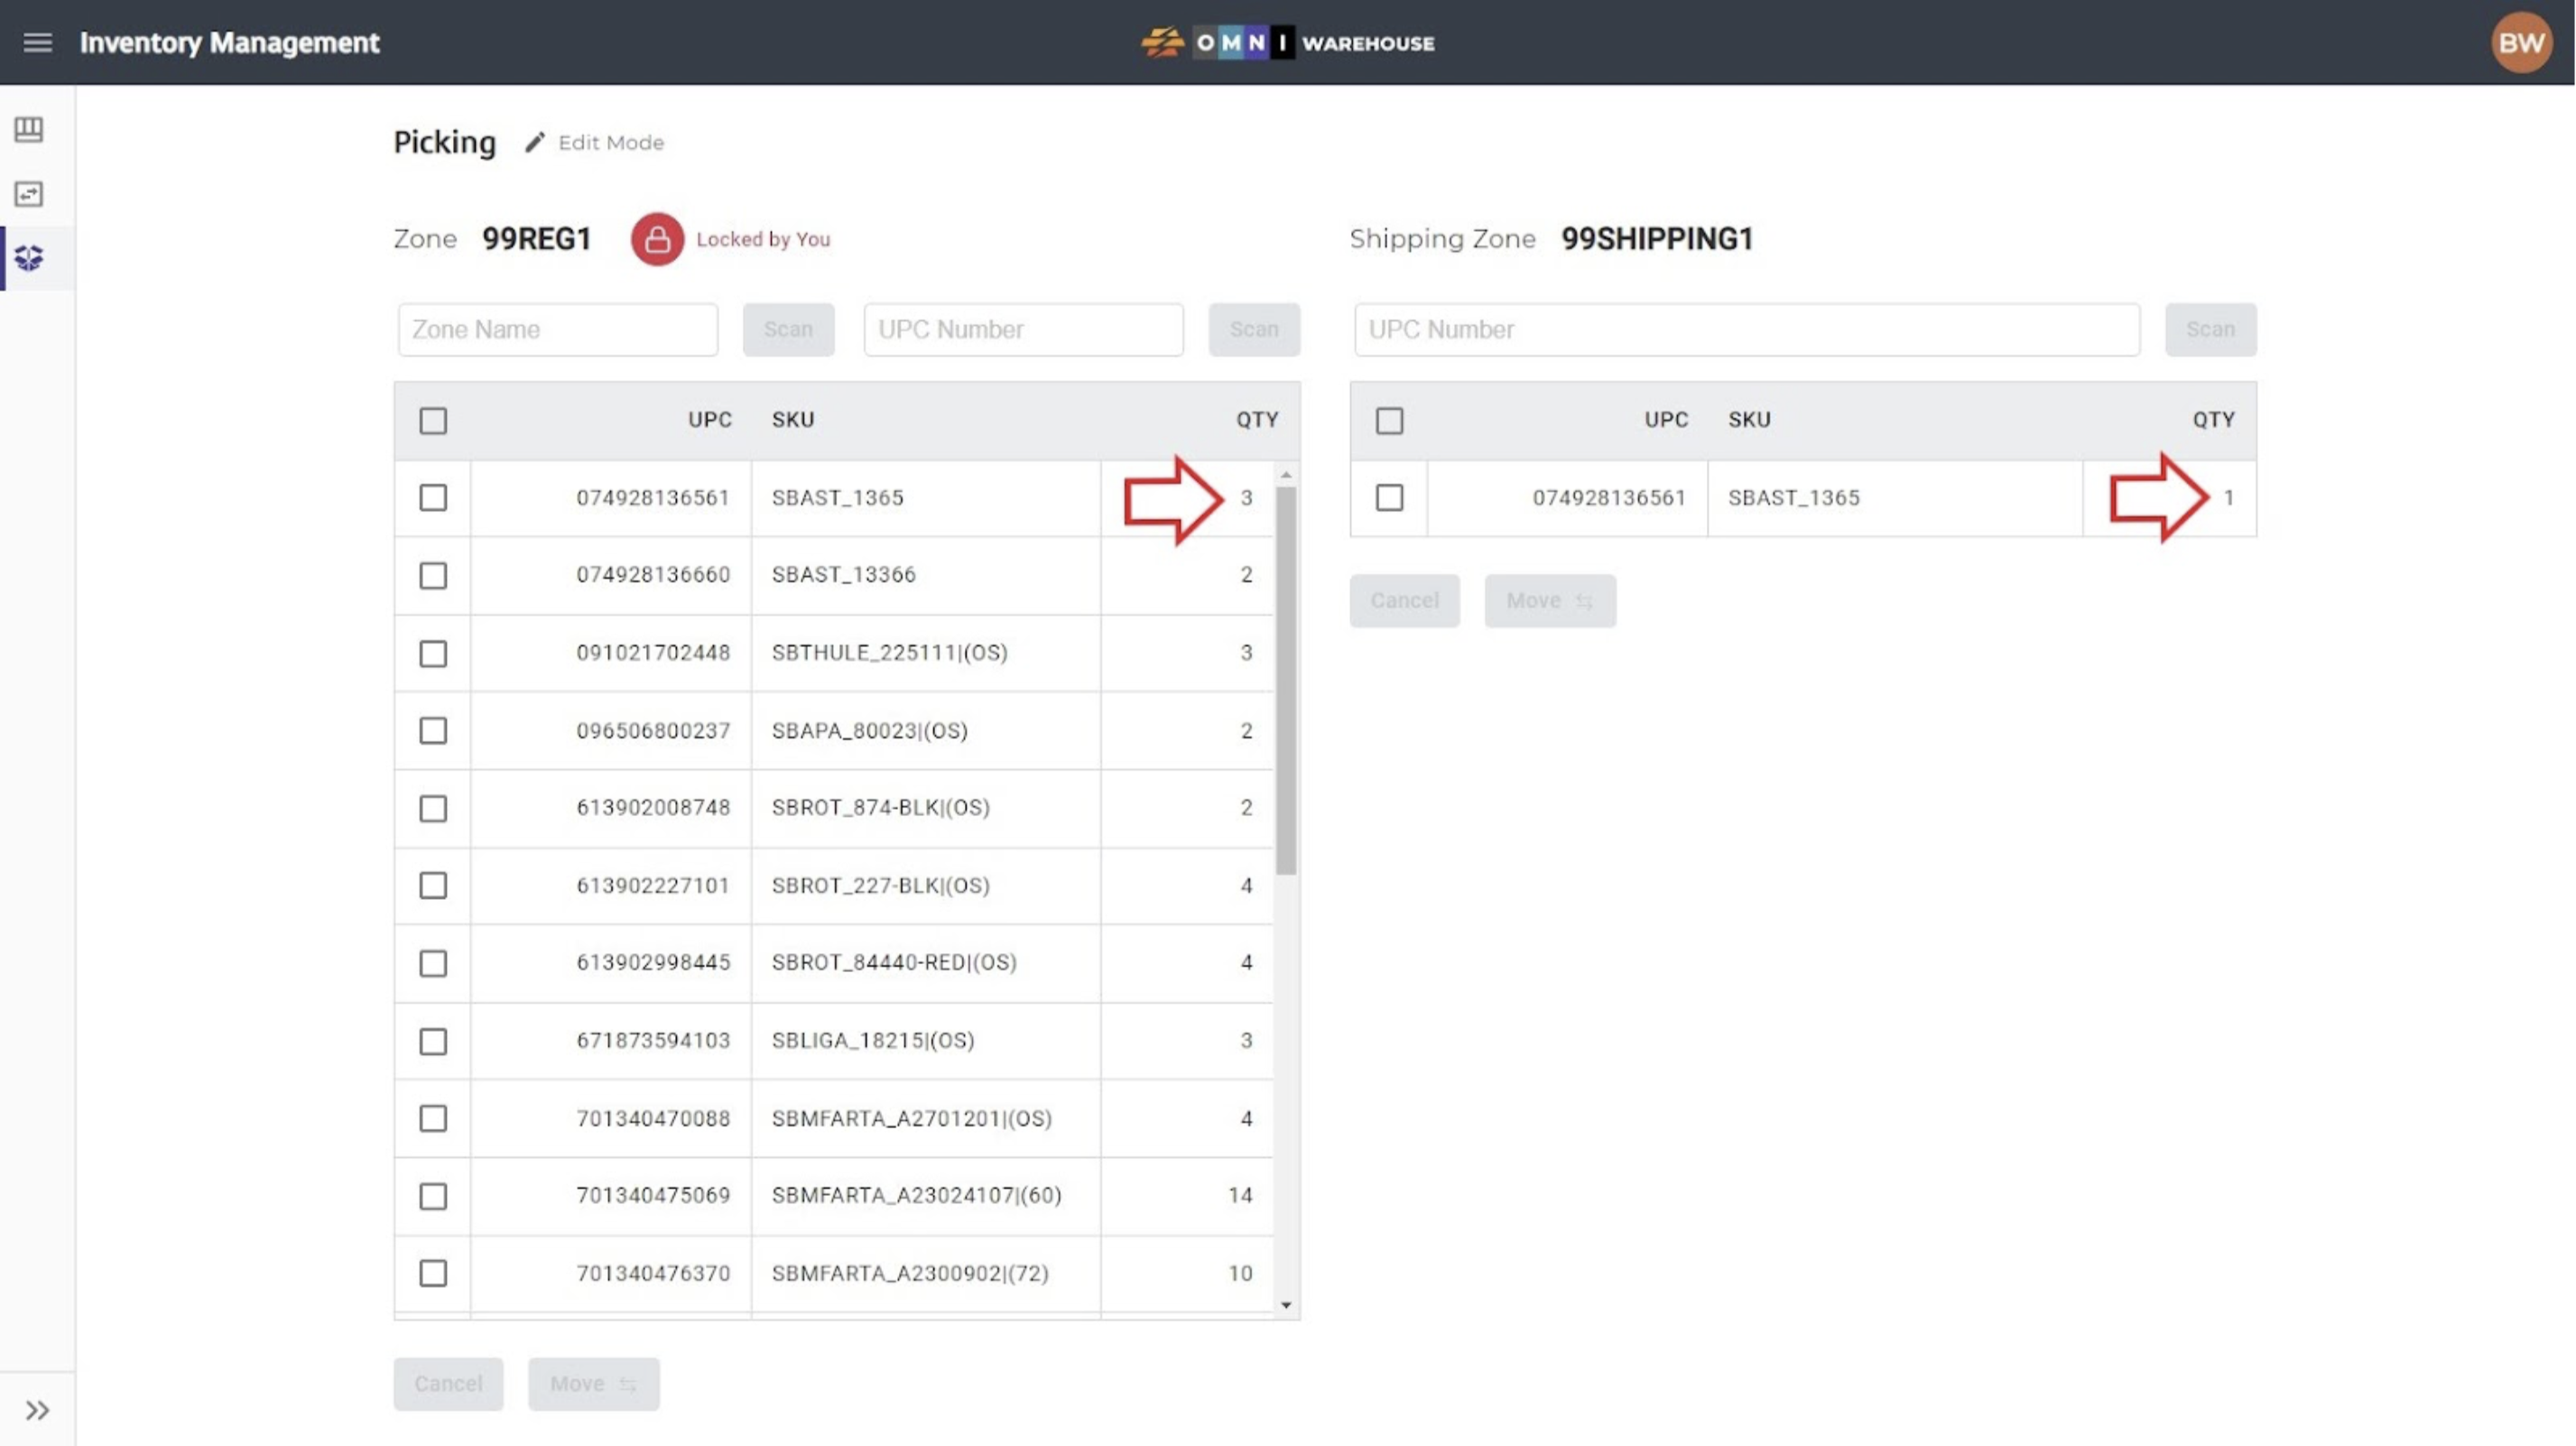
- Pick the item needed for the order and scan the UPC into the UPC Number field on the left side of the screen. The scanned item will move from the current zone on the left and into the Shipping Zone on the right of the page. In the example below, UPC# “074928136561” was scanned once on the left and moved into the Shipping Zone on the right of the page. Note that the item shows in the zone on the left side but with Qty listed as “3” instead of the previous “4”.
- As with the move feature in Inventory View, the user can send ALL quantities of an item by selecting the item and clicking the Move button. To cancel selection click the Cancel button.
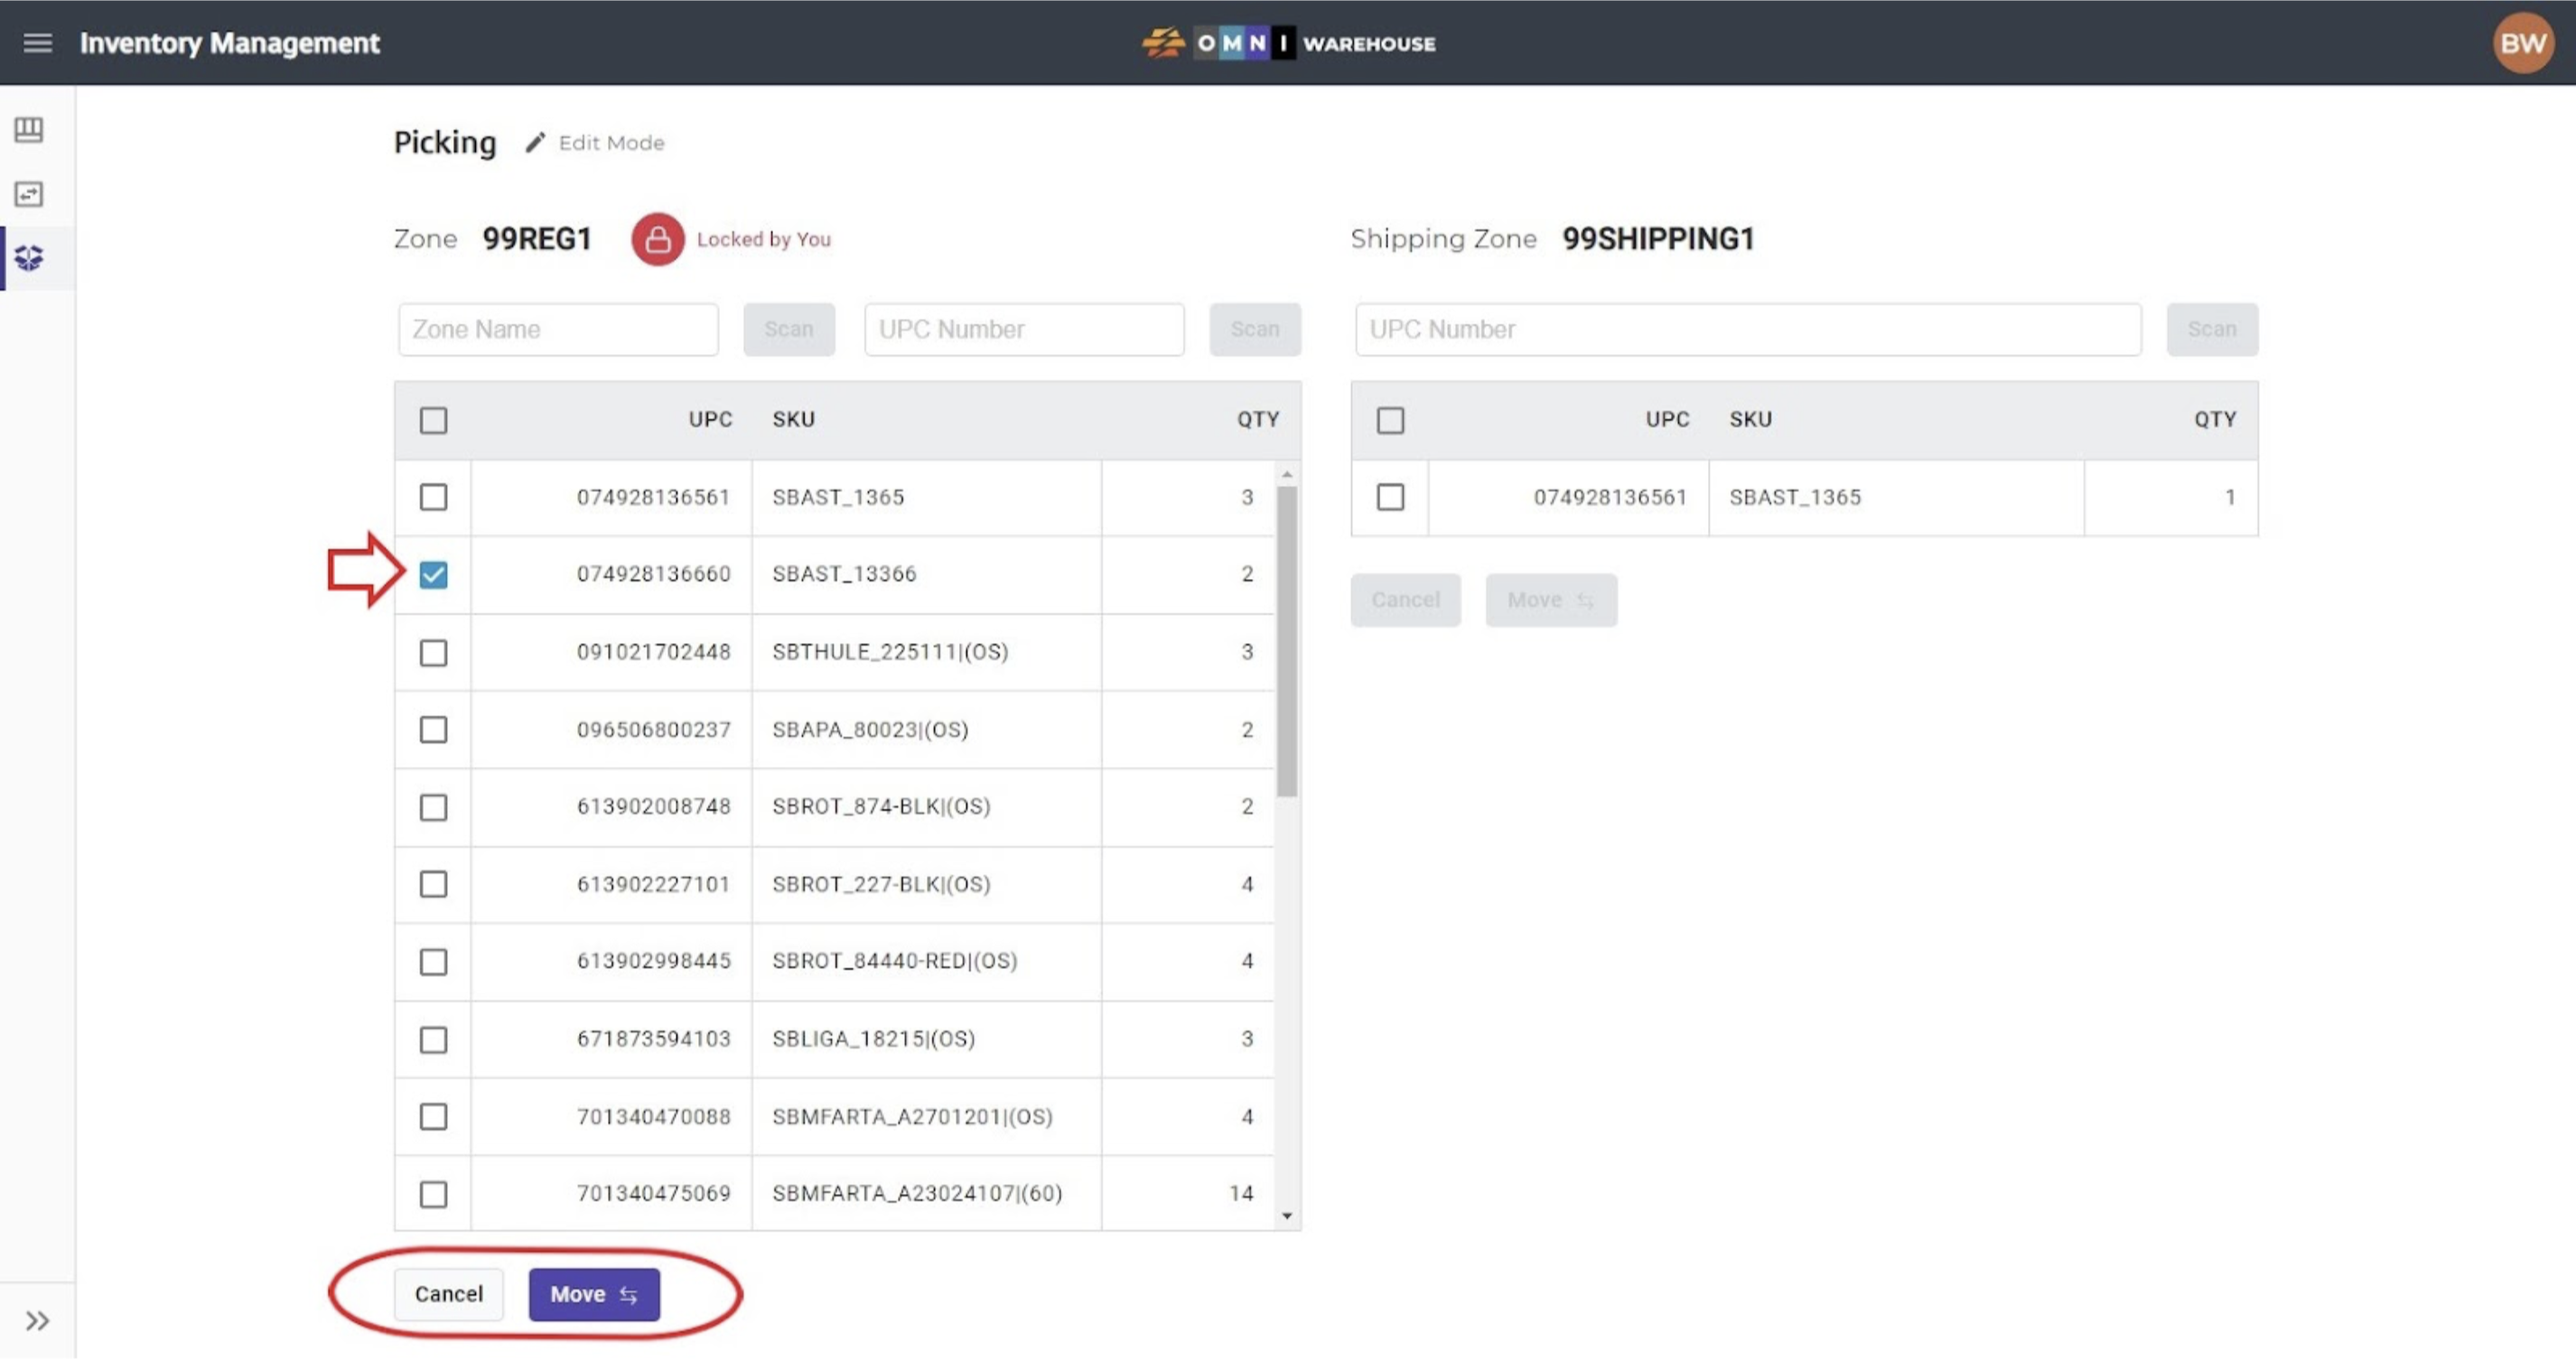
- If the wrong item is scanned into the Shipping Zone, the action can be reversed by scanning the UPC into the UPC Number field in the Shipping Zone on the right, or by selecting the item and clicking the Move button to move all quantities. This will move the item(s) from the Shipping Zone back into the zone. In the example below, UPC# “074928136660” has been selected and the Move button has become active.
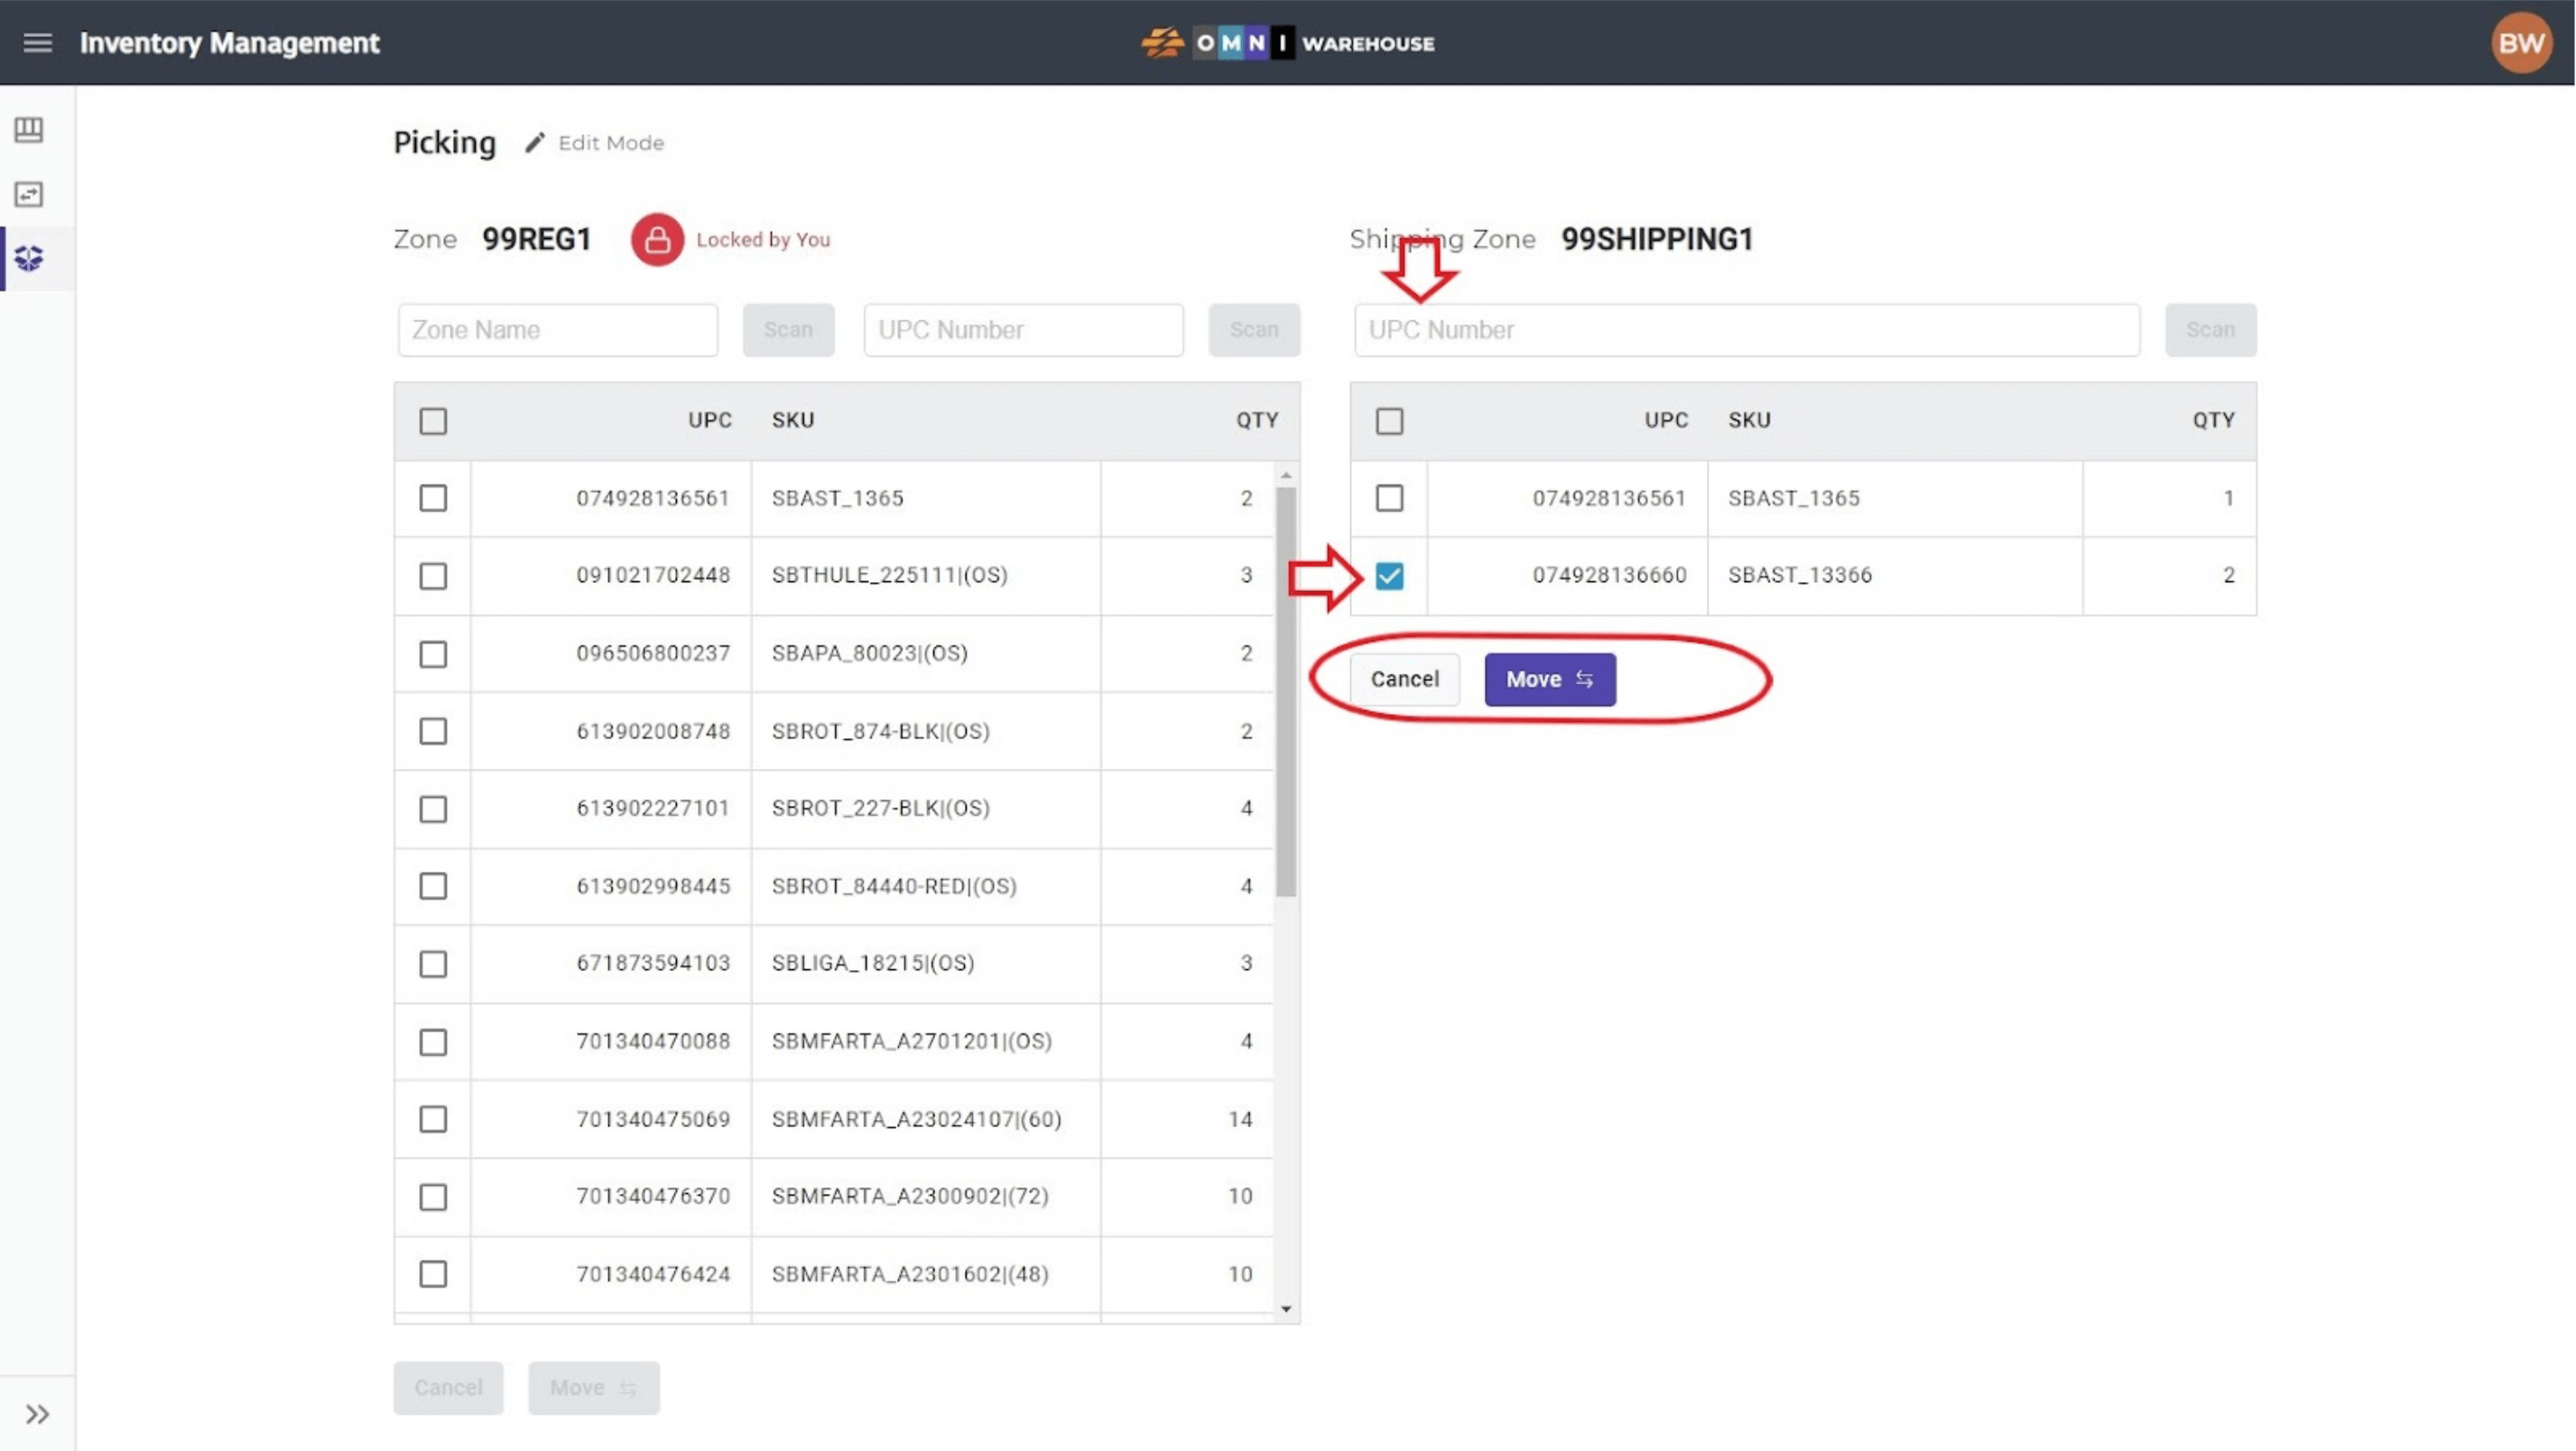
- If there are no move items to pick from this zone, click on the Zone Lock button to unlock the zone.
- The default shipping zone is 99Shipping1 and it can be checked in Inventory View by entering the zone in the Zone Name field.
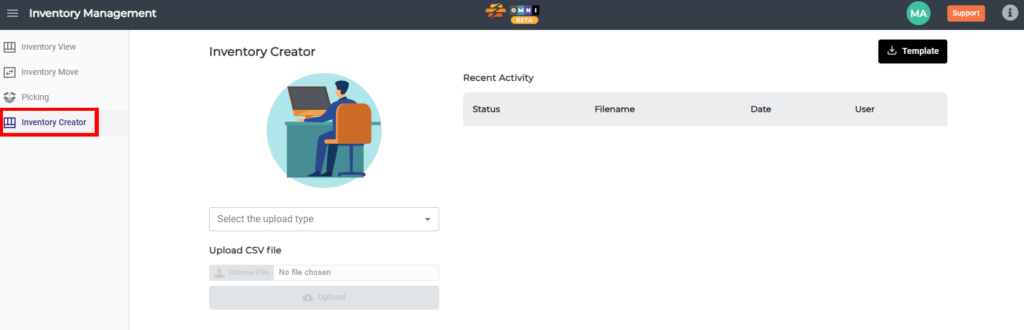
8. Inventory Creator
You can add in partial of full inventory quantity upload of your products in this section.
1) Download the Template from the upper right hand corner of the screen.
2) After filling in the necessary fields for the template, select either Full or Partial Upload from “Select the Upload type” dropdown.
3) Choose the saved csv file and press Upload to begin the process. The Status of the upload should appear after a page refresh in Recent Activity.